
Related Manuals for Clarke CWS200B


Summary of Contents for Clarke CWS200B
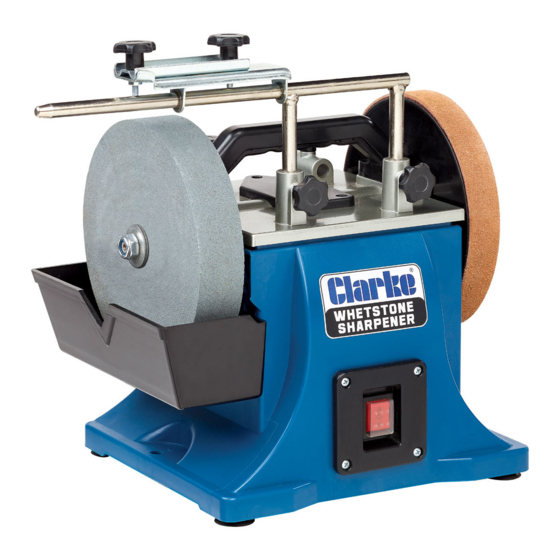
- Page 1 WHETSTONE SHARPENER MODEL NO: CWS200B PART NO: 6500531 OPERATING & MAINTENANCE INSTRUCTIONS ORIGINAL INSTRUCTIONS GC0517 - Issue 2...
-
Page 2: Environmental Protection
INTRODUCTION Thank you for purchasing this CLARKE Whetstone Sharpener. Before attempting to use this product, please read this manual thoroughly and follow the instructions carefully. In doing so you will ensure the safety of yourself and that of others around you, and you can look forward to your purchase giving you long and satisfactory service. -
Page 3: General Safety Rules
GENERAL SAFETY RULES CAUTION: FAILURE TO FOLLOW THESE PRECAUTIONS COULD RESULT IN PERSONAL INJURY, AND/OR DAMAGE TO PROPERTY. WORK ENVIRONMENT 1. Keep the work area clean, tidy and well lit. Cluttered and dark areas invite accidents 2. Do not operate power tools in explosive atmospheres, such as in the presence of flammable liquids, gases or dust. -
Page 4: Electrical Safety
6. NEVER attempt any repairs yourself. If you have a problem with this product contact your local CLARKE dealer. 7. Do not use the tool for any purpose than that described in this manual. - Page 5 4. When operating a power tool outdoors, use an extension cable suitable for outdoor use. Use of a cable suitable for outdoor use reduces the risk of electric shock. GRINDING STONE SAFETY 1. Check the speed of the grindstone before fitting to your grinder. Never use a stone with a rpm speed less than the rpm speed of your grinder.
-
Page 6: Safety Symbols
4. Never use damaged or incorrect grindstones. The stone and retaining fixtures were specially designed for your grinder, for optimum performance and safety of operation. Inspect the condition of the grinding stone before use and do not use if any damage is found. 5. -
Page 7: Electrical Connections
ELECTRICAL CONNECTIONS WARNING! READ THESE ELECTRICAL SAFETY INSTRUCTIONS THOROUGHLY BEFORE CONNECTING THE PRODUCT TO THE MAINS SUPPLY. Before switching the product on, make sure that the voltage of your electricity supply is the same as that indicated on the rating plate. This product is designed to operate on 230VAC 50Hz. - Page 8 Tube of Abrasive Paste The items above should be supplied in the carton. If any items are missing or damaged, please contact the Clarke dealer where you purchased the product. Position the machine in good light, and fixed to a suitable workbench using the boltholes in the machine base.
-
Page 9: Before Use
BEFORE USE FITTING THE TOOL SUPPORT 1. Insert the tool support into the two mounting holes at the top of the grinder as shown. • The tool support can be used to support the grinding jigs/ clamps, a trueing or dressing tool, or as a tool or hand rest when working without jigs. -
Page 10: Using Your Grinder
5. To start/stop the grinder, press the ON/OFF switch. • The grinder can run either forwards or backwards, selectable via a 3-position rocker switch. Press the switch ‘up’ for reverse rotation (anti-clockwise when viewed from the grinding wheel end). Press the switch ‘down’ for forward rotation (clockwise when viewed from the grinding wheel end). - Page 11 1. Slide the tool clamp onto the tool support. 2. Position the clamp directly above the grinding stone or honing wheel. Loosen the two knobs on the tool clamp. Insert the tool blade (bevelled end downwards) in the tool clamp, then firmly tighten the blade in position as shown.
-
Page 12: Grinding Tips
1. Loosen the knurled screw on the knife holder. Centre the tension plate along the top edge of the knife blade then firmly tighten the knurled screw to set the knife blade in position. 2. Tighten the knob to secure the knife blade tightly before starting work. 3. -
Page 13: Troubleshooting
CAUSE SOLUTION Grinder will not No power supply. Check supply & rectify. operate. ON/OFF switch is Consult your CLARKE dealer. faulty. Fuse blown. Check & replace if necessary. Consult your dealer if condition persists. Motor faulty. Consult your CLARKE dealer. -
Page 14: General Maintenance
New grinding stones are frequently not true or in time can become grooved, glazed (built-up), out of round or otherwise mis-shapen. To correct these defects, a grinding stone dresser is available from your Clarke dealer. ET125 Grinding Wheel Dresser - Part No:1700225 Replacement Dresser Wheel - Part No:1700230 Parts &... -
Page 15: Installing A New Honing Wheel
ET154 ½ Carat Diamond Tip Wheel Dresser - part No:1700329 1. If the grinding stone is new, allow it to spin for a minute with no load. Check that it is spinning straight and true. If not, it will require dressing before use. 2. -
Page 16: Specifications
SPECIFICATIONS Feature Value Product Dimensions (L x W x H) 255 x 343 x 303 (excl work support) mm Weight 11.1 kg Grinding Stone Dimensions (D x T) 200 x 40 mm (12 mm bore) Honing Wheel Dimensions (D x T) 200 x 30 mm (12.5 mm bore) IP Rating Rated Voltage / Frequency... -
Page 17: Declaration Of Conformity
DECLARATION OF CONFORMITY Parts & Service: 020 8988 7400 / E-mail: Parts@clarkeinternational.com or Service@clarkeinternational.com... -
Page 18: Component Parts Diagram
COMPONENT PARTS DIAGRAM Parts & Service: 020 8988 7400 / E-mail: Parts@clarkeinternational.com or Service@clarkeinternational.com... -
Page 19: Component Parts List
COMPONENT PARTS LIST Description No Description Tool Clamp Water Trough Tool Support Flat Washer Screw/flat washer/spring washer Base Frame Handle Rubber Foot Screw M4 x 8 Base Plate Gearbox Cover Motor Assembly Locknut Screw/flat washer/spring washer Retaining Washer Strain Gland Grinding Wheel Connecting Box Bearing Holder...
Need help?
Do you have a question about the CWS200B and is the answer not in the manual?
Questions and answers