
Related Manuals for NCR 1668-K106


Summary of Contents for NCR 1668-K106
- Page 1 KIT INSTRUCTIONS SpacePole Display Mount, with 2x20 Mount Release 1.0 1668–K106 Issue A...
-
Page 2: Revision Record
NCR, therefore, reserves the right to change specifications without prior notice. All features, functions, and operations described herein may not be marketed by NCR in all parts of the world. In some instances, photographs are of equipment prototypes. Therefore, before using this document, consult with your NCR representative or NCR office for information that is applicable and current. -
Page 3: Kit Contents
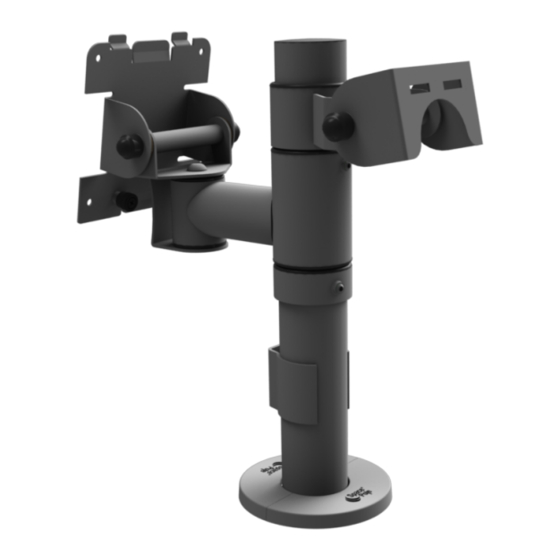
SpacePole Display Mount with 2x20 Mount Introduction This kit provides the components to install a SpacePole Display Mount with 2x20 Mount. Kit Contents... -
Page 4: Installation Procedure
1668-K106 (Display Mount, SpacePole, with 2x20 Mount) Installation Procedure 1. For countertop installation, drill four holes for the mounting bolts in the desired location. Use the SpacePole Mount base as a template for locating the holes. Install the SpacePole Display Mount with 2x20 mount and secure with screws (4) or bolts (4) included in the hardware pack or with your preferred fasteners. - Page 5 1668-K106 (Display Mount, SpacePole, with 2x20 Mount) 3. Attach the P–Series POS main display to the SpacePole arm by sliding the bracket tabs into the head slots. 4. Tighten the thumbscrews (2) at the bottom of the bracket to secure the main display.
- Page 6 1668-K106 (Display Mount, SpacePole, with 2x20 Mount) 5. Attach the 2x20 customer display to the SpacePole arm and secure with screws (2). 6. Pivot the main display towards the back.
- Page 7 1668-K106 (Display Mount, SpacePole, with 2x20 Mount) 7. Loosen the screw on the Terminal Cable Cover. To open, press the indentations in the Cable Cover to unlatch the cover then pivot to open. 8. Route the customer display cable to the main display and connect to the...
- Page 8 1668-K106 (Display Mount, SpacePole, with 2x20 Mount) 9. Route the cables from the main display down the SpacePole Mount and out of the integration tray or countertop.
- Page 9 1668-K106 (Display Mount, SpacePole, with 2x20 Mount) 10. Install the Cable Clip to secure the cables. 11. Add the integration tray cover.
Need help?
Do you have a question about the 1668-K106 and is the answer not in the manual?
Questions and answers