
Subscribe to Our Youtube Channel
Related Manuals for Rogers Combo Passing Trainer


Summary of Contents for Rogers Combo Passing Trainer
- Page 1 Product Information Packet Product Name: Combo Passing Trainer Product Part Number: 410621...
-
Page 2: Table Of Contents
Careful study of this manual is encouraged to obtain a thorough understanding of your new Combo Passing Trainer and its functions. If your manual is lost or destroyed, Rogers Athletic will gladly provide you with a new copy. Should you require additional information or assistance, please feel free to contact us at 800-457-5337. -
Page 3: General Safety Rules
General Safety Rules WARNING! READ AND UNDERSTAND ALL INSTRUCTIONS. Failure to follow all instructions listed below may result in serious personal injury. SAVE THESE INSTRUCTIONS Supervision of athletes while using the equipment is recommended. Horse play such as climbing on the machine or using the machine for unintended purpose can result in injuries. -
Page 4: Symbols
Symbols Safety Alert: Precautions that involve your safety Store this equipment in a secure, controlled area: Unsupervised and/or inappropriate use of this equipment could result in serious injury. Pinch Point Warning Label: Failure to keep hands away from pinch points will result in personal injury Do Not Climb Warning Label: To reduce risk of injury, do not climb on field equipment For Off-Road Use Only Warning Label: Field equipment is not... -
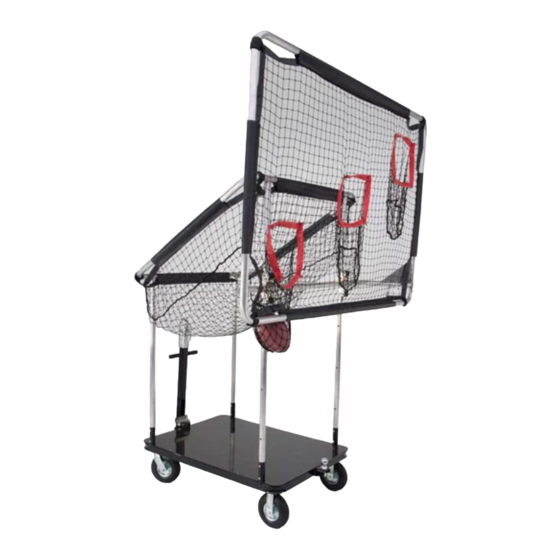
Page 5: Technical Specifications
(152 cm) Width: 78 in (198 cm) Combo Passing Trainer allows users to work independently on multiple passing techniques Height of target net can be adjusted to 7, 8, 9 or 10 ft in order to work on QB accuracy and high release... -
Page 6: Assembly Instructions
Assembly Instructions Align the hole in the hitch tube with the hole in the mount bracket. Insert the 1/2” x 3 1/2” bolt thru the bracket and turn the 1/2” lock nut onto the threads. Use two 3/4” wrenches to tighten the bolt. With the bolt fully tightened rotate the hitch tube to its vertical storage position. - Page 7 TOP (1) BOLT PER INSERT BOTTOM (2) BOLTS PER INSERT Assemble (2) rear vertical tubes by aligning the holes of (4) inserts to the holes in the vertical tubes. The inserts placed at the bottom of the vertical tube will be fastened with (2) 1/4" x 1 3/4” bolts and (2) 1/4” lock nuts per insert.
- Page 8 VELCRO LOOP SEWN LOOP SEWN LOOP VELCRO LOOP Begin assembly of the drop – in net by pushing the connection tubes thru the sewn vinyl loops on the sides of the net. With connection tubes in position place short insert tubes into each end of the connection tubes. Use (1) 1/4”...
- Page 9 Position the drop – in net assembly over top of the vertical tubes. Align the tubes in each corner and lower the net assembly onto the vertical tubes. Each corner connection gets secured with (2) 1/4" x 1 3/4" bolts and (2) 1/4"...
- Page 10 Insert connection tubes into the bottom portion of the target net frame and secure their position with (1) 1/4" x 1 3/4" bolt and (1) 1/4” lock nut per tube. VELCRO LOOP SEWN LOOP SEWN LOOP Align the top frame tube to the sewn loops in the target net. Insert the side tubes thru the sewn loops and then loosely attach the top Velcro loop.
- Page 11 Finish assembly of the target net by aligning the top frame to the bottom frame. Secure top frame to the connection tubes with (2) 1/4" x 1 3/4" bolts and (2) 1/4" lock nuts. Attach top and bottom Velcro loops as well as all four corner loops.
-
Page 12: Maintenance
Customer Service For parts or service contact Rogers Athletic Company. When ordering parts be sure to provide all relevant information available including the name and part number of the equipment purchased. This information is located on the cover of this product information package. - Page 13 Rogers Athletic Company 3760 West Ludington Drive Farwell, MI 48622 www.rogersathletic.com (989) 386-2950 (800) 457-5337 Fax toll free (888) 549-9659...
Need help?
Do you have a question about the Combo Passing Trainer and is the answer not in the manual?
Questions and answers