Table of Contents
Advertisement
OPERATORS MANUAL
RPW-310-EL
We would like to inform you about the fact that this RAVAS product is 100 % recyclable on the basis
that the parts are processed and disposed off in the right manner.
More information can be found on our website www.ravas.com.
Rev.20180612
Printing/typographical errors and model changes reserved
1
Advertisement
Table of Contents

Related Manuals for Ravas RPW-310-EL


Summary of Contents for Ravas RPW-310-EL
- Page 1 OPERATORS MANUAL RPW-310-EL We would like to inform you about the fact that this RAVAS product is 100 % recyclable on the basis that the parts are processed and disposed off in the right manner. More information can be found on our website www.ravas.com.
-
Page 2: Table Of Contents
5. Printer (Option) 6. Relay (Option) 7. Trouble Shooting. 8. Calibration 9. Parameter Settings Contact Us: RAVAS USA, LLC PO BOX 3098 3195 Grand Prix drive – Ste. A Decatur IL 62524 Decatur, IL 62526 Phone number: +1 (217) 412-1100... -
Page 3: Safety Instructions
13. Never lower loads if you are unsure you can place the goods on a stable surface. Personal injury may result from placement on an unstable environment. 14. RAVAS is not responsible for errors that occur due to incorrect weighings or inaccurate scales. -
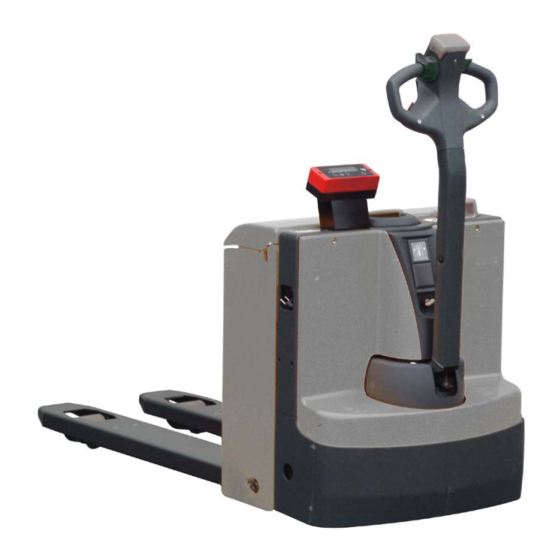
Page 4: The Weighing Electric Pallet Truck
The RPW-310-EL comes equipped with a level switch. This means that when the system is tilted by greater than 2º the indicator will automatically shut off. An uneven floor will have a greater effect on weighing ability. - Page 5 TEMPERATURE Temperature range: between 15 – 105 ºF (-10 - +40 ºC) the maximum inaccuracy is 0.1% of the weighed load. Outside this range inaccuracies of up to 0.3% may occur. Fast temperature changes must be avoided because it can cause condensation in the electronics.
-
Page 6: Touch Panel Indicator
3. TOUCH PANEL INDICATOR Indicator Front There are 3 display-modes. The display may show the weight in kgs, lbs or it shows the number of pieces. Also the battery sign is integrated in the display in order to show low battery status. THE DISPLAY By means of eight pointer bars the display shows: ◄... - Page 7 THE TOUCH PANEL Each key has 2 operational and one entry function Function level 1 Function level 2 Function level 3 (short key press) (long key press) (entry mode) zero setting code entry enter automatic tare pre-set tare decrease the value of the digit flashing print weight and add check subtotal and...
-
Page 8: Indicator Functions
4. INDICATOR FUNCTIONS GRADUATION The indication is shown in 2 lb steps. BEFORE WEIGHING: CHECK ZERO POINT Before each weighing it is necessary to check whether the system is unloaded and free. The indicator is fitted with an automatic zero correction. This means that small deviations of the zero point will be corrected automatically. - Page 9 NET WEIGHING: MANUAL TARE ENTRY A tare weight can be entered at any moment, either in a loaded or unloaded situation. For a higher accuracy, a tare weight can be entered with a smaller graduation step, independent of the applied load and the active graduation of the indicator.
- Page 10 You may make a printout and add up the weights. A special printout will be made which includes the code. (See option printer). NOTE: if the code is “000000” it will be ignored and it will not be printed on the ticket. PIECE COUNT: SAMPLING If an unknown piece weight is to be determined you may do this by sampling a certain number of pieces.
- Page 11 Press the key to go up a value or press the key to go down a value until the ∧ ∨ required value is reached. Press < to change to the next digit. Repeat this procedure until the required piece weight is displayed. ...
-
Page 12: Printer (Option)
NOTE: It is not possible to use any of the scale functions when the display has been changed to the second unit. If any key is pressed the indicator will display “ERR99” and return to normal weighing mode. 5. PRINTER (Option) If the weighing system has been equipped with a printer, obtained and entered weighing data can be printed. -
Page 13: Relay (Option)
CHANGE TIME AND DATE ON THE PRINTOUT If the weighing system has been equipped with a printer, and an option board, the date and time can be printed together with the weight information. Press the key for 6 seconds. The display will show “ho_00”... - Page 14 OVERLOAD CHECK Gross Weight / Net Weight In this setting set-point 1 is activated as soon as the gross or net value exceeds the set-point value. In this case the set-point value is an absolute value. To enter a new value: Press the key.
- Page 15 FILLING: Place an empty container on the scale. Press the T key. The display shows the net value and the pointers stp1 and stp2 are on. Relays 1 and 2 are closed. As soon as set-point 1 is reached, pointer stp1 will turn off and relay 1 will be ...
- Page 16 Press the key. Press the ∧ key to go up a value or press the ∨ key to go down a value until the required value is reached. Press < to change to the next digit. Repeat this procedure until the required value is displayed. ...
-
Page 17: Trouble Shooting
7. TROUBLE SHOOTING No power Open indicator Is voltage coming from Check where the power line comes from. See if power and measure the truck battery? is available on this point. power on the Mostly a fuse is installed. Measure is voltage is also board. - Page 18 Measure resistance with ohm meter between wires and load cell body. Do this with the other load cells disconnected from indicator. No resistance is allowed. The load cells should have +/- 350 ohm between the signal wires: yellow and green, and excitation wires, black and red.
- Page 19 Check the load cells. If connected independently to the indicator, it can be checked which one is unstable and which one is not. With load Check mechanics. Function No reaction Check the touch panel Test can be done by making short cut on connection error when pushing of the touch panel to simulate a key being pressed.
- Page 20 ERROR MESSAGES INDICATOR Displayed error Meaning Out of error mode Err01 Load cell signal is unstable Disappears when signal is stable again Err02 Overload on full weighing system Disappears when overload is removed Err03 Gross negative. This action is not allowed Disappears after 3 sec.
-
Page 21: Calibration
8. CALIBRATION CALIBRATION INSTRUCTIONS INDICATOR 310 The calibration mode can only be reached from the standard weighing mode. You cannot get into the calibration mode when you are in piece count mode. DEFINING ZERO Unload the system. Switch the system on. ... - Page 22 MULTI-POINT CALIBRATION Push the T key for about 30 seconds until you see “UNIT” in the screen When you see UNIT you press the ↵ key to continue The display will show the first calibration point with the pointer “e1” flashing. Press the ↵...
-
Page 23: Parameter Settings
9. PARAMETER SETTINGS ATTENTION: Before entering the setup mode make sure that the battery supply is sufficient. A low battery may cause the micro-processor to block. If this happens remove the empty battery and replace it with a fully charged battery. - Page 24 PARAMETERS: Default Parameter Function Settings Start-up unit (and print units) 1=kg / 2=lb Smallest graduation step for 0.1/0.2/0.5…………10/20/50 multi-range Largest graduation step for 0.1/0.2/0.5 ……….. 10/20/50 multi-range Number of graduations for 0000-9900 divisions 1000 every range Weighing capacity system (full 0000-99999 units 5000 scale)
- Page 25 Default Parameter Function Settings Sense active (4 or 6 wire) 4; 6 Gravity value working area 9.750-9.850 9.797 Print format time/date European format dd/mm/yy hh:mm American format mm/dd/yy hh:mm Baudrate comport 1 600-1200-2400-4800-9600-19200 9600 Databits comport 1 8_n_1;8_n_2;7_n_1;7_n_2;7_E_1;7_E_2;7_o_1;7_o_ 8_n_1 22-23 Not used End character comport 1 CR/LF/CRLF...
- Page 26 Default Parameter Function Settings Dataprotocol comport 2 0 = PC (bi-directional) 1 = PC Excel format on print command 2 = remote display 3 = printer with power control 4 = printer without power control 5 = not used 6 = PC excel format on print command with ACK/NAK 7 = special 1 8 = special 2...
- Page 27 Default Parameter Function Settings Auto Tare release(at empty No/yes scale) 71-89 Not used Reset to default parameter If parameter 01 was on 1 it will default to the EU settings without altering settings, if P01=2 the US settings will be defaulted. calibration parameters New delivered boards will have the EU settings.
Need help?
Do you have a question about the RPW-310-EL and is the answer not in the manual?
Questions and answers