Table of Contents
Advertisement
Quick Links
USER MANUAL
iForks-52 (BLE)
We would like to inform you about the fact that this RAVAS product is 100% recyclable on the basis that the
parts are processed and disposed of in the right manner.
More information can be found on our website:
www.ravas.com
Rev. 20210330
Printing/Typographical errors and model changes reserved.
USER MANUAL – iForks-52 (BLE)
1
Advertisement
Table of Contents

Related Manuals for Ravas iForks-52


Summary of Contents for Ravas iForks-52
- Page 1 USER MANUAL iForks-52 (BLE) We would like to inform you about the fact that this RAVAS product is 100% recyclable on the basis that the parts are processed and disposed of in the right manner. More information can be found on our website: www.ravas.com...
- Page 2 This manual has been com- piled with all due care, but the manufacturer cannot be held responsible for any consequences of errors. All rights are reserved and no part of this manual may be reproduced in any way. USER MANUAL – iForks-52 (BLE)
-
Page 3: Table Of Contents
3. System setup 3.1 Installing the iForks-52 (BLE) 3.2 Locking the iForks-52 (BLE) 3.3 Installing the indicator 3.4 Placing the battery packs in the iForks-52 (BLE) 3.5 Connecting and switching on the iForks-52 (BLE) 4. Use 4.1 Indicator functions 4.2 Display functions 4.3 Net / Tare / Gross weight... -
Page 4: Introduction
1. Introduction This manual describes the installation and use of the iForks-52 (BLE). Read this manual carefully. The installer must be informed of the contents of this manual. Always do things in the correct order. This manual should be kept on a safe and dry place. In case of damage or loss the user may request a new copy of the manual from RAVAS. -
Page 5: Lithium Ion Battery
Note: Before using the weighing system, be sure that the battery is fully charged. • After the battery has become completely empty. An empty battery will break (loss of capacity) when not directly fully charged. USER MANUAL – iForks-52 (BLE) - Page 6 Disposal information for countries outside the European Union This symbol is only valid within the European Union. Follow local regulations when disposing used batteries. If you are not sure, consult the place of purchase or a RAVAS dealer. USER MANUAL – iForks-52 (BLE)
-
Page 7: System Setup
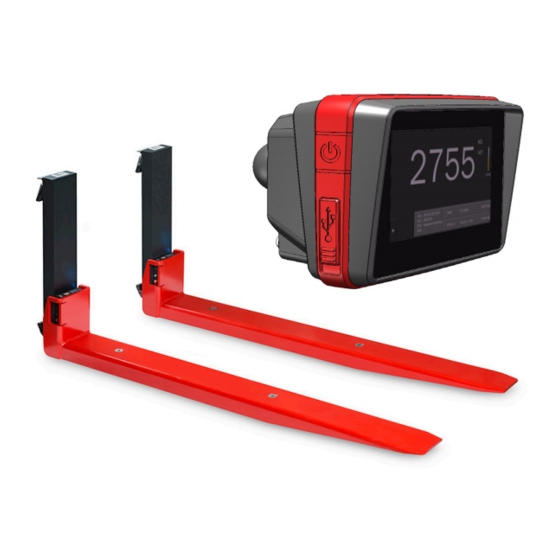
3. System setup 3.1 Installing the iForks-52 (BLE) The standard forks must be taken off the carriage plate. The iForks-52 (BLE) are placed on the carriage plate. 3.2 Locking the iForks-52 (BLE) USER MANUAL – iForks-52 (BLE) -
Page 8: Installing The Indicator
Find a suitable position for the indicator: 1. at the cabin’s roof. 2. on the right side of the cabin, mounted onto a side-rail. 3. on the dashboard. Installation of the indicator bracket & support. USER MANUAL – iForks-52 (BLE) -
Page 9: Placing The Battery Packs In The Iforks-52 (Ble)
3.4 Placing the battery packs in the iForks-52 (BLE) 1. Push the red locking clips down to unlock the battery holders. 2. Open the battery holders of both forks. 3. Position the battery packs in the battery holders of both forks until the red locking clip shifts up again. -
Page 10: Connecting And Switching On The Iforks-52 (Ble)
3.5 Connecting and switching on the iForks-52 (BLE) On/ Off switch Switch on the iForks-52 (BLE): Switch on the indicator by Move the iForks-52 (BLE) quickly in upwards or pressing the On/Off button. downwards direction. ID CODE TOTAL KG/LB •... -
Page 11: Use
4. Use 4.1 Indicator functions On/Off switch USB input (for USB stick) 4.2 Display Functions USER MANUAL – iForks-52 (BLE) - Page 12 Powered up in ‘HOST’ mode. In this mode it is possible to update firmware via a PC connection (only for RAVAS technicians). If powered up in host mode it will stay in this mode until the indicator has been powered down again.
-
Page 13: Net / Tare / Gross Weight
EXPLANATION: Net(1) + Tare(2) = Gross(3) 4.3.1 Net weighing: automatic tare Press the →T← key. The indicator is set to zero. The ‘NET’ sign shows that the tare weight is activated. ‘Tare:25kg’ shows the tare weight. USER MANUAL – iForks-52 (BLE) - Page 14 The display shows the net value of the load weight. Press the →T← key. The gross weight is displayed again. NOTE: for OIML approved RAVAS 5200 the tare will be erased automatically when the weight returns to gross zero! For the next weighing the tare must be activated again.
-
Page 15: Net Weighing: Manual Tare (Pt)
Confirm with ‘Enter’. Pick up the load. The ‘NET’ sign shows that the tare weight is The indicator now shows the NET weight. activated. ‘Tare: Euro pallet 25kg’ shows the tare weight. USER MANUAL – iForks-52 (BLE) -
Page 16: Net Weighing: Reset Tare (Two Options)
NET sign is gone. In press the →T← key. the tare field ‘None’ is active. NOTE For OIML approved RAVAS 5200 the tare will be erased automatically when the weight returns to gross zero! For the next weighing the tare must be activated again. -
Page 17: Activate And Edit Id-Code
4.5 Activate and edit ID code The RAVAS 5200 allows you to enter up to 4 ID codes which will be visible on the printout or when used with data communication. The ID field will show the 4 ID-codes. Press the ‘ID 1’ field. - Page 18 Only ID-1 will be shown. All codes will now be steps 1 and 2. Press the arrow left to return to the shown on the printout, or when transferring data. main screen (see step 6). USER MANUAL – iForks-52 (BLE)
-
Page 19: Adding, Print, Clear Memory & Send Data
Press the → Σ ← key. The weight has been added to the selected total memory. 4.6.2 Change active total memory If preferred you can select a total memory. Press the total field. Select your preferred total memory. USER MANUAL – iForks-52 (BLE) -
Page 20: Print Single Weight
The indicator is now printing. The weight is printed and the indicator is ready for the next weighing. 4.6.4 Send WiFi The indicator is sending. First a new weight must be on the display. Press the WiFi button. USER MANUAL – iForks-52 (BLE) -
Page 21: Edit, Clear And Print Total Registers
Select the total memory you want to print or Press the total field. clear and press the settings symbol. Press Print Total to get a total print out of The indicator is printing your receipt. the selected total register. USER MANUAL – iForks-52 (BLE) - Page 22 Change the name of the selected total register. this total register. Or go back if you don’t wish to change the register. You can edit the name (max. 14 characters), press ‘Enter’ if you are finished. USER MANUAL – iForks-52 (BLE)
-
Page 23: Piece Counting
The toggle switch will be grey instead of white. Return back to the basic weighing mode if you want to use the units toggle switch. USER MANUAL – iForks-52 (BLE) -
Page 24: Entering Piece Weight Manually
Select ‘Manual piece weight’. Enter the piece weight and confirm with Enter. Pick up load. The weight per piece is now shown in the The number of pieces are shown in the display. display. USER MANUAL – iForks-52 (BLE) -
Page 25: Calculating Piece Weight
Note: the weight difference should be at least 5 - 10 kg. Add or remove the given number of pieces from Automatically the weight per piece is calculated the load. Then confirm with ‘OK’. (see in the display on the left). USER MANUAL – iForks-52 (BLE) -
Page 26: Data Storage On Usb Stick
USB icon is shown as a USB-connection, the USB port is defined as host for PC connections. It will keep the setting until the system is powered off and on again. USER MANUAL – iForks-52 (BLE) -
Page 27: Change The Time And Date
4.9 Change the time and date Press arrow down. Press on the arrow up/down. Press the user settings symbol. Select ‘User menu’. Select the parameter you wish to change. For this example we change the time. USER MANUAL – iForks-52 (BLE) - Page 28 Change the cursor to the next Enter the correct hour. value by pressing on the ‘.’ When you are finished, press ‘Enter’. To return to the normal weighing mode, press the ‘Back’ button twice. USER MANUAL – iForks-52 (BLE)
-
Page 29: Change Button Functions & Positions
Go into the user menu. Select Button Functions. example we take the print button. Check the boxes of the actions you want to Select Function. happen after pressing the ‘Printer’ button. When you are finished, press ‘Enter’. The changes will be saved. USER MANUAL – iForks-52 (BLE) -
Page 30: Change Button Positions
Select the row and button position on which the printer is installed after delivery. The default location printer button should be located. Save changes by is None. pressing ‘Enter’. The printer button is now present on button row 1. USER MANUAL – iForks-52 (BLE) -
Page 31: Show/Hide Buttons On Startup
Uncheck the box to hide the buttons on start-up. meaning the buttons are always present. Press ‘Enter’ to save the changes. The weight will be displayed bigger without the buttons active. If you need the buttons, press ‘>’. USER MANUAL – iForks-52 (BLE) -
Page 32: Debug Mode For User
This could be helpful information in case of connection problems. Switch on the indicator by pressing the On/Off button. Press the arrow down 2 times to scroll through the buttons. Press the user settings symbol. Select ‘User menu’. Press ‘Debug’. Select ‘Service help’. USER MANUAL – iForks-52 (BLE) - Page 33 Press ‘BACK’ to return to the previous screen. This table shows you all information regarding the Bluetooth connection. Note: After each refresh the channels will differ because the Bluetooth is continuously hopping to another channel to maintain the best possible connection. USER MANUAL – iForks-52 (BLE)
-
Page 34: Alibi Memory
UID Code / Alibi number > this is a 10 digit number which is generated by the indicator itself. On/ Off switch Switch on the indicator by pressing the On/Off button. Press the arrow down 2 times to scroll through the buttons. USER MANUAL – iForks-52 (BLE) - Page 35 Press the settings symbol. Now press ‘User Menu’. Press ‘Service Help’. Press ‘Alibi’. The information of the last weighing is shown on the display. By pressing ‘Prev’ you switch to weighings performed prior to the last weighing. USER MANUAL – iForks-52 (BLE)
-
Page 36: Warnings And Error Messages
(or left) side of the forks. Side Load the center of gravity of the present load on the scale is correct. USER MANUAL – iForks-52 (BLE) -
Page 37: Mast Position
Mast is horizontal This is the perfect position for accurate weight readings and also for placing the goods in a rack. USER MANUAL – iForks-52 (BLE) -
Page 38: Error Messages
Load not centered Centre point of gravity of the load is too far off which could cause dangerous situations and inaccurate readings. Replace the load in opposite position of the gravity point. USER MANUAL – iForks-52 (BLE) - Page 39 Indicator power is so low that proper functioning of the system is no longer guaranteed. The system will automatically switch off after 10 seconds. Reset Reboot or reset is being performed. BLT-Master Connect Failed Bluetooth master module not installed or defect. 2011 USER MANUAL – iForks-52 (BLE)
-
Page 40: Maintenance
Always follow the operating, maintenance and repair instructions of the forklift truck and ask the supplier when in doubt; • RAVAS is not responsible for errors that occur due to incorrect weighing or inaccurate scales. USER MANUAL – iForks-52 (BLE) -
Page 41: Ravas Weightsapp
IDs. In addition the app makes it possible to download a log file from the RAVAS indicator and send it for technical analysis as a CSV file in the event of malfunctioning.
Need help?
Do you have a question about the iForks-52 and is the answer not in the manual?
Questions and answers