Table of Contents
Advertisement
Available languages
Available languages
Quick Links
Art.-Nr.: 16615
Intelligentes Batterieladegerät
6/12 V 4 A
Bedienungsanleitung . . . . . . . . . . . . . . . . . . . . . . . . . . . . 2
Art. No. 16615
Intelligent battery charger
6/12 V 4 A
Operating instructions . . . . . . . . . . . . . . . . . . . . . . . . . . . 7
Réf. art. 16615
Chargeur de batteries intelligent
6/12 V 4 A
Manuel de l'opérateur . . . . . . . . . . . . . . . . . . . . . . . . . . 11
Art.nr. 16615
Intelligente acculader
6/12 V 4 A
Gebruiksaanwijzing . . . . . . . . . . . . . . . . . . . . . . . . . . . . 16
Cod. art. 16615
Caricabatterie intelligente
6/12 V 4 A
Istruzioni per l'uso . . . . . . . . . . . . . . . . . . . . . . . . . . . . . 26
Č. výr. 16615
Inteligentní nabíječka pro baterie
6/12 V 4 A
Návod k obsluze . . . . . . . . . . . . . . . . . . . . . . . . . . . . . . 12
1
Advertisement
Table of Contents

Related Manuals for EUFAB 16615


Summary of Contents for EUFAB 16615
- Page 1 Gebruiksaanwijzing ......16 Bedienungsanleitung ......2 Art. No. 16615 Cod. art. 16615...
-
Page 2: Table Of Contents
Intelligentes Batterieladegerät 6/12 V 4 A INHALT 1. BESTIMMUNGSGEMÄSSER GEBRAUCH 2. LIEFERUMFANG 3. SPEZIFIKATIONEN 4. SYMBOLERKLÄRUNG 5. SICHERHEITSHINWEISE 6. BEDIENUNGSANLEITUNG 6.1 VORBEREITUNG 6.2 ANSCHLIESSEN DES BATTERIELADEGERÄTES 6.3 MÖGLICHE LADEPROGRAMME 6.4 FEHLERMELDUNGEN 6.5 ENTFERNEN DES LADEGERÄTS 7. WARTUNG UND PFLEGE 8. HINWEISE ZUM UMWELTSCHUTZ 9. -
Page 3: Spezifikationen
3. Spezifikationen Abmessungen: 180 x 80 x 45 [mm] Batteriekapazität: 6 V, min 1,2 Ah, max. 14 Ah Gewicht: 0,465 kg 12 V, min 1,2 Ah, max. 120 Ah Länge Netzkabel: 1,50 m Schutzklasse: IP65 (nur Gerätegehäuse, Länge Ladekabel: 1,50 m nicht Anschluß- und Eingang: 220-240 V AC, 50/60 Hz... -
Page 4: Bedienungsanleitung
ab, ziehen Sie die Parkbremse an und schalten Sie die Zündung aus. Klemmen Sie die Batterie (Pluspol) vom Bord- netz Ihres Fahrzeugs ab. Lesen Sie dazu im Handbuch Ihres Fahrzeugs nach oder fragen Sie Ihre Fachwerkstatt. • Bei Fahrzeugen mit Start/Stop-System beachten Sie die Angaben der Fahrzeuganleitung zum Aufladen der Batte- rie und den Anschlußpunkten. -
Page 5: Mögliche Ladeprogramme
plays wird aktiviert. Wurde die Batterie falsch angeschlossen (Verpolung) oder das Ladegerät hat keinen Kontakt leuchtet im Display die Fehlermeldung ˝ Er 1˝. Wird im Display die Fehlermeldung ˝Er 2˝angezeigt, wurde eine defekte 6 V-Batterie angeschlossen, diese kann mit dem Batterieladegerät nicht aufgeladen werden. Bei korrekt angeschlossener Batterie werden im Display die aktuelle Batteriespannung und die Symbole für das ein- gestellte Ladeprogramm angezeigt. -
Page 6: Fehlermeldungen
Batterieerhaltungslademodus Sobald der Akku voll geladen ist, wechselt das Batterieladegerät automatisch in den Batterieerhaltungslademodus. Dies wird im Display entsprechend angezeigt (Nur in ausgebautem Zustand). Lassen Sie das Ladegerät nie länger als 5 Tage angeschlossen. 6.4 Fehlermeldungen Fehlermeldung nach Falschanschluß (Verpolung), Kurzschluß, Auswahl eines falschen Ladepro- gramms oder Überhitzung. - Page 7 Intelligent battery charger 6/12 V 4 A OVERVIEW 1. INTENDED USE 2. SCOPE OF DELIVERY 3. SPECIFICATIONS 4. EXPLANATION OF SYMBOLS 5. SAFETY NOTES 6. OPERATING INSTRUCTIONS 6.1 PREPARATION 6.2 CONNECTING THE BATTERY CHARGER 6.3 POSSIBLE CHARGING PROGRAMMES 6.4 ERROR MESSAGES 6.5 REMOVING THE CHARGER 7.
- Page 8 3. Specifications Dimensions: 180 x 80 x 45 mm Battery capacity: 6 V min 1.2 Ah, max. 14 Ah Weight: 0.465 kg 12 V min 1.2 Ah, max. 120 Ah Long mains cable: 1.50 m Protection class: IP65 (only device housing, Long charger cable: 1.50 m not connection and Input:...
- Page 9 • For vehicles with a start/stop system, please observe the specifications in the vehicle manual regarding charging the battery and the connection points. In the event of further questions, contact the manufacturer of your vehicle. • When pulling the mains cable out of the socket, only hold the plug. •...
- Page 10 • Motorbike 12 V • Motorbike 12 V winter • Car 12 V • Car 12 V winter Depending on the charging state of the battery, the device adapts the charging current in order to best char- ge the connected battery. The specified maximum charging current is only used during the main charging phase.
- Page 11 6.5 Removing the charger First pull the plug out of the socket and observe the sequence for disconnection. This prevents sparks from forming. Since charging generates a detonating gas, this is particularly important for the sake of your safety. Disconnect the charger from the mains power supply. Then disconnect the black callipers (minus).
- Page 12 AVERTISSEMENT Lisez attentivement la notice d‘utilisation avant la mise en service et respectez toutes les consignes de sé- curité ! Tout non-respect peut entraîner des dommages corporels, endommager l‘appareil ou vos biens ! Conservez l‘emballage d‘origine, le justificatif d‘achat et la présente notice pour vous y référer ultérieure- ment ! Si vous revendez ou remettez l‘appareil à...
- Page 13 4. Signification des symboles Les appareils portant Produit électrique carac- ce symbole ne peuvent Conforme aux térisé, ne devant pas être directives être utilisés qu‘à éliminé avec les ordures européennes l‘intérieur (environne- ménagères ment sec) Boîtier avec double Fusible, Capacité de batterie isolation (Indice de ici : temporisé, 1,6 A recommandée...
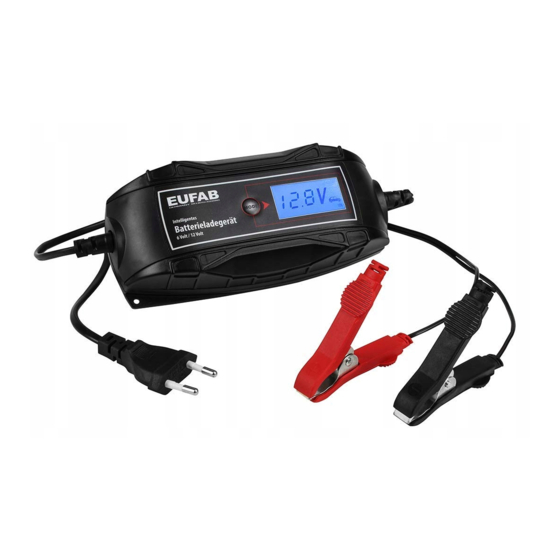
- Page 14 6. Mode d‘emploi A Touche MODE B Écran C Câble de chargement D Pince rouge (+) E Pince noire (-) F Câble d‘alimentation Fig.1 : vue d’ e nsemble 1. Affichage de la tension de la batterie 2. Programme de charge 6 V 3.
- Page 15 de chargement principale. Le courant de charge appliqué s‘affaiblit juste avant l‘obtention de la capacité de charge maximale. Ainsi, la batterie est chargée de manière optimale et en douceur jusqu‘à ce que la capacité maximale soit atteinte. Le symbole de batterie (7) (Fig. 2 : écran)) affiché sur l‘écran indique l‘état de charge actuel de cette dernière. 6.3 Programmes de chargement disponibles Mode 6 Volts Programme de chargement pour batteries 6 V de 1,2 Ah jusqu‘à...
- Page 16 Débranchez le chargeur de l‘alimentation électrique. Retirez ensuite le raccordement de la pince noire (négatif) Retirez maintenant la pince de la batterie de la borne positive de la batterie (pince rouge). Laissez refroidir la batterie et remplissez les cellules d‘eau distillée jusqu‘au niveau de remplissage décrit par le fabricant de la batterie.
- Page 17 WAARSCHUWING Lees voorafgaand aan de ingebruikname de gebruiksaanwijzing aandachtig door en neem alle veiligheids- voorschriften in acht! Het niet naleven hiervan kan letsel, schade aan het product of uw eigendom veroorzaken! Bewaar de oorspronkelijke verpakking, het aankoopbewijs en de gebruiksaanwijzing om deze later te kun- nen raadplegen! Geef bij het doorgeven van het apparaat eveneens deze handleiding door.
- Page 18 Behuizing met Zekering, Aanbevolen capaciteit randaarde hier: traag, 1,6 A van de accu‘s (beveilingingsklasse II) Komt overeen met de Beveiligingsklasse Gebruiksaanwijzing eisen van § 21 van de IP 65 beveiligd tegen water- lezen wet inzake de product- straal veiligheid (ProdSG) 5.
- Page 19 6. Gebruiksaanwijzing A MODE-toets B Display C Laadkabel D Pooltang rood (+) E Pooltang zwart (-) Afbeelding 1: overzicht F Stroomkabel 1. Accuspanningsindicatie 2. 6 V-oplaadprogramma 3. Oplaadprogramma voor de winter 4. 12 V-oplaadprogramma 5. Oplaadprogramma voor de auto 6. Oplaadprogramma voor de motorfiets Afbeelding 2: display 7.
- Page 20 • Auto 12 V • Auto 12 V Winter Afhankelijk van de laadtoestand van de accu past het apparaat de laadstroom aan, teneinde de aangeslo- ten accu optimaal op te laden. Uitsluitend tijdens de hoofdlaadfase wordt geladen met de aangegeven maximale laadstroom.
- Page 21 6.5 De oplader verwijderen Trek eerst de stekker uit het stopcontact en neem de volgorde bij het losmaken van de klemmen in acht. Zo voorkomt u vonkvorming. Omdat tijdens het opladen uiterst explosief knalgas ontstaat, is dit heel erg belangrijk voor uw bescherming. Trek de stekker van de oplader uit het stopcontact.
- Page 22 AVVERTENZA Leggere attentamente le istruzioni per l‘uso prima della messa in funzione e osservare tutte le avvertenze di sicurezza! La mancata osservanza di queste istruzioni può provocare lesioni personali, danni al prodotto o alla vostra proprietà! Conservare la confezione originale, la prova d‘acquisto e queste istruzioni come ri- ferimento futuro! Verificare l‘integrità...
- Page 23 Alloggiamento Fusibile, nel caso Capacità della batteria protettivo isolato specifico: ritardato, raccomandata (classe di protezione II) 1.6 A Conforme ai requisiti Classe di protezione. Leggere le istruzioni del § 21 della legge IP 65 Protezione contro i d‘uso sulla sicurezza dei getti d‘acqua prodotti 5.
- Page 24 6. Istruzioni per l‘uso A Tasto MODE B Display C Cavo di carica D Morsetto rosso (polo +) E Morsetto nero (-) F Cavo di alimentazione Figura 1: Vista d‘insieme 1. Indicazione tensione batteria 2. Programma di ricarica 6 V 3.
- Page 25 processo. Solo durante la fase di carica principale, il dispositivo lavora con il massimo valore della corrente di carica. Poco prima del raggiungimento del massimo livello di carica, il dispositivo lavora con la corrente di carica minima. Questo accorgimento consente di completare il processo di carica in modo ottimale. Il simbolo della batteria visualizzato sul display (7) (figura 2: Display) mostra il livello di carica attuale della batteria.
- Page 26 6.5 Scollegamento del caricabatterie Attenzione: Scollegare prima la spina dalla presa e rispettare la sequenza indicata per il distacco dei morsetti. In questo modo si evita la formazione di scintille. Questo è molto importante per la sicurezza, poiché durante la carica si formano dei gas esplosivi.Scollegare il caricabatterie dalla rete di alimentazione. Staccare prima il morsetto nero (negativo).
- Page 27 VAROVÁNÍ Před uvedením do provozu si pozorně přečtěte návod k obsluze a dodržujte všechna bezpečnostní upozornění! Nedodržování pokynů a upozornění může vést k poranění osob, škodám na přístroji nebo vašem majetku. Uschovejte si originální balení, doklad o koupi a tento návod pro použití v budoucnosti! Před uvedením do provozu zkontrolujte, zda není...
- Page 28 5. Bezpečnostní upozornění • Výstražný trojúhelník označuje všechny pokyny důležité pro bezpečnost. Vždy je dodržujte, v opačném případě byste se mohli zranit nebo by se mohl poškodit přístroj. • Děti by si neměly hrát se spotřebičem. • Čištění a údržbu nesmí provádět děti bez dozoru. •...
- Page 29 1. Indikace napětí baterie 2. Nabíjecí režim 6 V 3. Nabíjecí režim zimní 4. Nabíjecí režim 12 V 5. Nabíjecí režim auto 6. Nabíjecí režim motocykl 7. Indikace stavu nabití baterie Obr. 2: Přehled 6.1 Příprava Očistěte kontakty akumulátoru od prachu a zbytků koroze. Pouze pro otevřené akumulátory: Nalijte destilovanou vodu, dokud se nedosáhne minimální...
- Page 30 6.3 Možné režimy nabíjení Režim 6 V Režim nabíjení pro 6 V akumulátory, 1,2 Ah až 14 Ah, teploty nad 0 °C Nabíjecí proud: maximálně 2 A Nabíjecí napětí: 7,2 V Zimní režim 6 V Režim nabíjení pro 6 V akumulátory, 1,2 Ah až 14 Ah, teploty pod 0 °C Nabíjecí...
- Page 31 9. Kontaktní informace EAL GmbH +49 (0)202 42 92 83 0 info@eal-vertrieb.com www.eal-vertrieb.com +49 (0) 202 42 92 83 – 160 Otto-Hausmann-Ring 107 42115 Wuppertal, Německo © EAL GmbH, 16615, 06.2020...
Need help?
Do you have a question about the 16615 and is the answer not in the manual?
Questions and answers