Table of Contents
Advertisement
Quick Links
Advertisement
Table of Contents

Related Manuals for Ayra ALO 030 MKII


Summary of Contents for Ayra ALO 030 MKII
- Page 1 ALO 030 MKII 30 Watt DMX LED scanner User manual Any information and illustrations shown in this user manual are subject to change without further notice. User manual version: 2.0 Creation date + author initials: 21-11-2013 RV Revision date + author initials: 17-11-2014 RV...
-
Page 2: Safety Instructions
Safety instructions WARNING! Always keep this device away from moisture and rain! Hazardous electrical shocks may occur! WARNING! Only connect this device to a matching power outlet. This device is intended to work on a specified AC currency. Connecting this device to power outlets with other voltages may result in permanent damage and possible hazardous situations, such as fire or electrical shocks! WARNING! Be careful with every operation of this device. - Page 3 - Familiarize yourself with the functions of the device before use. Do not allow operation of the device by unskilled or unqualified people. - Use of the device in other ways than described in this user manual may cause damage and injury. Ayra can not be held responsible for any damage or injury caused by improper use.
- Page 4 rating. - Do not bridge the fuse with electrical wires, aluminum foil, as the fuse is used for protection against electrical shocks and short circuit. - Always mount the fuse cover back to the fuse compartment. Any information and illustrations shown in this user manual are subject to change without further notice. User manual version: 2.0 Creation date + author initials: 21-11-2013 RV Revision date + author initials: 17-11-2014 RV...
-
Page 5: Box Contents
Box contents Box contents 1x ALO 030 fixture 1x power cable IEC C13 to Schuko 1x power cable IEC C13 to UK connector Unit and accessory inspection - Always use the supplied power cable to connect the unit to a power supply. If the cable appears broken or has visible damage, do not use it. -
Page 6: Device Overview
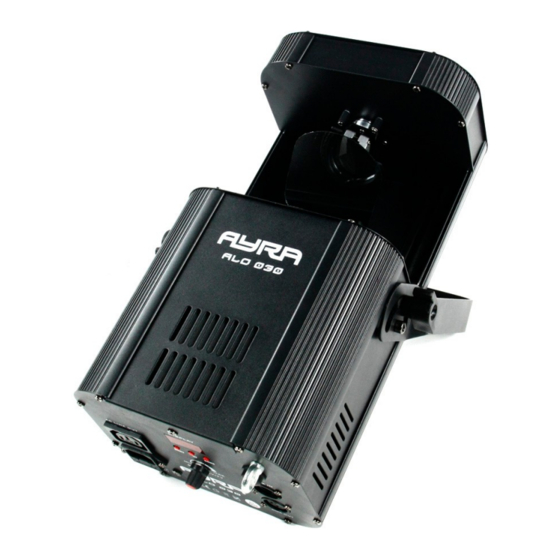
Device overview 1. Moving mirror 2. Beam output with manual focus 3. Standing/hanging adjustable bracket 4. Ventilation slots 5. IEC Power inlet with integrated fuse holder 6. IEC Power outlet (used to link several fixtures) 7. Control panel display with MENU, UP and DOWN buttons 8. -
Page 7: Setting Up The Unit
Setting up the unit To activate the unit, connect the included power supply with the unit and a suitable 230V, 50 Hz power outlet. The unit will activate directly after it is plugged in to a wall outlet or other power source. Give the scanner time to calibrate the stepping motors, which are used to determine the position of the mirror. - Page 8 doing so, make sure your DMX-controller is capable of controlling your fixture. When in doubt, contact your local dealer for advice. Set the correct address on the digital display, you are able to choose a value between 001 and 255. When a DMX-signal is received, a blinking red dot on the display is active.
- Page 9 Channel 5: Shutter/Strobe: Start Function value value Blackout Shutter open Strobe slow-fast (variable) Shutter open Shutter slow open -> fast close Shutter open Shutter fast open -> slow close Shutter open (235 = reset function when the value is selected for 3-5 seconds) Random strobe Shutter open...
- Page 10 DMX lighting troubleshooting If you have any problems with DMX lighting, consult this troubleshooting section to solve any difficulties with your product. If this troubleshooting section does not solve your problem, contact your dealer for more information and help. This troubleshooting section contains the most frequent problems and is not a complete collection of possible faults, defects and solutions.
- Page 11 DMX signal (high) power cables parallel to each other. No DMX terminator Apply a DMX terminator at the end of your DMX-chain Signal loss or distortion in DMX Apply a DMX booster in your DMX values chain after 32 fixtures or less. After a maximum of 32 fixtures the DMX signal needs to be refreshed.
-
Page 12: Technical Specifications
Technical specifications Compact scanner with LED light source LED module: 1x 30W LED chip 8 DMX-channels 3-pin XLR in- and output Music controlled mode with internal microphone Microphone sensitivity adjustable Maximum flash rate: 18 Hz Maximum ambient temperature: 45 degrees Celsius Maximum distance from flammable surfaces: 0.5m Power consumption: 50W max.
Need help?
Do you have a question about the ALO 030 MKII and is the answer not in the manual?
Questions and answers