Table of Contents
Advertisement
Quick Links
Instruction Sheet
AX-SXR SERIES
Rotating Equipment Access System
PATENT 5,443,312
THANK YOU
Thank you for purchasing the AX-SXR Series Rotating Equipment Access System. Please read these
instructions thoroughly before installing / assembling this product.
PRODUCT FEATURES
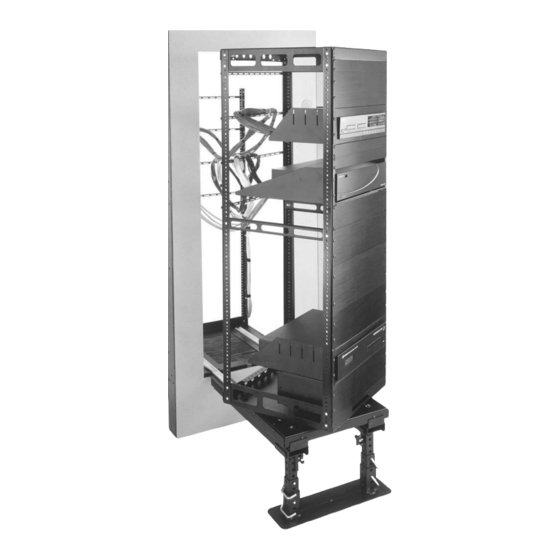
- Slides out and rotates for access to cables and rear equipment connections
- Allows installation of equipment flush into a wall or cabinet
- Removable rack frame can be integrated off-site to save time
I-00073
Rev D
Advertisement
Table of Contents

Related Manuals for Middle Atlantic Products AX-SXR Series


Summary of Contents for Middle Atlantic Products AX-SXR Series
- Page 1 Rotating Equipment Access System PATENT 5,443,312 THANK YOU Thank you for purchasing the AX-SXR Series Rotating Equipment Access System. Please read these instructions thoroughly before installing / assembling this product. PRODUCT FEATURES - Slides out and rotates for access to cables and rear equipment connections...
- Page 2 1) Construct rough opening and base. 2) Assemble frame. 3) Install cable carriers / rough-in pan. 4) Install service stand. 5) Attach frame to tracks and cable carriers. 6) Assemble leash. 7) Tie cable to carriers. 8) Secure rack in millwork.
-
Page 3: Important Safety Instructions
IMPORTANT SAFETY INSTRUCTIONS • Read these instructions. WARNING: A WARNING ALERTS YOU TO A SITUATION THAT COULD RESULT IN SERIOUS PERSONAL INJURY • Keep these instructions. OR DEATH. • Heed all warnings. CAUTION: A CAUTION ALERTS YOU TO A SITUATION THAT MAY RESULT IN MINOR PERSONAL INJURY OR •... -
Page 4: Table Of Contents
TABLE OF CONTENTS ..................Important Safety Instructions ..................Rough-In / Site Preparation ....................Millwork Requirements ...................... Rack Assembly ..................Rack Assembly (Continued) ..................Rack Assembly (Continued) ................Service Stand / Service Track Assembly ............Rack and Cable Carrier Installation / Cable Management ................ -
Page 5: Rough-In / Site Preparation
ROUGH-IN / SITE PREPARATION 1) Rough-in millwork must be plumb, square and completed before beginning assembly. Refer to millwork mounting requirements below. WIDTH DEPTH SETBACK 9 1/4” 25 1/2” 1/2” MINIMUM MAXIMUM 2 1/2” 9 1/4” 27 1/2’ 19.25" [489 mm] 20"... -
Page 6: Millwork Requirements
MILLWORK REQUIREMENTS NUMBER OF “A” “B” USABLE USABLE ROUGH RACKSPACES RACK HEIGHT OPENING HEIGHT 33 [838] AX-SXR-15 26-1/4 [667] 34-3/4 [883 AX-SXR-16 28 [711] ]36-1/2 [927] AX-SXR-17 29-3/4 [756] 31-1/2 [800] 38-1/4 [972] AX-SXR-18 33-1/4 [845] 40 [1016] AX-SXR-19 35 [889] 41-3/4 [1060] AX-SXR-20 36-3/4 [933]... -
Page 7: Rack Assembly
RACK ASSEMBLY 1) Align the (4) pre-installed mounting studs on each rackrail with mounting holes in top and bottom frames. (FIGURE A) 2) Loosely secure each rackrail to top and bottom frame using (2) 5/16” flange nuts per frame. (FIGURE A) Top Frame Rackrail 5/16 Flange Nuts... -
Page 8: Rack Assembly (Continued)
FIGURE C EQUIPMENT LOADING AND SQUARING PANELS To eliminate the possibility of a center bow in the frame, Middle Atlantic Products suggests that the Bottom Frame squaring panels be left in place until some of your components have been mounted. -
Page 9: Rack Assembly (Continued)
RACK ASSEMBLY (Continued) 8) Install top trim panel using (2) 10-32 x 1/4” screws. (FIGURE D) Top Trim Panel NOTE: Top trim panel contains only two screw holes. 9) If equipped, align the edge of the lacer bars with the outside edge of the rackrail and ensure that the flat side of the lacer bar is on top. -
Page 10: Service Stand / Service Track Assembly
SERVICE STAND / SERVICE TRACK ASSEMBLY 1) Assemble service stand as per instructions included with unit. 2) Adjust stand to approximate height of rough-in pan. (FIGURE G) Notches Service Tracks 3) Position notched end of each service track on service stand saddles. (FIGURE G) CAUTION! Be sure notched ends are fully seated in service stand saddles to prevent tracks from falling out. -
Page 11: Rack And Cable Carrier Installation / Cable Management
RACK INSTALLATION / CABLE MANAGEMENT 1) Place rack on service track assembly (observe proper front/rear orientation). (FIGURE J) CAUTION! Do not allow the frame to roll off end of tracks. NOTE: Determine which direction the rack will rotate before beginning cable management. 2) Select one side of the rack for signal cables, and the opposite side for power cables. -
Page 12: Securing Rack Assembly In Millwork
SECURING RACK ASSEMBLY IN MILLWORK 1) Roll loaded rack into millwork. 2) Install bottom trim panel using (4) 10-32 Phillips head screws (included in hardware kit). (FIGURE L) WARNING! The trim panel is integral to the safe operation of this product and is required to prevent the rack from sliding out. -
Page 13: Warranty
WARRANTY Middle Atlantic Products (the "Company") warrants the AXS/ AX-SX / SAX / SSAX Equipment Access System to be free from defects in material or workmanship under normal use and conditions for a period of (3) years from the date of shipment by the company.
Need help?
Do you have a question about the AX-SXR Series and is the answer not in the manual?
Questions and answers