Table of Contents
Advertisement
Advertisement
Table of Contents

Subscribe to Our Youtube Channel
Related Manuals for Bay Tek Games SINK IT SHOOTOUT!


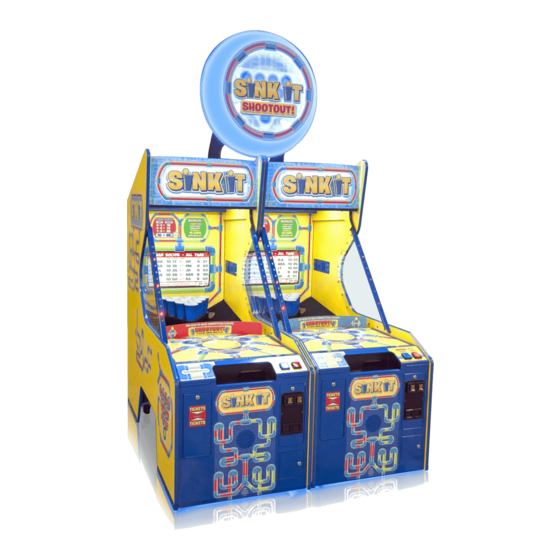
Summary of Contents for Bay Tek Games SINK IT SHOOTOUT!
-
Page 2: Factory Contact Information
All games are proudly manufactured at our factory in Pulaski, Wisconsin, USA GAME INSPECTION Inspect the game for any damaged, loose, or missing parts. If damage is found, please contact your freight carrier first. Then, contact Bay Tek Games’ Service Department at 920.822.3951 or e-mail them at service@baytekgames.com for further assistance. -
Page 3: Table Of Contents
TABLE OF CONTENTS FACTORY CONTACT INFORMATION ......2 WELCOME TO: Sink It ......... .4 HOW TO PLAY . -
Page 4: Welcome To: Sink It
Your Friends at Bay Tek Games GAME INSPECTION Inspect the game for any damaged, loose, or missing parts. If damage is found, please contact your freight carrier first. Then, contact Bay Tek Games’ Service Department at 920.822.3951 or e-mail them at service@baytekgames.com for further assistance. -
Page 5: How To Play
HOW TO PLAY Insert credits and select 1- or 2-player with the buttons on the front of the games. (Single games will not have the 2-player button) Toss or bounce the balls into the cups, trying to hit all 10 cups and turn off the blue lights inside before your opponent! Win tickets for your skills! -
Page 6: Specifications
GAME SPECIFICATIONS WEIGHT POWER REQUIREMENTS NET WEIGHT 475 LBS. INPUT VOLTAGE 100 to 120 220 to 240 RANGE SHIP WEIGHT 525 LBS. INPUT FREQUENCY 50 HZ 60 HZ DIMENSIONS RANGE WIDTH 30” MAX START UP OPERATING CURRENT CURRENT DEPTH 71” 1 AMPS @ 115 VAC 1.5 AMPS @ 115 VAC HEIGHT... -
Page 7: Quick Setup Guide
QUICK SET UP GUIDE Place the game near its final location. Open the stor- age compartment by unlocking the front metal and sliding the bounce platform forward. Ensure the balls didn’t bounce out of the trough during transport. No more than 20 balls should be in the machine at a time for proper function Sink It uses 38-40 mm ping pong balls... -
Page 8: Head To Head Connection
HEAD TO HEAD CONNECTION Place two games next to each other and pull out the bounce platforms. Locate the grey phone cables inside each compart- ment connected to the auxillary board shown. The boards are connected to the motherboard via USB. Feed the cable through the hole in the back of the cabinet, and repeat in other cabinet Plug the cables from each game into each other, then... - Page 9 HEAD TO HEAD CONNECTION Secure the cabinets together with included bolts, washers and locknuts. One set of holes is located inside the coin door of the left game and the ticket door of the right game. The other set of holes is inside the back doors.
- Page 10 HEAD TO HEAD CONNECTION Place the marquee on top of the two games, centering it between them. Secure with included wood screws. Run the cable down between the cabinets and plug in to housing near bottom of the right side game.
-
Page 11: Dip Switch Settings
DIP SWITCH SETTINGS The dip switch bank is located on the minigen board under the bouncing platform; open the front door, then slide the platform towards you. *factory default settings are highlighted below SWITCH DESCRIPTION Enable Tickets New Jersey compliance Do Not Adjust Do Not Adjust... -
Page 12: Main Menu Functions
MAIN MENU Press the MENU BUTTON inside the front door to enter the main menu. Scroll through the options by pressing MENU BUTTON and make your selection with the MENU SELECT button. The blue and red player buttons also scroll through the menus. -
Page 13: Game Setup
GAME SETUP SETTINGS OPTIONS & FACTORY DEFAULTS Credits per Play DBA Additional Games Gives additional games for $ bill denominations (default is 0-off ) CC Charge Games/Swipe CC Add Games/Swipe Game Time (seconds) Balls Per Game Extra Last Ball Delay never (seconds) Ticket Patterns... -
Page 14: Ticket Patterns
TICKET PATTERNS NUMBER OF CUPS HIT PATTERN TICKETS (+1 per remaining ball) (+1 per remaining ball) (+1 per remaining ball) (+1 per remaining ball) (+1 per remaining ball) (+1 per remaining ball) -
Page 15: Diagnostics Menu
DIAGNOSTICS MENU... -
Page 16: Location Name & Advertising
LOCATION NAME & ADVERTISING Insert a USB stick containing your advertise- ments and text file into the USB port next to the menu buttons under the bounce platform. LOCATION NAME: Your location name can be entered manually with the on-screen keyboard and the player buttons, OR it can be uploaded from the USB stick (name.txt). -
Page 17: Machine Setup- Head To Head
MACHINE SETUP- HEAD TO HEAD SETTINGS OPTIONS & FACTORY DEFAULTS Game Volume Attract Volume Attract Timing 30 sec 1 min 5 min 10 min 15 min Next Player Start 30 sec 1 min 2 min 3 min 5 min Timeout Timed Game 5 sec 10 sec... -
Page 18: Machine Setup- Single Game
MACHINE SETUP- SINGLE GAME SETTINGS OPTIONS & FACTORY DEFAULTS Game Volume Attract Volume Attract Timing 30 sec 1 min 5 min 10 min 15 min Next Player Start 30 sec 1 min 2 min 3 min 5 min Timeout Timed Game 5 sec 10 sec 15 sec... -
Page 19: Reports- Head To Head
REPORTS MENU- HEAD TO HEAD These reports will help you to determine the earmings, payout and overall number of plays generated by your Beer Pong game. -
Page 20: Reports- Single Game
REPORTS MENU- SINGLE GAME These reports will help you to determine the earmings, payout and overall number of plays generated by your Beer Pong game. -
Page 21: Software Update
SOFTWARE UPDATE... -
Page 22: Mainboard Pinout
MAINBOARD PINOUT DIAGRAM ... - Page 23 MAINBOARD PINOUT GUIDE...
- Page 24 MAINBOARD PINOUT GUIDE...
-
Page 25: Minigen Pinout
MINIGEN PINOUT (AANEWGEN1-PJ/RBN) AACE3306 Ribbon Cable to AACE3315 lights in cups Menu Buttons & Counter AACE3303 12 Volt DC Power In Cable AACE2510 Bill Acceptor +12 V AACE9109 Signal Coin Door A5CEAU010 Cable to AANEWGEN1-PJ/RBN Speakers AACE3302 Cable to Speakers AACE3301 Lights and Player Start Buttons... -
Page 26: Wiring Diagrams
WIRING DIAGRAMS COIN MECH, MENU BUTTON & COUNTERS Menu Select Menu Scroll Button Button AAPB2700 AAPB2700 AACE3315 AACE3315 Game Counter To J25 AACE3317 on main board. AACE3303 To Power IN (J18) from power supply. + 12 V AANEWGEN1-PJ/RBN AANEWGEN1-PJ Coin Door Harness AACBL4A-DOOR To J9 on main... - Page 27 WIRING DIAGRAMS PLAYER BUTTON, MOTOR & SENSORS 12 Volts DC Power In between Red and Black wires Normally 0 VDC between Black and White wires. (LED is ON) When Blocked - 3.3 VDC between Black and White wires. (LED is OFF) AANEWGEN1-PJ/RBN AANEWGEN1-PJ Ball Release Sensor...
- Page 28 WIRING DIAGRAMS MOTHERBOARD COMMUNICATION AACM1300 Camera A5CORD23 USB Dongle Software A5MO2200 Monitor AAMB8 Connection A5CORD11 A5CORD23 A5CN1031 Adaptor to Connector plug cable into A5CN3001 Motherboard. A5CORD11 AACE3314 Communication cable from J2 on Interface Board to Motherboard A5CEAU010 Audio Jack from Motherboard to Main Board AANEWGEN1-PJ/RBN...
- Page 29 WIRING DIAGRAMS CUP LIGHTS & SPEAKER AANEWGEN1-PJ/RBN AANEWGEN1-PJ To J19 Comm from Minigen on main AACE3306 board. Cup 10 Lights Cup 1 Lights AACE3310-10 AACE3310-1 AACE3302 Cup 9 Lights AACB3004 Cup 2 Lights A5CB3004 AACE3310-9 Speaker AACE3310-2 AACE8811 Cup 8 Lights Cup 3 Lights AACE3310-8 AACE3310-3...
- Page 30 WIRING DIAGRAMS A/C IN & POWER SUPPLY AC Bulb A5LI0001 AAMB8 AACE8868 Monitor A5MO2200 AC Power to Marquee AACE3307 Power Supply A5PS1008 Power Cable To AC Power to MiniGen AACE3303 back of game. A5CORD5 To J18 Connector on Main Board AANEWGEN1-PJ AANEWGEN1-PJ/RBN AC Power to...
-
Page 31: Troubleshooting Guide
TROUBLESHOOTING GUIDE Troubleshooting Strategy Use common sense and a systematic method of troubleshooting to determine the exact problem, probable cause and remedy. Use the process of elimination to find the faulty component. Always check for the simple and obvious causes first such as unplugged, loose or broken wires and bad sensors, bent, pinched, stuck or jammed components. - Page 32 TROUBLESHOOTING GUIDE Problem Probable Cause Remedy All scoring is registered with a If no camera picture in Diagnostic Menu: Scoring Incorrectly camera in top of cabinet. Check: Camera (Part # AACM1300) It is OK if camera is mounted Cable (Part # A5CORD23) on angle.
- Page 33 TROUBLESHOOTING GUIDE Problem Probable Cause Remedy Look for “Check Minigen Refer to “Check Minigen Comm” error Game not coining up. Comm” error on screen. diagnostic section. Note: Ensure game makes sound Check coin switches—both should be wired If game is equipped with 2 Bill Accep- when coin switch is triggered.
- Page 34 TROUBLESHOOTING GUIDE Problem Probable Cause Remedy Balls not releasing - There are many factors that could contribute to the balls not releasing. Please browse through the following sections: - Not enough balls in game - Ball jam - Error on screen - Faulty Motor - Ball release sensor blocked/bad - Ball trough sensor blocked/bad...
- Page 35 TROUBLESHOOTING GUIDE Problem Probable Cause Remedy Balls not releasing - There are many factors that could contribute to the balls not releasing. Please browse through the following sections: - Not enough balls in game - Ball jam - Error on screen - Faulty Motor - Ball release sensor blocked/bad - Ball trough sensor blocked/bad...
- Page 36 TROUBLESHOOTING GUIDE Problem Probable Cause Remedy Any balls missing the cups will Ensure ball trough is clear and not blocked with be counted be the Ball Trough debris. Sensor Check power: 12 Volts DC Power In between Not counting balls Check voltage with DC Red and Green wire.
- Page 37 TROUBLESHOOTING GUIDE Problem Probable Cause Remedy Monitor VGA cable unplugged. Small 12 Volt power connector unplugged Monitor says on motherboard. “NO SIG- Large power NAL” for 5 connector unplugged seconds after Monitor on motherboard power-up. Then dark. Faulty or loose RAM working.
-
Page 38: Power Supply Diagnostics
POWER SUPPLY DIAGNOSTICS 1.) Verify AC power to game. Check power strip in front door. The rocker switch should be illuminated. 3.) Check connection to power supply. 4.) Ensure Power Supply switch is set to 115V (or 230V) (Some model power supplies may not have this) 5.) Ensure Power switch is on. -
Page 39: Bill Acceptor Diagnostics
BILL ACCEPTOR DIAGNOSTICS Note: There are many different models and brands of Bill Acceptors that are used on redemption games. Your Bill Acceptor may differ from the unit shown. Determine if Bill Acceptor has power: Turn game ON—The bill acceptor should make noise as stacker cycles and green lights on outside bezel should flash. -
Page 40: How To: Access Mainboard
HOW TO: ACCESS MAINBOARD/ MOTOR Unlock 2 top locks and flip open front panel. Slide “Bounce Pad” out toward front of game. Motherboard, Power Supply, Minigen board and Communication board are now accessible. To Remove Motor: Remove 4 screws from center of wood wheel. Motor can now be unscrewed and removed from game. -
Page 41: How To: Remove Ball Sensor
HOW TO: REMOVE BALL SENSOR Unlock 2 top locks and flip open front panel. Slide “Bounce Pad” out toward front of game. Remove 2 screws from brackets on both sides of the cabinet and remove carpeted wood platform. Remove screws from brackets holding vertical wood that sensor is mounted to. -
Page 42: How To: Remove Cup Assembly
HOW TO: REMOVE CUP ASSEMBLY Remove 2 screws holding cup platform in place. HOW TO: ACCESS CAMERA/ AC LIGHT Remove 3 screws holding wood support in place. Slide plexi toward front of cabinet and remove from game. -
Page 43: Credit Card Reader
CREDIT CARD READER Beer Pong Masters is credit card reader ready. Baytek sells a credit card reader that will connect to a harness inside cabinet and will communicate via cell phone signals. No need for an internet connection. The E-Port Reader will involve drilling holes in the left side of your metal front to mount. Instructions will come with E-Port Reader, here is a picture of it mounted on metal plate. -
Page 44: Parts Lists
PARTS LIST PART # DESCRIPTION PART # DESCRIPTION A5PL9097 Plate, replaces the bill acceptor AACE3300 Cable, Count Sensor A5BA4050 Ball, Ping Pong Ball AACE3301 Cable, Main Door AACE3302 Cable, Volume A5VF2002 Con Box, Black Plastic AACE3303 Cable, Minigen Power In Cable A5CE6601 Cable, USB, 6 foot A5CEAU010... - Page 45 PARTS PICTURES A5PL9097 A5BA4050 A5VF2002 A5CE6601 A5CEAU010 A5CN1031 A5CO4203 A5CORD14 A5CORD23 A5CN3001 A5CORD5 A5CU3000 A5FI9010 A5HU1200 A5OU1000 A5LK2000 A5LK5001 A5PB3000 A5PB3001 A5DE3000 A5DE3001 A5DE3002 A5DE3003 A5DE3004 A5DE3007 A5DE3008 A5DE3009 A5DE3010-1 A5DE3010-2...
- Page 46 PARTS PICTURES AACBL4A-DOOR A5LI0001 AACE8811 AAPB2700 AACE3300 AACE3301 AACE3302 AACE3303 AACE3304 AACE3306 AACE3307 AACE3309 AACE3310-X AACE3311 AACE3314 AACE9109 AACE3317 AAMO3300 AACE8868 A5PS1008 A5AC9093 AACB3003 AACB2204 AACB2203 AACB3003 AAMB7 AANEWGEN1-PJ/RBN AACM3000 AACB3004...
-
Page 47: Maintenance Log
MAINTENANCE LOG If repairs are necessary, it is good practice to keep a log of repairs done and parts ordered. The chart below will assist you in tracking your game’s maintenance. DATE MAINTENANCE PERFORMED PARTS ORDERED INITIALS... -
Page 48: Technical Support
Bay Tek games. Many of our games share the same main-board electronics. This means you can buy one set of spare electronics to support many of your Bay Tek games. Spare boards allow you to get your game up and running the quickest and provide you a valuable troubleshooting option. Call our... -
Page 49: Warranty
Warranty Registration for each machine. Warranty Registration cards may be found as shipped with each machine or online at our website. These must be filled out and submitted to Bay Tek Games within 30 days of purchase to be valid. - Page 50 CERTIFICATE OF COMPLIANCE...
Need help?
Do you have a question about the SINK IT SHOOTOUT! and is the answer not in the manual?
Questions and answers