Table of Contents
Advertisement
Quick Links
MANUALE DI ISTRUZIONI PER L'USO E
LA MANUTENZIONE
USE AND MAINTENANCE INSTRUCTIONS
MANUAL D'INSTALLATION,
D'UTILISATION ET D'ENTRETIEN
INSTALLATION, BEDIENUNG UND
WARTUNG
S 554 / S 554T
ED. 05/02
ED. 05/02
ED. 05/02
ED. 05/02
ED. 05/02
SMONTAGOMME UNIVERSALE
UNIVERSAL TRUCK TYRE CHANGER
DEMONTE-PNEUS UNIVERSEL
UNIVERSELLE LKW-REIFENMONTIERGERÄT
DESMONTADORA DE NEUMATICOS UNIVERSAL
Advertisement
Table of Contents

Subscribe to Our Youtube Channel
Related Manuals for GIULIANO S 554


Summary of Contents for GIULIANO S 554
- Page 1 UNIVERSELLE LKW-REIFENMONTIERGERÄT DESMONTADORA DE NEUMATICOS UNIVERSAL MANUALE DI ISTRUZIONI PER L'USO E LA MANUTENZIONE USE AND MAINTENANCE INSTRUCTIONS MANUAL D'INSTALLATION, D'UTILISATION ET D'ENTRETIEN S 554 / S 554T INSTALLATION, BEDIENUNG UND WARTUNG ED. 05/02 ED. 05/02 ED. 05/02 ED. 05/02...
- Page 2 DECLARACION CE DE CONFORMIDAD DECLARACION CE DE CONFORMIDAD dichiara sotto la propria esclusiva responsabilità che il prodotto: Smontagomme universale S 554 declare on our own responsibility that the product: Universal truck tyre changer Déclare sous son propre responsabilité que le produit: Demonte-pneus universel erklärt unter ihrer eigenen Verantwortung, daß...
- Page 4 CONSTRUCTEUR / HERSTELLER Questi dati si trovano sulla targhetta adesiva applicata sul retro dello smontagomme, di cui riportiamo un FAC-SIMILE per maggiore GIULIANO S.r.l. chiarezza. Via Guerrieri, 6 - 42015 CORREGGIO - ITALY Tel. +39. 522. 73.11.11 - Fax. +39. 522. 63.31.09...
- Page 5 Pour plus de clarté se référer à la position du FAC-SIMILE en figure. “KENNUMMER” (Nr.) erleichtert den Service des technischen Kundendienstes. GIULIANO S.r.l. Via Guerrieri, 6 - 42015 CORREGGIO - ITALY Diese Angaben sind auf dem Typenschild lesbar, das an der Rückseite Tel.
-
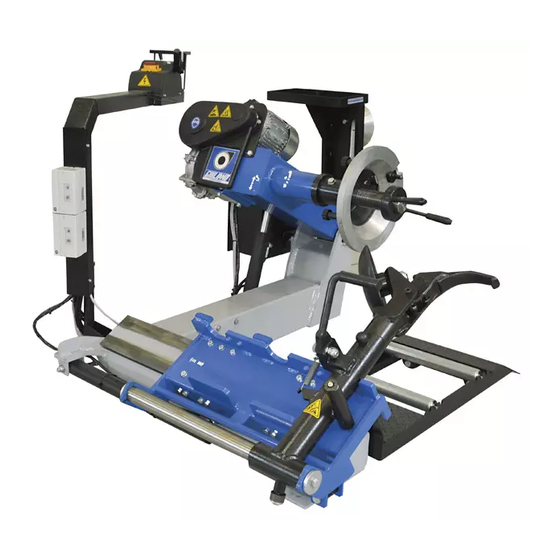
Page 6: Descrizione Della Macchina
2. DESCRIZIONE DELLA MACCHINA Interruttore generale ON / OFF Leva comando rotazione ORARIA / ANTIORARIA flangia di bloccaggio Leva comando AVANTI / INDIETRO carrello porta-utensile Leva comando SALITA / DISCESA braccio porta-flangia di bloccagio Colonnetta porta comandi Flangia fissa di bloccaggio ruota Flangia mobile grande di bloccaggio ruota Cono di bloccaggio Ø... -
Page 7: Description Of The Machine
2. DESCRIPTION OF THE MACHINE 2. DESCRIPTION DE LA MACHINE 2. BESCHREIBUNG DER MASCHINE ON/OFF main switch Intérrupteur général ON/OFF Hauptschalter ON/OFF Locking flange control lever for rotating Levier de commande rotation HORAIRE/ANTIHORAIRE Steuerhebel für RECHTS- / LINKSDREHUNG vom CLOCK-WISE/COUNTERCLOCKWISE de la bride de blocage Spannflansch Control lever for FORWARDS/BACKWARDS... -
Page 8: Norme Generali Di Sicurezza
3. NORME GENERALI 3. GENERAL 3.1_Norme generali di SICUREZZA 3.1_General SAFETY rules Lo smontagomme è stato progettato e realizzato esclusivamente The tyre-changer has been studied and producted exclusively for per lo smontaggio e il montaggio dei pneumatici dai/sui cerchi. removing/mounting tyres from/onto the rims. Questo apparecchio dovrà... -
Page 9: Normes Générales De Sécurité
3. GENERALITES 3. ALLGEMEINES 3.1_Normes générales de sécurité 3.1_Allgemeine SICHERHEIT snormen Le démonte-pneus a été projeté et réalisé uniquement pour le Die Reifenmontiermaschine eignet sich ausschließlich zur Montage/ Demontage von Reifen auf/aus Felgen. démontage / montage des pneus de/sur jantes. Die Maschine darf nur für die Zwecke benutzt werden, für die sie Cette machine devra être utilisée uniquement pour l’emploi pour konzipiert wurde. - Page 10 3.1_Norme generali di SICUREZZA Cod. 3005410 Presenza di tensione elettrica Cod. 3005421 Pericolo di schiacciamento . Cod. 3005421 Prestare particolare attenzione al bloccaggio del cerchio onde evitare la caduta del pneumatico sollevato Cod. 3006037 Pericolo di schiacciamento. Tenersi a Cod. 3006038 distanza durante il funzionamento del braccio porta flangia di bloccaggio.
-
Page 11: Allgemeine Sicherheitshinweise
3.1_General SAFETY rules 3.1_Normes générales de SECURITE’ 3.1_Allgemeine SICHERHEITShinweise Cod. 3005410 Présence de tension électrique Cod. 3005410 Spannungsanwesenheit Cod. 3005410 Live electrical panel Cod. 3005421 Danger d’écrasement. Cod. 3005421 Quetschungsgefahr. Cod. 3005421 Danger of crushing. Prêter attention particulière au blocage Auf die Einspannung der Felge besonders Pay particular attention to the rim locking de la jante, afin d’eviter la chute du pneu... -
Page 12: Installazione
4. TRASPORTO, STOCCAGGIO E 4. TRANSPORT, MOVING AND MOVIMENTAZIONE STORING Lo smontagomme deve essere trasportato nell'imballo originale e The machine must be transported in its original package mantenuto nella posizione indicata sull'imballo stesso. and kept in the position shown on the package itself. Lo spostamento della macchina imballata deve essere effettuato Move the machine by means of a fork-lift truck having inforcando con un carrello elevatore di adeguate capacità, nei... - Page 13 4. TRANSPORT, STOCKAGE ET 4. TRANSPORT UND LAGERUNG DEPLACEMENT Die Reifenmontiermaschine in ursprünglicher Verpackung Le démonte-pneus doit être transporté dans son emballage transportieren und in der angegebenen Stellung halten. original et tenu dans la position indiquée sur l’emballage même. Zur Verlagerung der verpackten Maschine einen Gabelstapler von angemessener Tragkraft benutzen und die Gabeln an den in der Le déplacement de la machine emballée doit être effectué...
- Page 14 Lo smontagomme universale deve essere installato su un pavimen- The universal tyre-changer must be installed on a level concrete to di cemento ben livellato di almeno 15 cm di spessore e di una floor at least 15 cm thick, with a minimum concrete quality of B25 in qualità...
- Page 15 Le démonte-pneus universel doit être installé sur un sol en béton bien Die universelle Reifenmontiermaschine muß auf ebenem nivelé, d’au moins 15 cm d’épaisseur et de qualité B25, comme Betonboden von mindestens 15 cm. Stärke und einer d’après les normes DIN 1045 (fondations). Mindestbetongüte von B25 nach DIN 1045 (Fundament) aufgestellt Pour plus de clarté...
-
Page 16: Collegamento Elettrico
6.2_Assemblaggio parti. Montare il supporto comandi infilando il tubo nell'apposito sostegno e bloccando il tutto come indicato nella fig. 7 Montare il supporto flange avvitando le due viti indicate nella fig. 8 6.3_Collegamento elettrico. Tutte le operazioni per il collegamento elettrico devono essere eseguite da personale professionalmente qualificato L’utente deve provvedere a:... -
Page 17: Electrical Connection
6.2_Parts assembling 6.2_Assemblage des parties 6.2_Einbau der Teile Das Steuerungssäulchen durch Stecken der Säulchenstange Mount the control stand by fitting the hose in its support and fix as Monter le bras des commandes en introduisant le tuyau dans son in den Träger einbauen und das Ganze festmachen (siehe shown in fig.7 support. -
Page 18: Test Di Funzionamento
6.4_Test di funzionamento Prima di cominciare a lavorare con lo smontagomme sono necessari alcuni controlli per verificarne il corretto funzionamento e la corretta installazione. Effettuare tutte le manovre seguenti con il braccio porta-utensile (17) in posizione FUORI LAVORO. Utilizzare la fig. 11 per effettuare il Test di funzionamento. Agire quindi sulla leva (18) per sbloccare il braccio e tirarlo verso se stessi per portare il braccio fuori lavoro. -
Page 19: Operation Test
6.4_Operation test 6.4_Operation test 6.4_Betriebtest Before working with tyre-changer it is necessary to carry out some Avant de la mise en marche du démonte-pneus, il faut effectuer Vor der Aufnahme der Arbeit sind einige Prüfungen erforderlich, um tests to check the correct operation and installation as well. quelques contrôles pour vérifier le correct fonctionnement ainsi den korrekten Betrieb sowie die fehlerfreie Aufstellung der Maschine que la corrècte installation. -
Page 20: Avvertenze Per L'uso
7. USO 7. USE 7.1_Avvertenze per l'uso 7.1_Notes for use L'inosservanza delle istruzioni e delle avvertenze può The non-observance of instructions and warnings can provocare lesioni gravi agli operatori e ai presenti. cause serious injuries to the operator or third persons. Non usare la macchina prima di aver letto e compreso Do not use the machine before having read and understood tutte le istruzioni contenute nel presente manuale. -
Page 21: Betrieb
7. EMPLOI 7. BETRIEB 7.1 Avertissements 7.1 Allgemeine Sicherheitshinweise L’inobservance des instructions et des avertissements Die Nichtbeachtung der Sicherheitshinweise kann peut provoquer de graves lésions aux opérateurs ainsi schwere Verletzungen dem Bediener sowie den qu’aux présents. Anwesenden verursachen. Ne pas utiliser la machine avant d’avoir lu et compris Dieses Handbuch und die enthaltenen Hinweise vor toutes les instructions contenues dans ce livret. - Page 22 7.2_Bloccaggio del cerchio La macchina è progettata per lavorare su pneumatici da 14" a 26" montati su cerchi con foro centrale di diametro da un minimo di 100 mm. a un massimo di 300 mm. A seconda del tipo di cerchio montato sul pneumatico, occorre quindi procedere in modi diversi per bloccarlo sulla flangia.
- Page 23 7.2_Rim locking 7.2 Blocage de la jante 7.2 Einspannung der Felge The machine has been designed to work on 14”-26” tyres mounted La machine a été conçue pour opérer sur tout pneu de 14” à 26” Die Maschine eignet sich für alle Reifen von 14” bis 26”, die auf on rims having central hole of min.
- Page 24 7.3 RUOTE TUBELESS 7.3.1_ Stallonatura e smontaggio con UTENSILE A RULLO 1) Assicurarsi che la ruota sia bloccata e sgonfia. 2) Abbassare il braccio porta utensili (17) in posizione di lavoro, fino a che si sarà agganciato con l'apposito cricchetto. Verificare sempre che il braccio sia correttamente agganciato al carrello.
- Page 25 7.3 TUBELESS WHEELS 7.3 ROUES TUBELESS 7.3 SCHLAUCHLOSE REIFEN 7.3.1_ Bead breaking and tire removing with 7.3.1_Décollage du talon et démontage 7.3.1_Wulstabdrücken und Demontage mit ROLLER TOOL moyennant l'OUTIL À ROULEAU ROLLENWERKZEUG 1) Make sure that the tyre is locked and deflated. 1) S’assurer que la roue soit bloquée et dégonflée.
- Page 26 7.3.2_ Stallonatura e smontaggio con DOPPIO UTENSILE A RULLO 1) Assicurarsi che la ruota sia bloccata e sgonfia. 2) Abbassare il braccio porta utensili (17A) in posizione di lavoro, fino a che si sarà agganciato con l'apposito cricchetto (18). 3) Abbassare anche il secondo braccio porta-utensili (17B) in posi- zione di lavoro, fino a che non si sarà...
- Page 27 7.3.2_ Bead breaking and tire removing with 7.3.2_ Décollage du talon et démontage 7.3.2_ Wulstabdrücken und Demontage mit DOUBLE ROLLER TOOL moyennant le DOUBLE OUTIL À ROULEAU DOPPELROLLENWERKZEUG 1) Feststellen, das der Reifen festgemacht und entleert ist. 1) S’assurer que la roue soit bloquée et dégonflée. 1) Make sure that the tyre is locked and deflated 2) Baisser le bras porte-outils (17A) en position de travail, jusqu’àce 2) Werkzeugtragarm (17A) in Arbeitsstellung herunterlassen, bis er...
- Page 28 7.3.3_Stallonatura e smontaggio con UTENSILE DOPPIO 1) Assicurarsi che la ruota sia bloccata e sgonfia. 2) Abbassare il braccio porta utensili (17) in posizione di lavoro, fino a che si sarà agganciato con l'apposito cricchetto. Verificare sempre che il braccio sia correttamente aggan- ciato al carrello.
- Page 29 7.3.3_Bead breaking and tyre removing with 7.3.3_Décollage du talon et démontage 7.3.3_Wulstabdrücken und Demontage mit DOUBLE TOOL moyennant l’outil double. Doppelwerkzeug 1) Make sure that the tyre is locked and deflated. 1) Feststellen, das der Reifen festgemacht und entleert ist. 1) S’assurer que la roue soit bloquée et dégonflée.
- Page 30 7.3.4_Montaggio con utensile a rullo. 1) Assicurarsi che il cerchio sia bloccato sulla flangia. 2) Lubrificare i talloni del pneumatico e il cerchio con il grasso in dotazione. 3) Serrare la pinza al bordo esterno del cerchio, nel punto più alto. 4) Posizionare il pneumatico sulla pedana ed abbassare la flangia per agganciare il primo tallone alla pinza (avendo cura di mante- nere quest'ultima nel punto più...
- Page 31 7.3.4_Tyre mounting with roller tool. 7.3.4_Montage moyennant l’outil à rouleau 7.3.4_Montage mit Rollenwerkzeug 1) Make sure that the rim is locked on the flange. 1) S’assurer que la jante soit bloquée sur la bride. 1) Feststellen, das die Felge auf dem Flansch festgemacht ist. 2) Grease both beads and rim by means of the supplied grease.
- Page 32 7.3.5_Montaggio con utensile DOPPIO. 1) Assicurarsi che il cerchio sia bloccato sulla flangia. 2) Lubrificare i talloni e il cerchio con il grasso in dotazione. 3) Serrare la pinza al bordo esterno del cerchio, nel punto più alto. 4) Posizionare il pneumatico sulla pedana ed abbassare la flangia per agganciare il primo tallone alla pinza (avendo cura di mante- nere quest'ultima nel punto più...
- Page 33 7.3.5_Tyre mounting with DOUBLE TOOL. 7.3.5_Montage moyennant L’OUTIL DOUBLE. 7.3.5_Montage mit Doppelwerkzeug 1) Make sure that the rim is locked on the flange. 1) S’assurer que la jante soit bloquée sur la bride. 1) Feststellen, das die Felge auf dem Flansch festgemacht ist. 2) Grease both beads and rim by means of the supplied grease.
- Page 34 14) Posizionare la pinza per cerchioni appena sopra l'utensile a becco 14) Position the pliers over the peak-tool as shown by fig.30 come indicato in figura 30. 15) Let the tyre turn clockwise until the pliers is in its lowest point. 15) Far ruotare il pneumatico in senso orario fino a portare la pinza Second bead should be set in position too.
- Page 35 14) Positionner la pince pour jantes juste au-dessus de l’outil à bec, 14) Die Zange kaum auf das Spitzewerkzeug stellen (Abb.30) comme indiqué en fig. 30. 15) Den Reifen rechts drehen lassen, bis wann sich die Zange in 15) Faire tourner le pneu en sens horaire jusqu’à porter la pince dans niedrigsten Punkt befindet.
- Page 36 7.4 RUOTE CON CAMERA D'ARIA 7.4 TYRES WITH TUBE 7.4.1_Stallonatura e smontaggio 7.4.1_Bead breaking and tyre removing with con UTENSILE DOPPIO DOUBLE TOOL WARNING: Unscrew the bush which fixes the valve when deflat- ATTENZIONE: Quando si sgonfia la ruota è necessario svitare la ing the tyre so that the valve, coming in the inside of the rim, is ghiera che fissa la valvola in modo che, quest'ultima, rientran- not an obstacle during bead breaking.
- Page 37 7.4 ROUES AVEC CHAMBRE A AIR 7.4 RÄDER MIT SCHLAUCH 7.4.1_Décollage du talon et démontage 7.4.1_Wulstabdrücken und Demontage mit moyennant l’OUTIL DOUBLE. DOPPELWERKZEUG ATTENTION: Lors du dégonflage de la roue il faut dévisser la bague VORSICHT: Bei Entleerung des Reifens ist es nötig, die qui fixe la valve de sorte que cette dernière, en rentrant dans la Ventilbefestigungsmutter abschrauben, damit das jante, ne constitue pas un obstacle pendant le décollage.
- Page 38 10) Traslare il braccio portautensile sul lato interno della ruota, ruotare 10) Move the tool carrier arm to the inside plane of the tyre, turn the l'utensile di 180° ed abbassare il braccio in posizione di lavoro. peak-tool of 180° and lower the arm to its working position. Insert it Inserire il medesimo tra cerchio e tallone e traslarlo fino a che il between rim and bead and move it until the bead is by the front tallone sia in prossimità...
- Page 39 10) Placer le bras porte-outil sur le côté intérieur de la roue, tourner 10) Den Werkzeugtragarm nach Radinnenseite verlegen, das l’outil de 180° et abaisser le bras dans la position de travail. Introduire Werkzeug um 180° verdrehen und den Arm in Arbeitsstellung l’outil entre la jante et le talon et le faire avancer jusqu’à...
- Page 40 5) Sollevare il cerchio con il pneumatico agganciato e ruotarlo in 5) Lift the rim with the hooked tyre and turn it anticlockwise of about senso antiorario di 15-20 cm. Il pneumatico si posizionerà in modo 15-20 cm. The tyre will set itself slantingly. obliquo rispetto al cerchio.
- Page 41 5) Soulever la jante avec le pneu accroché et le tourner dans le sens 5) Die Felge mit dem angehakten Reifen heben und 15-20 cm im inverse aux aiguilles d’une montre de 15-20 cm. Le pneu se positionnera Gegenuhrzeigersinn verdrehen. Der Reifen ordnet sich dann schräg de travers par rapport à...
- Page 42 16) Ruotare l'autocentrante fino a portare la valvola in basso 16) Turn the spindle until the valve is at the bottom. 17) Gonfiare leggermente la camera d'aria (fino a che non presenti 17) Inflate the inner tube a little (until no more folds are present) so pieghe) per evitare di pizzicarla durante il montaggio del secondo as not to pinch it while mounting the second bead.
- Page 43 16) Tourner le mandrin jusqu'à positionner la valve en bas. 16) Das Spannfutter verdrehen, bis das Ventil unten steht. 17) Gonfler légèrement la chambre à air (jusqu’à ce qu’il n’y ait plus 17) Den Schlauch leicht aufpumpen (bis er keine Falten mehr aufweist), de plis) pour éviter de la pincer pendant le montage du deuxième um zu verhindern, daß...
- Page 44 7.5 RUOTE CON CERCHIETTO A 3 PEZZI 7.5.1_Stallonatura e smontaggio con UTENSILE DOPPIO 1) Bloccare la ruota sull'autocentrante, come precedentemente descritto, e assicurarsi che la stessa sia sgonfia. 2) Abbassare il braccio porta utensili in posizione di lavoro, fino a che si sarà...
- Page 45 7.5 WHEELS WITH 3-PIECE SPLIT RING 7.5 ROUES A CERCLE EN 3 PIECES 7.5 RÄDER MIT 3-TEILIGEM SPALTRING 7.5.1_Bead breaking and tyre removing with 7.5.1_Décollage du talon et démontage 7.5.1_Wulstabdrücken und Demontage mit DOUBLE TOOL. moyennant l’OUTIL DOUBLE. DOPPELWERKZEUG 1) Bloquer la roue sur le mandrin, comme décrit précédemment et 1) Das Rad wie vorstehend beschrieben auf dem Spannfutter aufspannen.
- Page 46 7.5.2_Montaggio con UTENSILE DOPPIO 7.5.2_Tyre mounting with DOUBLE TOOL 1) Move the tool carrier arm to its non-working position. If the rim 1) Portare il braccio porta autocentrante in posizione di fuori lavoro. has been removed from the spindle, put it back on the spindle as Se il cerchio è...
- Page 47 7.5.2_Montage moyennant L’OUTIL DOUBLE. 7.5.2_Montage mit DOPPELWERKZEUG 1) Den Spannfutterarm in Raststellung bringen. Wenn die Felge vom 1) Basculer le bras porte mandrin en position hors service. Si la Spannfutter heruntergenommen worden ist, muß sie wieder jante a été démontée du mandrin la bloquer de nouveau comme aufgespannt werden, wie im Abschnitt “RADAUFSPANNEN”...
- Page 48 7.6 RUOTE CON CERCHIETTO A 5 PEZZI 7.6 WHEELS WITH 5-PIECE SPLIT RING 7.6.1_Stallonatura e smontaggio 7.6.1_Bead breaking and tyre removing with con UTENSILE DOPPIO DOUBLE TOOL 1) Bloccare la ruota sull'autocentrante, come precedentemente de- 1) Clamp the wheel on the spindle as described previously and make scritto, e assicurarsi che la stessa sia sgonfia.
- Page 49 7.6 ROUES A CERCLE EN 5 PIECES 7.6 RÄDER MIT 5-TEILIGEM SPALTRING Décollage du talon et démontage Wulstabdrücken und Demontage mit 7.6.1_ 7.6.1_ moyennant l’OUTIL DOUBLE. DOPPELWERKZEUG 1) Bloquer la roue sur le mandrin, comme décrit précédemment et 1) Das Rad wie vorstehend beschrieben auf dem Spannfutter s'assurer que le pneu soit dégonflé.
- Page 50 12) Abbassare l'autocentrante fino a che il pneumatico non appoggi 12) Lower the spindle until the wheel is resting on the platform. sulla pedana. 13) Move the platform outwards until the tyre together (with split- 13) Traslare la pedana verso l'esterno fino a sfilare il pneumatico ring) is completely off.
- Page 51 12) Baisser le mandrin pour appuyer le pneu sur la plate-forme. 12) Das Spannfutter senken, bis wann der Reifen die Schiebebühne berührt. 13) Déplacer la plate-forme vers l’extérieur pour sortir complètement le pneu de la jante (avec le cercle accroché). 13) Die Schiebebühne nach außen verlegen und den Reifen (mit Spaltring daran) von Felge herausnehmen.
- Page 52 7.6.3_Montaggio con UTENSILE DOPPIO 7.6.3_Tyre mounting with DOUBLE TOOL. 1) Portare il braccio porta autocentrante in posizione di fuori lavoro. 1) Move the tool carrier arm to its non-working position. If the rim Se il cerchio è stato smontato dall'autocentrante ribloccarlo come has been removed from the spindle, put it back on the spindle as descritto nel paragrafo "BLOCCAGGIO DEL CERCHIO".
- Page 53 7.6.3_Montage moyennant L’OUTIL DOUBLE. 7.6.3_Montage mit DOPPELWERKZEUG 1) Porter le bras porte-outil en position hors service. 1) Den Spannfutterarm in Raststellung bringen. Si la jante a été démontée du mandrin la bloquer de nouveau comme Wenn die Felge vom Spannfutter heruntergenommen worden ist, muß décrit dans le paragraphe “BLOCAGE DE LA JANTE”.
- Page 54 8. RIPOSIZIONAMENTO 8. RESITING Per riposizionare lo smontagomme è necessario disporre di un To install the tyre-changer in a new place, a lift truck must be carrello elevatore. available on site. Scollegare l'alimentazione elettrica. Disconnect the power supply. Rimontare la staffa di sollevamento Set up the lifting hanger again.
-
Page 55: Mise A La Ferraille
8. REPOSITIONNEMENT 8. WECHSEL DES AUFSTELLUNGSORTES Pour positionner le démonte-pneus dans un nouvel endroit, il faut disposer d’un chariot élévateur. Zur Umstellung der Reifenmontiermaschine ist ein Gabelstapler erforderlich. Débrancher l’alimentation électrique. Die Versorgungsquelle abtrennen. Remonter l’étrier de levage. Der Bügel zum Heben wiedereinbauen. Soulever le démonte-pneus moyennant une courroie appropriée et le positionner dans le nouvel endroit. -
Page 56: Oil Treatment
11. TRATTAMENTO OLIO 11. OIL TREATMENT L’olio è altamente inquinante!! Oil is highly pollutant!! Non gettare o disperdere nell’ambiente. Do not throw or disperse in the environment 11.1_Precauzioni generali 11.1_General precautions - Evitare il contatto diretto e prolungato con la pelle. - Avoid direct and prolonged contact with skin. - Page 57 11. TRAITEMENT DE L’HUILE 11. ÖLBEHANDLUNG L’huile est très polluante!! Das Öl ist hoch verseuchend! In die Umwelt nicht Ne pas couler ou disperser dans l’environnement. ablassen. 11.1 Précautions générales 11.1 Allgemeine Vorsichtsmaßnahmen Eviter le contact direct et prolongé avec la peau Direkte u.
-
Page 58: Manutenzione
13. MAINTENANCE 13. MANUTENZIONE Maintenance must never be performed by unauthorized La manutenzione è sempre vietata a personale non staff autorizzato Regular maintenance in accordance with the instructions given is La manutenzione regolare, come da istruzioni, è fondamentale per essential for correct operation of the tyre-changer and for its long un corretto funzionamento e una lunga durata dello smontagomme working life as well. -
Page 59: Entretien
13. ENTRETIEN 13. WARTUNG L’entretien est toujours interdit au personnel non autorisé. Die Wartung von Unbefugten ist streng verboten. Un entretien régulier, comme d’après les instructions, est fondamental Eine regelmäßige und vorschriftsmäßige Wartung ist die Grundlage pour le fonctionnement correct et une longue durée du démonte- für den einwandfreien und zuverlässigen Betrieb der pneus. -
Page 60: Dati Tecnici
14. DATI TECNICI 14. TECHNICAL DATA " 4 " 4 " 4 " 4 " 6 " 6 " 6 " 6 " " " " " " " " " 4 " 6 " " n i l c i l o l l o l l <... -
Page 61: Donnees Techniques
14. TECHNISCHE DATEN 14. DONNEES TECHNIQUES " " " " " " " " " " " 4 " 4 " 4 " 4 " 4 " 6 " 6 " 6 " 6 " 6 e t i i l u é... - Page 62 Motore elettrico rotazione Motore elettrico pompa idraulica F1 - F2 Interruttore termico salvamotore 4.0 - 6.3A Sezionatore 12A Invertitore di giri 3PH Electrical motor – rotation Electrical motor – hydraulic pump F1-F2 Thermal cutout switch 4.0 – 6.3A Disconnecting switch 3ph inverter Moteur électrique rotation Moteur électrique pompe hydraulique...
- Page 63 Cilindro carrello porta-utensile Cilindro braccio porta flangia di bloccaggio Valvola limitatrice di pressione Pompa idraulica Motore Filtro Tappo sfiato Distributore a 2 leve Vérin chariot porte-outil Vérin bras porte-bride de blocage Vanne limitatrice de pression Pompe hydraulique Moteur Filtre Event Distributeur à...
Need help?
Do you have a question about the S 554 and is the answer not in the manual?
Questions and answers