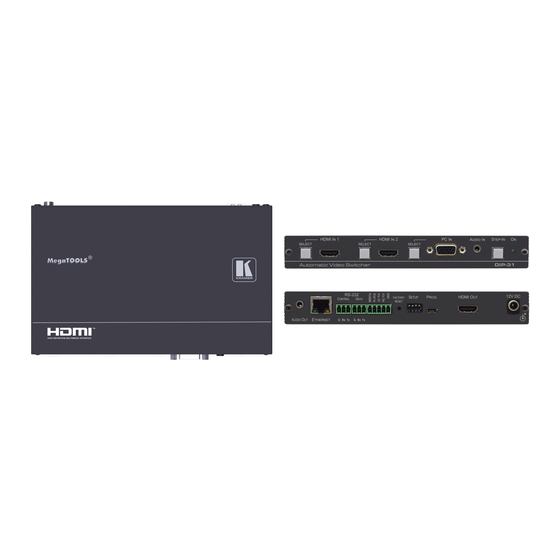
Kramer DIP-31M Quick Start Manual
Hide thumbs
Also See for DIP-31M:
- User manual (104 pages) ,
- Quick start manual (4 pages) ,
- User manual (10 pages)
Advertisement
Quick Links
Scan for full manual
Step 1: Check what's in the box
DIP-31M Automatic Video Switcher
1 Power supply (12V DC)
Step 2: Get to know your DIP-31M
#
Feature
SELECT Button
1
HDMI IN 1
HDMI 1 Connector
2
SELECT Button
3
HDMI IN 2
HDMI 2 Connector
4
SELECT Button
5
PC IN
PC Graphics 15-pin
6
HD Connector
7
AUDIO IN 3.5mm Mini Jack
8
STEP-IN Button
9
ON LED
DIP-31M Quick Start (P/N: 2900-300710QS REV 1)
DIP-31M Quick Start Guide
This guide helps you install and use your DIP-31M for the first time.
www.kramerav.com/downloads/DIP-31M
Go to
firmware upgrades are available.
4 Rubber feet
1 Quick start guide
Function
Press to select the HDMI IN 1 input. When HDMI IN 1 is selected, the button lights and
indicates the selected audio (see Step 5):
Red – External audio from the analog Audio IN is selected
Green – Embedded audio from HDMI IN 1 is selected
Connects to the first HDMI source
Press to select the HDMI IN 2 input. When HDMI IN 2 is selected, the button lights and
indicates the selected audio (see Step 5):
Red – External audio from the analog Audio IN is selected
Green – Embedded audio from HDMI IN 2 is selected
Connects to the second HDMI source
Press to select the VGA input. When PC IN is selected, the button lights and indicates the
selected audio (see Step 5):
Red – External audio from the analog Audio IN is selected
Green – No audio is selected
Connects to the VGA source, (for example, a laptop)
Connects to the unbalanced, stereo audio source, (for example, the audio output of the laptop)
Press to take control of the input that this device is connected to on a compatible switcher
Lights green when the device is powered on
to download the latest user manual and check if
ADC-DPM/HF DisplayPort (M) to
HDMI (F) adapter cable
P/N: 2 9 0 0 - 3 0 0 7 1 0 QS
Rev: 1
Advertisement

Summary of Contents for Kramer DIP-31M
- Page 1 DIP-31M Quick Start Guide This guide helps you install and use your DIP-31M for the first time. www.kramerav.com/downloads/DIP-31M Go to to download the latest user manual and check if Scan for full manual firmware upgrades are available. Step 1: Check what’s in the box...
- Page 2 Attach the rubber feet and place on a table or mount the DIP-31M in a rack (using an optional RK-T2B rack mount). A Kramer TOOLS™ can also be mounted on a desk top, wall or similar area. Fasten a bracket on each side of the TOOLS using the...
- Page 3 Step 4: Connect the inputs and outputs Always switch OFF the power on each device before connecting it to your DIP-31M. For best results, we recommend that you always use Kramer high-performance cables to connect AV equipment to the DIP-31M.
- Page 4 Step 6: Connect the power Connect the 12V DC power adapter to the DIP-31M and plug it into the mains electricity. Step 7: Operate the DIP-31M To operate and control the DIP-31M use: Front Panel Remote Control Switches Web Pages from IP 192.168.1.39 Buttons PC/HDMI—input...


Need help?
Do you have a question about the DIP-31M and is the answer not in the manual?
Questions and answers