Kramer VIA CONNECT PRO User Manual
Collaboration hub
Hide thumbs
Also See for VIA CONNECT PRO:
- User manual (131 pages) ,
- Quick start manual (4 pages) ,
- User manual (85 pages)

Related Manuals for Kramer VIA CONNECT PRO


Summary of Contents for Kramer VIA CONNECT PRO
-
Page 1: User Manual
K R A ME R E LE CT R O N IC S L TD . USER MANUAL MODEL: VIA Connect PRO Collaboration Hub (For Firmware Version 1.7) P/N: 2900-300419 Rev 3... -
Page 6: Table Of Contents
Figure 1: VIA Connect PRO Collaboration Hub Figure 2: Connecting the VIA Connect PRO Collaboration Hub Figure 3: VIA Connect PRO Admin Screen and Features Figure 4: VIA Connect PRO Main User Screen and Features Figure 5: The Participant List Figure 6: Enable Control... -
Page 7: Introduction
Each participant in a VIA Connect PRO session can quickly view, edit, annotate, comment, and share content with other participants. Participants can share their ideas through the primary screen, or break off with others into smaller groups during a meeting. -
Page 8: Applications & Features
Here are just a few of the things you can do with VIA Connect PRO: Up to four different participant screens can be shown at the same time. VIA Connect PRO automatically sizes each screen to the maximum available resolution. -
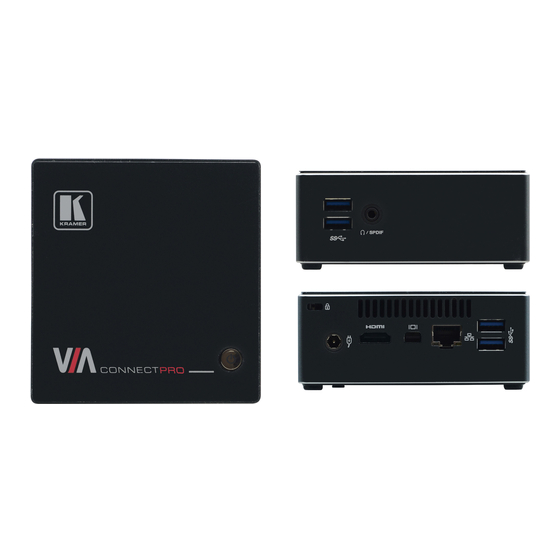
Page 9: Controls And Connections
Controls and Connections This section defines VIA Connect PRO. Figure 1: VIA Connect PRO Collaboration Hub Feature Function USB 3.0 Connectors Connect to up to two USB devices Ω/SPDIF 3.5mm Mini Jack Connects to earphones or a speaker (digital embedded audio from HDMI and analog audio supported;... -
Page 10: Setting Up
Always switch off the power to each device before connecting it to your VIA Connect PRO. After connecting VIA Connect PRO, connect its power and then switch on the power to each device. To connect the VIA Connect PRO as illustrated in the example in Figure 2 need: ... -
Page 11: Connecting Via Connect Pro To A Display
Figure 2: Connecting the VIA Connect PRO Collaboration Hub Connecting VIA Connect PRO to a Display VIA Connect PRO is equipped with HDMI and mini DP display output connectors. The HDMI connection can be used with any compatible projection or direct- view display, such as an LCD monitor. -
Page 12: Downloading And Running Via Connect Pro Software
For full functionality, VIA Connect PRO must be connected to a local area network (LAN). You must assign an IP address to the VIA Connect PRO. NOTE: Do not turn the device on before connecting the LAN port to the network. - Page 13 Setup instructions. The VIA app is saved to the KRAMER folder on your C: drive. It creates a shortcut on the desktop for easy access. For tablets and smartphones, the Kramer VIA app is found in the App Store (iOS) and Google Play (Android).
-
Page 14: Logging In To Via Connect Pro
VIA Connect PRO iOS and Android First, enter the IP address for the VIA Connect PRO. This is found on the main display screen in the lower left Next, choose a username (nickname) for your device (it can be any mix of letters and numbers) then enter it on the login screen of your device ... - Page 15 VIA’s AirPlay device is named VIA_AirMirror_XXXX, where XXXX is a random combination of letters and numbers. Note: If the room code is enabled on the VIA Connect PRO, you are prompted to enter the same 4-digit security code when attempting to mirror your iOS device.
- Page 16 2.4.2 MacBooks and Apple Computers Connect your Apple device to the network where the VIA Connect PRO resides. Click the AirPlay menu on the Apple Menu Bar. This is located in the top right corner of the screen near the clock.
- Page 17 Note: If the Room Code is enabled on the VIA Connect PRO, you are prompted to enter the same 4-digit security code when attempting to mirror you iOS device. This code appears on the main screen of the VIA Connect PRO.
-
Page 18: Via Connect Pro Functions And What They Do
VIA Connect PRO Functions and What They VIA Connect PRO presents two types of screens depending whether it is being used by the Admin or by a User. The following screen shots illustrate both types. Figure 3 shows the VIA Connect PRO main Admin screen and its functions:... -
Page 19: Figure 4: Via Connect Pro Main User Screen And Features
Figure 4 shows the VIA Connect PRO main User screen and its functions: Figure 4: VIA Connect PRO Main User Screen and Features VIA Connect PRO - VIA Connect PRO Functions and What They Do... - Page 20 Click to collaborate through a common display using your own Collaboration device. Multiple users can interact and control the main display at the same time Chat Allows sending chat messages among available participants during that session VIA Connect PRO - VIA Connect PRO Functions and What They Do...
-
Page 21: Using Via Connect Pro
VIA Connect PRO Main Menu This section refers to the user's experience. The VIA Connect PRO User main menu has three tabs across the top – Features, Step-In/Out, and Participants. ... -
Page 22: Enabling Control
Start Collaboration icon and drag his laptop mouse to the top and off their local screen. That cursor now moves to the VIA Connect PRO unit and appears on the main display of Dave. Buttons are shown in the picture below:... -
Page 23: Chatting With Participants
To initiate a chat session: Go to the participant list and click the chat icon for the desired participant. The chat window opens (Figure 7) and you can chat with selected participant: VIA Connect PRO - Using VIA Connect PRO... -
Page 24: Sharing Files
The user can check for active chat sessions by going to Features > Chat Sharing Files VIA Connect PRO can transfer files between PC/Mac logged in users. To share a file: ... -
Page 25: Figure 8: Admin File Sharing
Once completed, the file is saved on that participant’s system. Figure 9: User File Sharing When completed, the file is saved at receiver’s system. You can check or cancel currently sharing file from Features > File Transfer. VIA Connect PRO - Using VIA Connect PRO... -
Page 26: Accessing Cloud Data
A warning note appears that this is a permanent delete action To delete all files from the cloud directory, click on Clean Directory A warning note appears that this is a permanent delete action VIA Connect PRO - Using VIA Connect PRO... -
Page 27: Whiteboard Collaboration
Click on Start Collaboration or Whiteboard icon Drag the cursor to the main display Start annotate by using whiteboard tools Multiple users can interact, annotate and control the main display at the same time. VIA Connect PRO - Using VIA Connect PRO... -
Page 28: Figure 11: Whiteboard Toolbar
Previous Page Moves to previous page (when multiple pages added) New Page Creates a new page or to add a new page Next Page Moves to next page (when multiple pages added) VIA Connect PRO - Using VIA Connect PRO... - Page 29 Window Selection Directly captures a window and all of its content. Save Saves your activity in either.jpg or .pdf format Show/Hide Show/hide annotations Exit Exits the whiteboard VIA Connect PRO - Using VIA Connect PRO...
-
Page 30: Via Connect Pro Settings Menu
VIA Connect PRO Settings Menu The Settings menu is where you configure your VIA Connect PRO unit. The Settings menu tabs include: LAN Settings – configures network parameters Room Name/Room Code – manages room code and name preferences ... -
Page 31: Figure 12: Settings Screen
To change the IP address: Click on LAN Settings Select IP configuration -> Static Enter as required the IP address, subnet mask, default gateway, DNS server 1 VIA Connect PRO - Using VIA Connect PRO... -
Page 32: Figure 13: Lan Settings Screen
When finished, click on Apply Settings Click OK at the Confirmation Message Click on Reboot to restart the system with the new settings 4.7.2 Room Name/Code Settings To activate/deactivate Room Code, Date & Time: VIA Connect PRO - Using VIA Connect PRO... -
Page 33: Figure 14: Room/Name Code Screen
Show Room Name on Wallpaper: This feature displays the Room Name (a standard IP address) on the VIA Connect PRO home screen. By default, it displays the current IP address, but you can change it to a Domain Name System (DNS) name if local DNS services are supported by the network. -
Page 34: Figure 15: Configurations Screen
VIA Connect Enable Quick Client Access – Enables a floating icon on the desktop of the VIA Connect PRO gateway to open the VIA Connect PRO menu. The user can click on this icon and the menu opens ... -
Page 35: Figure 16: System Control Screen
System Control Settings System controls access the control panel, audio settings, display settings, task manager, system health and log files of the VIA Connect PRO unit. The log folder is only available if system logging is activated from the configurations tab of settings. -
Page 36: Figure 17: Wallpaper Screen
Connect the USB drive with the wallpaper file (must be a png image file) and click OK from your system. Upload begins Click on Reboot The background image on VIA Connect PRO changes after rebooting Figure 17: Wallpaper Screen VIA Connect PRO - Using VIA Connect PRO... -
Page 37: Figure 18: Authentication Screen
To enable Moderator Mode: Click on Authentication Select Activate Moderator Mode and the desired Authentication Mode. Figure 18: Authentication Screen There are three different moderator modes: Database based, active directory and Basic. VIA Connect PRO - Using VIA Connect PRO... -
Page 38: Database Based
4.7.6.1 Database Based This mode requires building a database of users that can access the system. The users receive credentials (username and password). There are two default users available to login into VIA Connect PRO client in the Moderator mode. Moderator: ... -
Page 39: Figure 19: Moderator Mode
Web administration interface. To login into the VIA Connect PRO client when Presentation Mode is activated: Open the VIA Connect PRO client and enter the location (IP address of the VIA Connect PRO gateway) ... -
Page 40: Figure 20: Login Screen When Moderator Mode Is Active
Figure 20: Login Screen When Moderator Mode is Active To start a presentation: Click on “Step-In” and VIA Connect PRO sends a request to the moderator for display permission The moderator clicks on “Allow full screen” to start the participant’s... - Page 41 Moderator: A user with meeting moderator rights i.e., this user can directly display his screen on a VIA Connect PRO Gateway and can allow a participant requesting to present on the main display. Participant: A participant of a presentation session who can join the meeting room but cannot project their desktop without the moderator’s permission.
- Page 42 5. Based on the above selection, type the name of Moderator and Participant Group/OU in their respective boxes. Note: VIA Connect PRO does not discover and connect to the Active Directory; rather it relies on you to correctly enter the details. If there is a typographical error in any of fields, the users (Moderators and Participants) cannot log in.
- Page 43 To login into the VIA Connect PRO client when basic moderator mode is activated: 1. Open the VIA Connect PRO client and enter the location (IP address of the VIA Connect PRO gateway). 2. Enter the nickname. The Room Code field appears.
-
Page 44: Managing Settings From The Via Web Management Interface
Additionally, it defaults to allow four iOS devices to simultaneously mirror on the VIA Connect PRO. This setting can also be changed. Once these setting changes have been made, click Apply. Reboot the VIA Connect PRO for the settings to take effect... - Page 45 VIA Site Management Server (VSM Server) is an optional software application (subject to a separate pricing) that allows an administrator to monitor and make changes to all connected VIA Connect PRO or Connect gateways. It is a Web- based interface that allows the administrator to: ...
- Page 46 Click Validate and Save for changes to take effect Choose the settings “From HQ” to download the setting from the HQ server or choose “From Gateway” to keep the local settings. Click Reboot to restart the unit VIA Connect PRO - Using VIA Connect PRO...
- Page 47 All previously uploaded wallpapers are saved and shown as below. To select one of them, click on “Set”. Then click on Reboot The background image on VIA Connect PRO changes after rebooting VIA Connect PRO - Using VIA Connect PRO...
- Page 48 The user that clicked DND has full access to all features: DND Activated The other users can see a modified user interface that is only allows access to the Participants’ List. All other icons are grayed out: VIA Connect PRO - Using VIA Connect PRO...
- Page 49 Show Room Name on Wallpaper: This feature displays the Room Name (a standard IP address) on the VIA Connect PRO home screen. By default, it displays the current IP address, but you can change it to a Domain Name System (DNS) name if local DNS services are supported by the network.
- Page 50 Show Room Name / Code on second Display also: Supported only if there is a second display connected to the VIA Connect PRO unit. This feature allows you to show the Room Name on the wallpaper of the second...
- Page 51 4.8.1.5 Authentication There are three different moderator modes: VIA Connect PRO - Using VIA Connect PRO...
- Page 52 The space allocated to this specific icon will be left blank so you can reorganize manually the order of the icons by simply dragging them to your preferred scheduling. Make sure you click on “Apply” and Reboot your unit to apply these changes. VIA Connect PRO - Using VIA Connect PRO...
- Page 53 4.8.1.8 Webadmin Activity Log VIA Connect PRO - Using VIA Connect PRO...
- Page 54 Click on Utilities on the left menu and then select Maintenance. You can select one by one the default configurations you would like to reset or simply click on “select all” to reset to complete default factory settings. VIA Connect PRO - Using VIA Connect PRO...
-
Page 55: User Experience
User Experience VIA Connect PRO enables a high level of collaboration in meetings. Participants can share files, chat, edit a common document, or stream full HD (1080p/60) video content. Following is a summary of VIA Connect PRO functions: VIA Connect PRO - Using VIA Connect PRO... - Page 56 (photo, document or video) and choose to upload it to your cloud service account, for later usage. Note: Different devices enable different features depending on the device capabilities. See the following illustrations. VIA Connect PRO - Using VIA Connect PRO...
-
Page 57: Figure 21: Samsung Galaxy
Figure 21: Samsung Galaxy VIA Connect PRO - Using VIA Connect PRO... -
Page 58: Figure 22: Ipad
Figure 22: iPad VIA Connect PRO - Using VIA Connect PRO... -
Page 59: Figure 23: Iphone
Figure 23: iPhone VIA Connect PRO - Using VIA Connect PRO... -
Page 60: Figure 24: Pc
Figure 24: PC VIA Connect PRO - Using VIA Connect PRO... -
Page 61: Technical Specifications
11.8cm x 11.5cm x 4.0cm (4.6” x 4.5” x 1.6”) W, D, H. DIMENSIONS: NET WEIGHT: 0.475kg (1.0lbs) INCLUDED ACCESSORIES: 3 power cords (US, EU, UK), Kramer mini DP to VGA adapter, VESA mounting bracket Specifications are subject to change without notice at http://www.kramerelectronics.com VIA Connect PRO - Technical Specifications... - Page 63 For the latest information on our products and a list of Kramer distributors, visit our Web site where updates to this user manual may be found. We welcome your questions, comments, and feedback. Web site: www.kramerelectronics.com E-mail: info@kramerel.com SAFETY WARNING...
Need help?
Do you have a question about the VIA CONNECT PRO and is the answer not in the manual?
Questions and answers