Table of Contents
Advertisement
Quick Links
Operation and Maintenance Manual
SEM Model DS-400
MAN-020 | Created: 1/30/20 | ECN: 00510
For Serial Numbers: S400-1743 and up
For service, parts, and customer support, contact us:
SECURITY ENGINEERED MACHINERY
5 Walkup Drive • Westborough, MA 01581
service@semshred.com
1-508-366-1488
www.semshred.com
Advertisement
Table of Contents

Subscribe to Our Youtube Channel
Related Manuals for SEM DS-400


Summary of Contents for SEM DS-400
-
Page 1: Operation And Maintenance Manual
Operation and Maintenance Manual SEM Model DS-400 MAN-020 | Created: 1/30/20 | ECN: 00510 For Serial Numbers: S400-1743 and up For service, parts, and customer support, contact us: SECURITY ENGINEERED MACHINERY 5 Walkup Drive • Westborough, MA 01581 service@semshred.com 1-508-366-1488... -
Page 2: Table Of Contents
Table of Contents Operation and Maintenance Manual ............................. 1 SEM Model DS-400 ................................. 1 1. Safety Procedures ................................3 2. General Assembly Diagram ..............................4 3. Unpacking and Installation ..............................4 3.1 Unpacking ..................................5 3.2 Power ................................... 6 3.3 Plug and Receptacle Information ..........................6 3.4 Vacuum Installation Instructions .......................... -
Page 3: Safety Procedures
Opening the front door to bypass the timed shutdown can result in jams or damage to the unit. Important: SEM recommends that machine operators wear safety glasses, hearing protection, a mask, and if doing maintenance or opening the cutting chamber, cut resistant gloves. It is up to each customer to determine the PPE for their individual site. -
Page 4: General Assembly Diagram
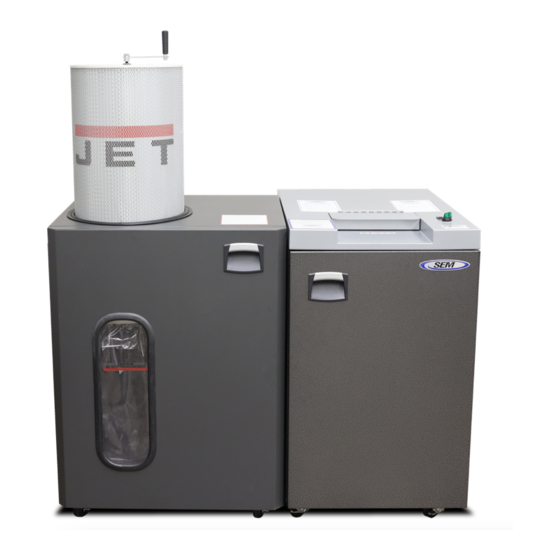
2. General Assembly Diagram Cartridge Filter Feed Door On-Off Selector Switch Disintegrator Cabinet Vacuum Cabinet semshred.com | 508.366.1488... -
Page 5: Unpacking And Installation
Important Note: Prior to unpacking, if there is any visible damage to the Model DS-400 or to the crate during shipping, the receiver must note what is damaged on the Bill of Lading and contact the shipping party immediately. -
Page 6: Power
3.2 – Power Power: The Model DS-400 uses a three horsepower, 3-phase motor to run its cutting chamber with a one horsepower single phase 120V vacuum motor run off of the main incoming power. The following table lists the recommended disconnects for the DS-400 which should be installed to local electrical code by a licensed electrician only. -
Page 7: Vacuum Installation Instructions
3.4 – Vacuum Installation Instructions Place the vacuum cabinet next to the disintegrator cabinet as shown so the holes in the sides are lined up with each other. Then open doors on the cabinets and feed the vacuum hose through the hole in the bottom of the right side of vacuum cabinet and fit over the angled tube of the transition in the disintegrator cabinet. -
Page 8: Startup And Operation
The Model DS-400 was designed to destroy solid state media, optical media, and paper products. But as with any type of office machine, it can be overloaded or jammed if overfed. Product destruction rate depends on the material, size, and desired particle size. -
Page 9: Shreddable Materials
Paper All capacitors, batteries, and liquid-crystal displays should be removed from solid state drives and other solid state media before running through the Model DS-400. This will often involve opening the product before running it through the unit. This unit is not intended for shredding rotational hard drives. Shredding rotational hard drives on this machine will cause damage to the machine and void your warranty. -
Page 10: Operation
Vacuum bag capacity is 35 gallons/approximately 200 sheets/5 reams of paper. Be sure to change this periodically. The line on the vacuum cabinet window shows SEM’s recommended fill point. Powering On: Turn the selector switch. The unit will start and illuminate the green operating lamp. -
Page 11: Maintenance
Serious injury or damage to the machine can occur. Warning: Shredded material can be sharp. SEM recommends wearing cut resistant gloves. Tools Needed: Phillips head screwdriver, pliers and other hand tools, vacuum (recommended vacuum listed with spare parts), cleaning solution (Windex/Simple Green) and rags/paper towels. -
Page 12: Screen Change/Removal
Depending on the media, shredded material may be sharp – be sure to wear all recommended PPE during maintenance. • Replacement screens and other screen sizes are available, contact SEM for details and prices. Nuts to remove 5.6 – Belts Tools &... -
Page 13: Knife Changing And Sharpening
25 hours of usage to avoid excess dust, noise, and potential jams. Note: SEM highly recommends that this work be completed by SEM trained technicians. Damage to equipment and harm to personnel may occur if work is not performed correctly. - Page 14 Spare Knives and Sharpening: To avoid downtime, it is always best to have a spare set of sharp knives on hand. SEM offers spare knives and sharpening services. Contact SEM customer service at 1-800-225-9293. Screen: It is recommended, but not required, to remove the screen from the chamber while changing the knives.
- Page 15 Bolts to remove Remove front and rear deflectors. Requires 1/2” wrench (Both sides) Front deflector Rear deflector Remove bolts from rotor knives and remove knives noting the edge orientation. • CAUTION – Knives are sharp. • Requires 5/16” Allen drive socket bit. Remove bolts from bed knives.
- Page 16 Rear bed knife Front bed knife clamp clamp Bed knife Bed knife Bed knife support Bed knife support Bed knives and clamp as seen from drive plate Install bed knife bolts with six 3/8-16” x 1-1/2" socket head cap screw and six 3/8” thick grey washer through top of clamp –...
- Page 17 Torque rotor knives to 50-55ft./lbs. Requires torque wrench and 5/16” Allen drive socket bit. Rotor knife bolt Set clearance between rotor and bed knives to .005” using adjustment screws and a feeler gauge, 10.) rotating the knives in reverse (clockwise) so flat-to-flat contact will not cut feeler gauge. •...
- Page 18 • Requires torque wrench and 5/16” Allen drive socket bit. • Torque wrench should not be used as a socket wrench and should be calibrated to ensure proper tightening to avoid damage. SEM offers a complete toolkit for this system. • Double check knife clearance after torqueing bolts.
- Page 19 Re-sharpening: Knives can be re-sharpened two to three times provided they are not significantly damaged or worn. Knives must be sharpened as a complete set (two bed knives, three rotor knives). Contact SEM customer service at 1-800-225-9293 for details or for replacement knives.
-
Page 20: Electrical Schematics
6. Electrical Schematics Electrical schematics are shipped in the electrical panel and available in PDF upon request. Contact customer care with your serial number. 7. Spare Parts ITEM DESCRIPTION PART/DWG# Spare Set of Knives (3 Rotor/2 Bed) designed for 391200K/3 Model 2 SSD/ DS400 Spare Sizing Screen (2 mm) designed specifically SSD-... - Page 21 For service, parts, and customer support, contact us: SECURITY ENGINEERED MACHINERY 5 Walkup Drive • Westborough, MA 01581 service@semshred.com 1-508-366-1488 www.semshred.com Follow us on social media: Facebook: https://www.facebook.com/semshred Twitter: https://twitter.com/semsecure Linkedin: https://www.linkedin.com/company/security-engineered-machinery Youtube: https://www.youtube.com/user/datadestruction semshred.com | 508.366.1488...
Need help?
Do you have a question about the DS-400 and is the answer not in the manual?
Questions and answers