Table of Contents
Advertisement
Quick Links
Advertisement
Table of Contents

Subscribe to Our Youtube Channel
Related Manuals for Eaton FlexPDU


Summary of Contents for Eaton FlexPDU
- Page 1 FlexPDU User Manual FlexPDU User Manual...
-
Page 2: Table Of Contents
FlexPDU User Manual Contents Ⅰ. Introduction..........................3 Ⅱ. Main functions..........................3 Ⅲ. Monitoring method........................3 Ⅳ. Applications..........................3 Ⅴ. Product sketch..........................4 Ⅶ. Mounting method........................4 Ⅷ. Hardware introduction....................... 5 1. Front panel introduction..................... 5 2.Initialization.......................... 5 3. Hardware settings.........................7 4. Daisy-chain connection...................... 8 Ⅸ. -
Page 3: Ⅰ. Introduction
Apply to single phase 100VAC~240VAC up to 63Amps, three phase 200VAC~400VAC up to 32Aamps and 100VDC~350VDC power source. The outlet type and quantity can be customized at request. FlexPDU is widely applied to the data centers of industries like network communication, telecom, electric power, finance, insurance, aerospace, transportation, information processing, education, medical, E-government etc. -
Page 4: Ⅴ. Product Sketch
Ⅵ. Instruction on the RS485 port and RJ45 terminal pin Color Instructions 1.Orange & White 2.Orange 3.Green & White RS485-A 4.Blue RS485-A 5.Blue & White RS485-B 6.Green RS485-B Brown & White 8. Brown Ⅶ. Mounting method FlexPDU products can be vertical installation. -
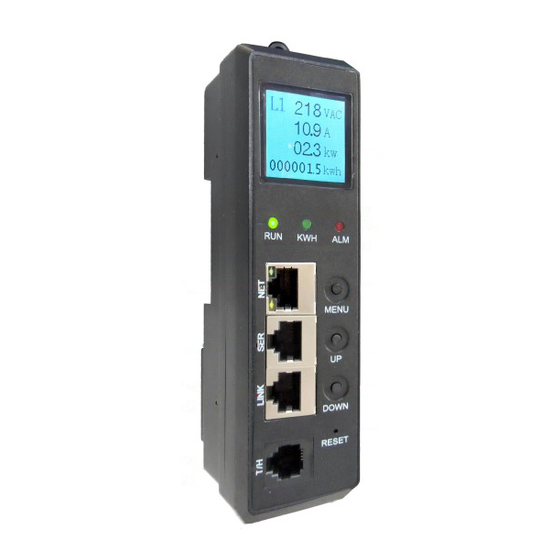
Page 5: Ⅷ. Hardware Introduction
2.Initialization When power on, the RUN indicator will flash and the FlexPDU works normally after initializing the LCD indicator and TFT screen. Following is the LCD displaying content introductions from the Direct current power , single phase and three phase power: 2.1 Direct Current modular:... - Page 6 FlexPDU User Manual 6th screen: the threshold of the temperature(40℃) and humidity(90%) (Figure 6) Temp Press MENU Press MENU Press MENU 192.168. 00.0 ℃ Baud TTON)键切换 1.165 00.0 9600 Addr 0 00% 000000.0KWh Figure 1) (Figure 2) ( (Figure 4)...
-
Page 7: Hardware Settings
FlexPDU User Manual 6th screen: the device IP, address code(from 0 to 4) (Figure 6) 7th screen: L1 threshold of the current (32A)and voltage(276VAC) (Figure 7) 8th screen: L2 threshold of the current (32A)and voltage(276VAC) (Figure 8) 9th screen: L3 threshold of the current (32A)and voltage(276VAC) (Figure 9) 10th screen: the threshold of the temperature(40℃) and humidity(90%) (Figure 10) -
Page 8: Daisy-Chain Connection
Ethernet Daisy-chain mode: (Figure 2) 4.2. Connect the each FlexPDU to the port from the HUB and connect the Net port from HUB to the internet. No limitation for the FlexPDU quantity. Please see figure Figure 3. 4.3 Connecting the Master net port with computer net port,then access via IE. -
Page 9: Ⅸ. Software Introduction
IP address in the address bar. The pop-up login window is illustrated as figure 1 Figure1 User will see the home page(as figure 2) after entering the correct user name and password (eaton/eaton) in the login dialog box... - Page 10 A. Device state: Click the Device State(AC or DC), user can check the current, voltage, power factor, Active power, Apparent power, energy consumption, Frequency, Temperature and Humidity senor of the FlexPDU as figure 2 Input: From the drop-down list to view the power date of L1,L2 or L3( Single phase module does not have drop-down list )...
- Page 11 FlexPDU User Manual C. PDU Settings as figure 4 a. PDU Settings PDU Name: fill the device name customer wants to define in the blank, then save it. Buzzer Mute: Set ON, enable alarm mute function, and alarm beeping sound is shut down.
- Page 12 FlexPDU User Manual Figure 5 U ser can revise the user name and password , the save it (the Max. length of user name and password is 10digits.) E. Networking Setting as figure 6 Figure 6 1. Networking Setting:...
- Page 13 FlexPDU User Manual HTTP Port: Default 80. IP Address: 192.168.1.163 (factory default IP Address) Subnet Mask: 255.255.255.0 Default Gateway: 192.168.1.1 DNS: factory default is 202.96.128.86 Please ensure the DNS address is correct so that email can be sent out. Note: Restarting software is necessary after a modification of the network settings.
- Page 14 Select Activity: user can restart the software or restore to factory default settings. After click “Save”, when FlexPDU buzzing, the software restart is successful. See below: Note: Press and hold the MENU button when power on to restore to factory settings.
-
Page 15: Snmp Access
FlexPDU User Manual Figure 9 2. SNMP access This software support SNMP V1, V2c and V3, a MIB file can be provided at customer’s request. User can view the power information and environment status and receive the alarming from the device. - Page 16 FlexPDU User Manual s3InputVoltage 1.3.6.1.4.1.534.6.6.8.2.4 Slave3 Input Voltage. s4InputVoltage 1.3.6.1.4.1.534.6.6.8.2.5 Slave4 Input Voltage. mVoltageA 1.3.6.1.4.1.534.6.6.8.2.6 Master Line1 Voltage. s1VoltageA 1.3.6.1.4.1.534.6.6.8.2.7 Slave1 Line1 Voltage. s2VoltageA 1.3.6.1.4.1.534.6.6.8.2.8 Slave2 Line1 Voltage. s3VoltageA 1.3.6.1.4.1.534.6.6.8.2.9 Slave3 Line1 Voltage. s4VoltageA 1.3.6.1.4.1.534.6.6.8.2.10 Slave4 Line1 Voltage. mVoltageB 1.3.6.1.4.1.534.6.6.8.2.11 Master Line2 Voltage.
- Page 17 FlexPDU User Manual mActPowerA 1.3.6.1.4.1.534.6.6.8.4.1 Master Line1 Active Power. s1ActPowerA 1.3.6.1.4.1.534.6.6.8.4.2 Slave1 Line1 Active Power. s2ActPowerA 1.3.6.1.4.1.534.6.6.8.4.3 Slave2 Line1 Active Power. s3ActPowerA 1.3.6.1.4.1.534.6.6.8.4.4 Slave3 Line1 Active Power. s4ActPowerA 1.3.6.1.4.1.534.6.6.8.4.5 Slave 4 Line1 Active Power. mActPowerB 1.3.6.1.4.1.534.6.6.8.4.6 Master Line2 Active Power.
- Page 18 FlexPDU User Manual s2EnergyA 1.3.6.1.4.1.534.6.6.8.6.3 Slave2 Line1 Energy. Magnified 10 times. s3EnergyA 1.3.6.1.4.1.534.6.6.8.6.4 Slave3 Line1 Energy. Magnified 10 times. s4EnergyA 1.3.6.1.4.1.534.6.6.8.6.5 Slave4 Line1 Energy. Magnified 10 times. mEnergyB 1.3.6.1.4.1.534.6.6.8.6.6 Master Line2 Energy. Magnified 10 times. s1EnergyB 1.3.6.1.4.1.534.6.6.8.6.7 Slave1 Line2 Energy. Magnified 10 times.
- Page 19 FlexPDU User Manual (1: normal 2: low 3: high) Slave2 Line1 Voltage Alarm. s2VolAlarmA 1.3.6.1.4.1.534.6.6.8.8.3 (1: normal 2: low 3: high) Slave3 Line1 Voltage Alarm. s3VolAlarmA 1.3.6.1.4.1.534.6.6.8.8.4 (1: normal 2: low 3: high) Slave4 Line1 Voltage Alarm. s4VolAlarmA 1.3.6.1.4.1.534.6.6.8.8.5 (1: normal...
- Page 20 FlexPDU User Manual Slave3 Line1 Current Alarm. s3CurAlarmA 1.3.6.1.4.1.534.6.6.8.9.4 (1: normal 2: low 3: high) Slave4 Line1 Current Alarm. s4CurAlarmA 1.3.6.1.4.1.534.6.6.8.9.5 (1: normal 2: low 3: high) Master Line2 Current Alarm. mCurAlarmB 1.3.6.1.4.1.534.6.6.8.9.6 (1: normal 2: low 3: high) Slave1 Line2 Current Alarm.
-
Page 21: Telnet Access
Slave 4 Phase. 3. Telnet access The application of Telnet enable the user to remotely manager the FlexPDU easily. The user can monitor and manage the device by entry the command line from the Telnet program. Telnet require the the customer terminal from the PC and there are free software like PUTTY available. The main command... -
Page 22: Ⅹ.technical Specification
FlexPDU User Manual line are as following: STATUS、REBOOT、RESET、HELP A、STATUS “STATUS”command line can be used to view the device states like amps/volts/kWh or temperature/humidity: Command form: STATUS【INDEX】 【INDEX】: 0 is master, 1-4 is slave For example:status 0:To view the amps/volts/kWh and temperature/humidity of the Master unit Note: the actual value should be 10time of displayed one B、REBOOT... - Page 23 Display direction:Vertical Accuracy:±1﹪ Resolution:0.1kWh Respond time:400ms Display method:LCD; Display direction:Vertical Material ABS+PC Physical Spec Color Black Build-in FlexPDU modular 155mm Dimension Hot-Swap FlexPDU 180mm modular Installation Vertical Total load current Input Voltage Monitor Total energy consumption(kWh) Total Power (kW) Temperature/humidity...
-
Page 24: Ⅺ. Quality Warranty
Ⅺ. Quality Warranty The FlexPDU warrants to be free for repairing in two years from the date of purchasing. During this period, our obligation is limited to repair, replace or return to our company for repair. If the product has been beyond the warrant for repairing time or it has been damaged by accident, negligence or misapplication, you should pay some repair charge.
Need help?
Do you have a question about the FlexPDU and is the answer not in the manual?
Questions and answers