
Related Manuals for Eaton Rack PDU G4 Series


Summary of Contents for Eaton Rack PDU G4 Series
- Page 1 R R a a c c k k P P D D U U G G 4 4 S S e e r r i i e e s s Installation and Setup Manual p/n: P-164001156 Revision 3...
- Page 2 All other trademarks are property of their respective companies. ©Copyright 2024 Eaton, Raleigh, NC, USA. All rights reserved. No part of this document may be reproduced in any way without the express written approval of Eaton.
- Page 3 1 1 I I n n t t r r o o d d u u c c t t i i o o n n ........................................................... . 1 1 1.1 Description..............................1 1.2 Product Specifications ..........................2 1.3 Eaton Rack PDU Models ..........................2 1.4 Circuit Protection............................3 1.5 Power Outlets ............................4 1.6 Input Power Cord ............................
- Page 4 1 1 . . 1 1 D D e e s s c c r r i i p p t t i i o o n n The Eaton® Enclosure Power Distribution Unit (Rack PDU ® ) G4 is an intelligent Rack PDU that is designed to distribute power within a standard 19-inch rack.
- Page 5 Product Specifications • Basic (BA) with no monitoring or intelligent controls • In-Line Metered (IL) with monitoring at the input • Metered Input (MI) with monitoring at the input and branch • Metered Outlet (MO) with monitoring at the input, branch, and individual outlet monitoring, but no outlet control •...
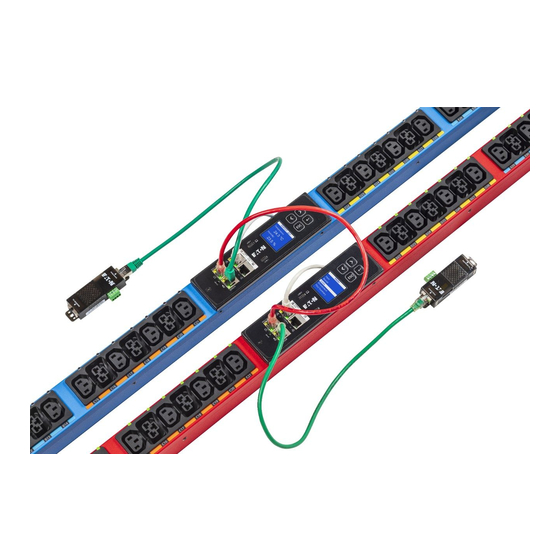
- Page 6 Circuit Protection F F i i g g u u r r e e 2 2 . . E E x x a a m m p p l l e e R R a a c c k k P P D D U U G G 4 4 P P r r o o d d u u c c t t s s Detatchable Input Cord Breaker A Breaker A...
- Page 7 Power Outlets Figure 3 shows circuit protection device examples. F F i i g g u u r r e e 3 3 . . C C i i r r c c u u i i t t P P r r o o t t e e c c t t i i o o n n D D e e v v i i c c e e s s 1 1 .
- Page 8 E E a a t t o o n n C C 3 3 9 9 w w i i t t h h H H i i g g h h R R e e t t e e n n t t i i o o n n Many Rack PDU G4 models have both IEC 60320 C13 outlets, as well as a proprietary Eaton C39 combination outlet.
- Page 9 This manual contains important instructions that you should follow during installation and operation of the Eaton Rack Power Distribution Unit (PDU) G4 Series. Please read all instructions before operating the equipment and save this manual for future reference. Failure to follow these instructions may result in severe injury or death.
- Page 10 I I n n s s t t a a l l l l a a t t i i o o n n All 0U Eaton Enclosure Power Distribution Unit (Rack PDU) G4 models are mounted vertically inside rack structures.
- Page 11 D D e e s s c c r r i i p p t t i i o o n n Eaton Rack PDU G4 Installation and Connectivity Quick Start Contains details for how to install the Rack PDU...
- Page 12 Optional Environmental Monitoring Probe T T a a b b l l e e 2 2 . . S S h h i i p p p p e e d d w w i i t t h h t t h h e e R R a a c c k k P P D D U U i i n n t t h h e e S S h h i i p p p p i i n n g g C C a a r r t t o o n n — — R R e e p p l l a a c c e e m m e e n n t t S S P P K K 0 0 4 4 5 5 ( ( C C o o n n t t i i n n u u e e d d ) ) Q Q u u a a n n t t i i t t y y D D e e s s c c r r i i p p t t i i o o n n (1) Red and (1) Blue Wrapping Labels...
- Page 13 Configurations 2 2 . . 9 9 C C o o n n f f i i g g u u r r a a t t i i o o n n s s You can install one or two Rack PDUs vertically on each side of the rack (see Figure F F i i g g u u r r e e 7 7 .
- Page 14 In particular it is designed to work well with Eaton rack enclosures with 11.5-12.5mm diameter slots and 1.5-2mm thick material, as well as TrippLite by Eaton 2-post and 4-post racks with 14mm diameter slots and 3mm thick material.
- Page 15 Installation and Mounting Buttons • Using flush-style buttons on the Rack PDU to mount it in the keyhole openings in the rack frame. Review the installation methods described in this section and choose the method appropriate for your environment. 2 2 . . 1 1 1 1 . . 2 2 U U s s i i n n g g F F a a c c t t o o r r y y - - i i n n s s t t a a l l l l e e d d M M o o u u n n t t i i n n g g B B u u t t t t o o n n s s To install the Rack PDU with the factory-installed shoulder-style mounting buttons: Carefully move the Rack PDU into position against the rail.
- Page 16 Installation and Mounting Buttons F F i i g g u u r r e e 1 1 0 0 . . S S e e c c u u r r i i n n g g t t h h e e R R a a c c k k P P D D U U 2 2 .
- Page 17 2 2 . . 1 1 2 2 Q Q u u i i c c k k S S t t a a r r t t f f o o r r U U n n i i v v e e r r s s a a l l I I n n p p u u t t R R a a c c k k P P D D U U Eaton Universal Input Rack PDUs are a highly versatile solution for meeting the challenges of powering today’s IT equipment.
- Page 18 Quick Start for Universal Input Rack PDU Gently pull, then rotate the cordset connector 90° ensuring that the screw holes in the PDU chassis line up with the corset panel assembly. Install the bottom assembly panel onto the PDU where the cordset assembly was initially located. Reinstall the screws.
- Page 19 Quick Start for Universal Input Rack PDU S S t t e e p p 3 3 : : C C o o n n n n e e c c t t t t h h e e C C o o r r d d S S e e t t t t o o t t h h e e P P D D U U To connect the cordset to the PDU: Rotate the cordset connector until the white line aligns with the large slot slot on the PDU connector.
- Page 20 Quick Start for Universal Input Rack PDU For Universal Input PDUs with G4 network card, the PDU input measurement mode defaults to "Auto-detect". In some cases this detection may be incorrect, and the mode may need to be manually configured in order to have proper display of input measurements and alarms.
- Page 21 Quick Start for Universal Input Rack PDU T T a a b b l l e e 3 3 . . C C o o r r d d S S e e t t O O p p t t i i o o n n s s P P a a r r t t N N u u m m b b e e r r P P l l u u g g T T y y p p e e I I n n p p u u t t V V o o l l t t a a g g e e...
- Page 22 Connect the power cord to a properly wired and grounded dedicated power source. The Rack PDU turns on and displays an Eaton startup screen while starting. After a period of inactivity, the LCD screensaver will begin cycling through different screens.
- Page 23 S S e e r r v v i i c c e e a a n n d d S S u u p p p p o o r r t t If you have any questions or problems with the Eaton Enclosure Power Distribution Unit (Rack PDU) G4, call...
- Page 24 P-1640011563 P-164001156 3...
Need help?
Do you have a question about the Rack PDU G4 Series and is the answer not in the manual?
Questions and answers