
Related Manuals for Stealth Products Drop Lock Hardware


Summary of Contents for Stealth Products Drop Lock Hardware
- Page 1 Seating Hardware USER MANUAL Drop Lock Hardware Stealth’s User Manual and Maintenance Guide for 2 or 4 Point Drop Lock Hardware...
-
Page 2: Customer Satisfaction
Customer Satisfaction Stealth Products strives for 100% customer satisfaction. Your complete satisfaction is important. Please contact us with feedback or suggested changes that will help improve the quality and usability of our products. You may reach us at: Stealth Products, LLC... - Page 3 Important Information Important Information! All persons responsible for fitting, adjustment, and daily use of the devices discussed in these instructions must be familiar with and understand all safety aspects of the devices mentioned. In order for our products to be used successfully, you must: ...
-
Page 4: Introduction
Ordering Documentation You can download additional copies of this User Manual on the Stealth website: https://stlpro.site/stealth-docs and search: Drop Lock Hardware User Manual in the search bar at the top of the page. -
Page 5: Warranty
Warranty Our products are designed, manufactured, and produced to the highest of standards. If any defect in material or workmanship is found, Stealth Products will repair or replace the product at our discretion. Any implied warranty, including the implied warranties of merchantability and fitness for a particular purpose, shall not extend beyond the duration of this warranty. -
Page 6: Table Of Contents
7.0 User Safety ....................1 7.1 User Safety/Warning Information ..............1 8.0 Parts and Accessories ................2 8.1 2 Point Drop Lock Hardware ................2 8.2 4 Point Drop Lock Hardware ................3 9.0 Installation Instructions ................ 3 9.1 Drop Lock Installation ..................5... - Page 7 Table of Contents 10.0 Mounting ....................7 11.0 Transit Checklist ................... 8 11.1 Before Transit ...................... 8 11.2 Pre-Transit ......................8 12.0 Chair Safety ................... 9 12.1 Chair Securement And Safety ..............9 13.0 Securing The Wheelchair ..............10 13.1 Guidelines ......................10 14.0 First Time Use ..................
-
Page 8: Warning Labels
Initial setup and driving should be done in an open area free of obstacles until the user is fully capable of driving safely. The Drop Lock Hardware should always be tested without any person sitting in the wheelchair until every alteration of the physical installation or adjustment is... -
Page 9: User Safety
Trays should be removed and secured in a safe location. A clear zone around the wheelchair occupant should be utilized. Any alterations or substitutions should not be made to the seating system or it’s parts and components without consulting Stealth Products. -
Page 10: Parts And Accessories
2 Point Drop Lock Hardware Drop Lock Hardware is offered in both 2-point and 4-point hardware for WC20 approved seating. This hardware is very clean and has no sharp edges. A basic setup of the 2 Point Drop Lock Hardware consists of:... -
Page 11: Point Drop Lock Hardware
Parts and Accessories 4 Point Drop Lock Hardware 4 Point Drop Lock Hardware includes the following hardware: Drop Lock Mount (4) NOTICE Seat to Back Bracket and Seat Tabs are not included with 4 Point Hardware. Standard cane size is 1”. -
Page 12: Installation Instructions
Installation Instructions Drop Lock Installation 2 Point Drop Lock Hardware includes: 1/4-20 x 5/8” Socket Head Screws (A) 1/4-20 x 1/2” Socket Head Screws & 1/4-20 Nylon Nuts (B) 1/4-20 x 3/4” Button Head Screws & 1/4-20 Flat Washers (C), (D) ... -
Page 13: Drop Lock Installation
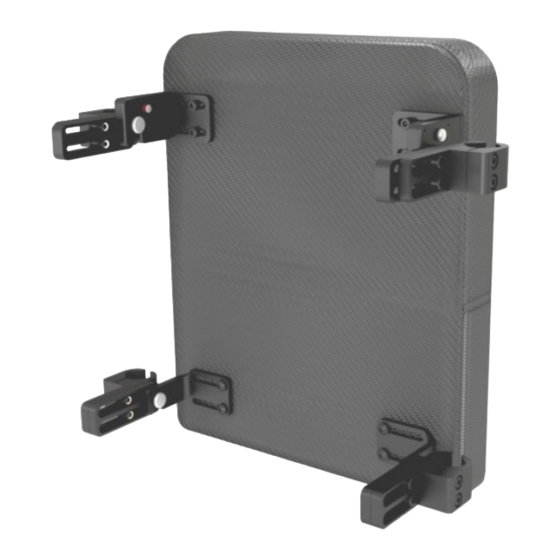
Installation Instructions 4 Point Drop Lock Hardware includes: 1/4-20 x 1 1/4 Socket Head Screws (A) 1/4-20 x 1/2 Socket Head Screws & 1/4-20 Nylon Nuts (B) 1/4-20 x 3/4 Button Head Screws & 1/4-20 Flat Washers (C) Mounting Instructions To mount the hardware to the canes, loosen the socket head screws (A). - Page 14 Mounting 10.0 Picture shown includes full assembly of 2 Point Drop Lock Hardware for the back: Picture shown includes full assembly of 4 Point Drop Lock Hardware for the back:...
-
Page 15: Mounting
Mounting 10.0 Picture shown includes full assembly of 2 Point Drop Lock hardware for seats: Picture shown includes full assembly of 4 Point Drop Lock hardware for seats:... -
Page 16: Transit Checklist
In the event that the chair is ever in an vehicular collision, check all hardware thoroughly for damage. If there are any signs of damage have a qualified tech inspect and replace the damaged components or send to Stealth Products for a complete overhaul to ensure future safety. -
Page 17: Chair Safety
Chair Safety 12.0 Chair Securement And Safety 12.1 The wheelchair occupant must be secured with dynamically crash-tested and approved pelvic and upper torso belts or with a five point child restraint harness as part of WTORS. Also, the pelvic belt should be angled between 45 and 75 degrees to the horizontal when viewed from the side. -
Page 18: Securing The Wheelchair
Securing the Wheelchair 13.0 General Guidelines 13.1 In order to meet WC20 standards, the chair must first abide by WC19 guidelines and have approved WTORS (SAE J2249). All guidelines and literature provided by the WTORS manufacturer must be followed. Always secure the wheelchair and occupant in a forward facing position in the vehicle. -
Page 19: First Time Use
Can the user safely operate the chair? Is the placement of the Drop Lock Hardware in an optimal position for the user? If needed, adjust the hardware to the proper position. Explain to the customer any possible issues and how to address them. -
Page 20: Maintenance
Maintenance 15.0 Care and Maintenance 15.1 Ensure the hardware you are using stays in working order by keeping it cared for and maintained. Periodically check the hardware for loose screws or worn parts. Replace or repair parts as needed. SAFETY ... - Page 21 NOTES 16.0...
- Page 22 NOTES 16.0...
- Page 23 NOTES 16.0...
- Page 24 Stealth Products, LLC. • info@stealthproducts.com • www.stealthproducts.com +1(800) 965-9229 | +1(512) 715-9995 | 104 John Kelly Drive, Burnet TX 78611 P91D03 Revision Date 2019-12-17...
Need help?
Do you have a question about the Drop Lock Hardware and is the answer not in the manual?
Questions and answers