
Related Manuals for Stealth Products i-Fit IFCS


Summary of Contents for Stealth Products i-Fit IFCS
- Page 1 i-Fit Positioning Products OWNERS MANUAL i-Fit Positioning Products Owner’s Manual for the i-Fit Line of Belts, Thoracic Supports, and Foot Positioners...
-
Page 2: Customer Satisfaction
Consult with your supplier for repair, adjustment, or replacement. If this document contains information you do not understand, or if there are concerns about safety or operation, contact your supplier. * i-Fit™ and Stealth Products™ are trademarks of Stealth Products, LLC. -
Page 3: Important Information
Important Information Important Information All persons responsible for fitting, adjustment, and daily use of the devices discussed in these instructions must be familiar with and understand all safety aspects of the devices mentioned. In order for our products to be used successfully, you must: ... -
Page 4: Introduction
Introduction Before you install or begin using Stealth Products’ i-Fit line, it is important that you read and understand the content of these installation and operating instructions. These installation instructions will guide you through the options and possibilities for the product. -
Page 5: Warranty
Any alteration or lack of serial number, where applicable, will automatically void this warranty. Stealth Products, LLC is liable for replacement parts only. Stealth Products, LLC is not liable for any incurred labor costs. No person is authorized to alter, extend, or waive the warranties of Stealth Products, LLC. -
Page 6: Table Of Contents
Table of Contents 1.0 Customer Satisfaction ................i 2.0 Important Information ................ii 3.0 Introduction ................... iii 4.0 Warranty ....................iv 5.0 Table of Contents ................... v 6.0 Warning Labels ..................ix 6.1 Warning Labels ..................... ix 6.2 Limited Liability ..................... ix 6.3 Testing ........................ - Page 7 Table of Contents 10.3 H-Harness ......................16 10.4 Back Pack Straps ....................17 10.5 Y-Straps ....................... 17 10.6 Chest Straps ....................... 18 Belt Anchor ......................18 Hook-and-Loop ....................18 10.7 Common Presentations................. 19 Trunk Kyphosis ....................19 Trunk Lordosis ....................19 Trunk Scoliosis ....................
- Page 8 Table of Contents 12.0 Installation Instructions ..............27 12.1 Pelvic Belt Installation ..................28 Fastened Tri-End ....................28 Tri-End and Around Seat Rail................28 Sliding Double-D Clip ..................29 Sliding Double-D Clip with Tri-End .............. 29 12.2 Posture Supports/H-Harness/Backpack Strap Installation ....30 Strap Risers ......................
- Page 9 Table of Contents 15.0 Maintenance................... 48 15.1 Care and Maintenance ................... 48 15.2 Cleaning ....................... 48 16.0 Notes ....................... 49 viii...
-
Page 10: Warning Labels
SAFETY be necessary. Limited Liability Stealth Products, LLC accepts no liability for personal injury or damage to property that may arise from the failure of the user or other persons to follow the recommendations, warnings, and instructions in this manual. -
Page 11: Design & Function
Design and Function Intended Use Stealth’s i-Fit line of pelvic belts, vests, chest straps and foot positioners are intended to be used as means to increase trunk stability, aid in proper pelvic alignment, and improving the clinical posture of a user in-chair through the use of breathable material and structured support. -
Page 12: Features
Design and Function Features Pelvic Positioning: 2-Point and 4-Point styles Single- or dual-pull tension straps Padded and non-padded, push-button and side-release options Offset belt anchors for easy adjustment without loosening the anchor bolts Flat belt anchors increase surface contact and minimize twisting Thoracic Positioning: ... -
Page 13: Important Reminders
Important Reminders Before using the i-Fit products, please keep the following in mind: DANGER Due to possibility of a user sliding while in-chair, unmonitored use of anterior thoracic support devices could pose a serious choking hazard. Continually ensure that the user is sitting upright and that the thoracic support device does not obstruct the user’s breathing in any way. - Page 14 Important Reminders WARNING These devices do not conform to ANSI/RESNA WC20 or SAE J224. Do not misuse belts or harnesses. WARNING Never use positioning belts or postural supports as motor vehicle restraints, unless they have been designed, tested, and labeled to do so. WARNING When transporting in a motor vehicle, only use in conjunction with restraints that have been designed for restraint in a motor vehicle and that have been...
-
Page 15: Pelvic Positioning
Pelvic Positioning... -
Page 16: Pelvic Positioning Belts
Pelvic Positioning Pelvic positioning impacts all aspects of proper seating and safety. Pelvic posi- tioning systems are placed anterior to the pelvis to maintain a neutral pelvic position (to the degree possible for each client). A correctly positioned pelvic support may: ... -
Page 17: Pads
Pelvic Positioning Pads When ordering pads for a) padded single-pull belts, b) padded dual-pull belts, or c) 4- point linear-style belts, reference the chart below: Belt Options Pad Sizes & Dimensions IFPB5110 IFPB5210 IFPB5310 IFPB6110 IFPB6210 Pad Size Pad Dimension (A x B) 3/4”... -
Page 18: 4-Point Belts
Pelvic Belts 4-Point Belts 4-Point belts are generally used for more aggressive pelvic positioning needs. The primary belt is attached at the desired angle to maintain the pelvis position. The secondary belt is designed to maintain the angle of the primary belt or to provide more control in two different areas. -
Page 19: Common Presentations
Pelvic Positioning Common Presentations The following sections detail common presentations of pelvic alignment and suggested belt usage. Anterior Pelvic Tilt Suggestion: Depending on the clinical outcome desired, attach the front straps of a 4- Point padded seat belt to the seat or frame at 60° or 90°. Attach the rear straps to the seat or frame at 30°... -
Page 20: Posterior Pelvic Tilt
Positioning Posterior Pelvic Tilt Suggestion: Depending on the clinical outcome desired, attach the front straps of a 4- Point positioning belt at 50° or more. This may help with sliding forward in the seat. This is extremely important if used in conjunction with an anterior positioning vest. -
Page 21: Pelvic Rotation
Positioning Pelvic Rotation Suggestion: Depending on the clinical outcome desired, use a 2 or 4-Point belt to secure the position of the non-rotated hip securely. The rotated side is adjusted and secured into position last (based on the range of flexibility). Belt Angle Common reference angle measurements referring to positioning belts’... - Page 22 Pelvic Positioning 45° 2-Point hip belt in position over the upper Correct placement of a 2-Point belt. thigh, pulling downwards and backwards. (Approximately 45°) 4-Point hip belt over the ASIS with main webbing running parallel to seat surface. CAUTION Never place a positioning belt or strap that applies force to the waist or abdomen.
-
Page 23: Thoracic Positioning
Thoracic Positioning... -
Page 24: Thoracic Positioning Items
Thoracic Positioning 10.0 Thoracic positioning impacts proper posture and safety. Thoracic trunk supports are placed in front of the trunk and are designed to keep the trunk aligned with the back of the seating system. A properly positioned trunk allows for: ... -
Page 25: Posture Support
Thoracic Positioning 10.0 Part Number Key: Chest Straps 1st Digit: 2nd Digit: 3rd Digit: 4th Digit: Prefix Fit Type Support Type Piece Type Sizing Options 1-Piece Small IFCS: i-Fit Chest Chest Strap Dynamic Function 2-Piece Medium Strap Large 3-Piece Part Number Key: Y-Straps 1st Digit: 2nd Digit: 3rd Digit:... -
Page 26: Contoured/Zipper
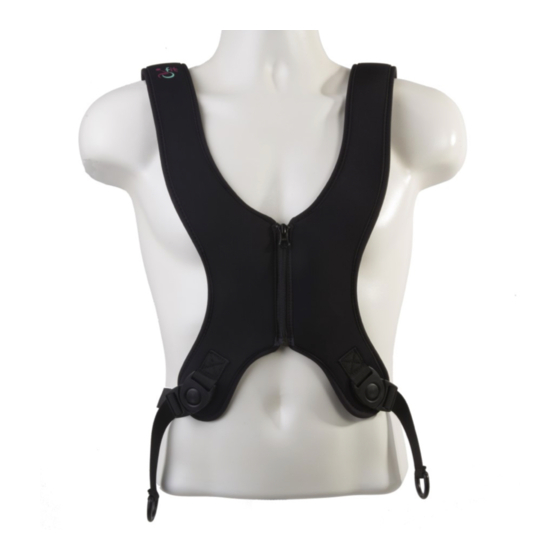
Thoracic Positioning 10.0 Contoured/Zipper The Contoured-style posture support has a narrower section over the sternum, making it a popular choice for female clients. Dynamic or Structured material is available. Vinyl Face is available. Pad Size Dimensions (A x B x C x D) 1/4”... -
Page 27: Back Pack Straps
Thoracic Positioning 10.0 Back Pack Straps 10.4 Back Pack straps have less contact with the client and help with shoulder retraction. Structured material is only available. No dynamic material. Straps can be mounted parallel or crossed over the front of the body. Pad Size Dimensions (A x B) 3/8”... -
Page 28: Chest Straps
Thoracic Positioning 10.0 Chest Straps 10.6 i-Fit chest straps are another form of anterior thoracic support and will help with providing additional trunk stability and proper alignment. The chest straps help prevent users with compromised trunk strength from falling forward.. Belt Anchor ... -
Page 29: Common Presentations
Thoracic Positioning 10.0 Common Presentations 10.7 Trunk Kyphosis Suggestion: Thoracic supports such as the H-Harness or Backpack Straps extend the trunk and retract the scapulae. A positioning support places the trunk over the pelvis, improves breathing, increases safe swallowing as well as head control, maintains a good visual field, and improves overall pressure distribution. -
Page 30: Foot Positioning
Foot Positioning... -
Page 31: Foot Positioning Items
Foot Positioning 11.0 Foot Positioning impacts proper seating and safety. Correct foot positioning results in: increased stability for function; sustained hip and knee positioning; Increased foot protection; improved foot circulation; the elimination of posterior pelvic tilt; and ... -
Page 32: Foot Positioner
Foot Positioning 11.0 Foot Positioner 11.2 The foot positioner is a foot positioning system that secures the foot in position but still allows movement. It consists of a base plate, ankle positioner pad, and toe strap. These three components can also be ordered separately if a custom configuration is necessary. ... -
Page 33: Footplate
Foot Positioning 11.0 Foot Plate Slots in the plates are ideal for foot rotation and positioning, and allow space for ankle supports and toe straps to be added if necessary. Foot Plate Footplate Size Dimensions (A x B) 3/4” 3/4” XS uses S foot plate) 1/4”... -
Page 34: Toe Straps
Foot Positioning 11.0 Toe Straps Toe straps limit aggressive foot rotation and are designed for durability. The strap and buckle has a curved design to comfortably rest on the client’s foot. Toe Strap Pad Size Replacement Size Dimensions (A x B) 1/4”... -
Page 35: Shoe Holder Pads
Foot Positioning 11.0 Shoe Holder Pads The shoe holder pad is made of structured material and is 1/4” thick with a hook-and- loop attachment underneath for easy application. Shoe Holder Pads Size Dimensions (A x B) 1/4” x 2” 3/4” x 2”... -
Page 36: Common Presentations
Foot Positioning 11.0 Common Presentations 11.4 The following details common presentations of adverse foot positioning and suggested usage: Knee Extension Suggestion: Foot positioners provide depth adjustability while keeping the foot in place and still allowing movement. Unequal Lower Leg Length Suggestion: Foot positioners and fixed ankle supports provide greater height adjustability. -
Page 37: Installation Instructions
Installation Instructions... -
Page 38: Pelvic Belt Installation
Installation Instructions 12.0 Pelvic Belt Installation 12.1 Pelvic belts may be installed in various manners depending on hardware, seating system, or wheelchair type. Many choices of aftermarket attachment hardware are available. Be sure to read and understand all instructions supplied with any aftermarket hardware. -
Page 39: Sliding Double-D Clip
Installation Instructions 12.0 Sliding Double-D Clip Sliding Double-D Clip with Tri-End CAUTION Ensure that the webbing is routed properly through the belt anchor and does not slip when pulled. Improper routing could cause the strap to become loose and slip from belt anchor. -
Page 40: Posture Supports/H-Harness/Backpack Strap Installation
Installation Instructions 12.0 The angles at which the thoracic supports attach to the seating system or wheelchair frame determine the effectiveness of the product for the user. Posture Support/H-Harness/Back Pack Strap Installation 12.2 Solid back should be roughly at shoulder height for anterior support to fit properly. If the strap is attached lower than the shoulders, it will pull the shoulders downward. -
Page 41: Installing T-Nuts And Bolts
Installation Instructions 12.0 Installing T-Nuts and Bolts Fasten tri-ends to the back with the t-nuts and bolts and attach the belt to tri-end. This will allow proper adjustment of the tension straps. CAUTION Check that the belt anchor is properly oriented and mounted flush to the chair. CAUTION Ensure that the bolts and t-nuts have been securely tightened. -
Page 42: Y-Strap
Installation Instructions 12.0 Y-Strap Installation 12.3 One end of the Y-Strap should cross over the shoulder at mid-clavicle and the other cross underneath the axilla on the same side of the body. The other end of the Y-Strap, with a single attachment point, should cross in front of the client’s body at an angle and attach on the opposite side, lower than the other two attachment points. -
Page 43: Foot Positioner Installation
Installation Instructions 12.0 Foot Positioner Installation 12.4 Toe Strap Step 1: Thread the toe strap webbing through the front slot of the foot plate. Step 2: Guide the webbing under the foot plate and back up through the slot on the opposite side of the plate. -
Page 44: Ankle Strap
Installation Instructions 12.0 Ankle Strap Step 1: Thread the strap of the ankle support through the back slot of the foot plate. Step 2: Guide the strap under the foot plate and back up through the slot on the opposite side of the plate. - Page 45 Installation Instructions 12.0 Step 4: Thread the strap over the post and back under and through the buckle. Pull the strap completely through, ensuring the strap is tight and secure. Step 5: To attach the back strap to the base of the foot plate, guide the webbing through the back slot and pull through.
-
Page 46: Buckle Installation
Installation Instructions 12.0 Buckle Installation 12.5 Swivel Buckle The swivel buckle is used on the following i-Fit products: Positioning Systems Y-Straps Step 1: To release the swivel buckle from the belt, push down on the button in the center of the male swivel buckle. -
Page 47: Side-Release
Installation Instructions 12.0 Side-Release The Side-Release Buckle is used on the following i-Fit products: Pelvic Belts Back Pack Straps Positioning Systems Shoe Holders Chest Straps Foot Positioners Y-Straps Step 1: To remove the side release buckle from the belt, push the prongs of the male buckle in, releasing the buckle from the female housing. -
Page 48: Push-Button
Installation Instructions 12.0 Push Button The Push Button is used on i-Fit pelvic belts. Step 1: To remove the push button from the belt, push down on the female buckle with the i-Fit logo, releasing the buckle from the female housing. Step 2: Remove the male push button and attached buckle from the female buckle. -
Page 49: Shoe Holder Strap Installation
Installation Instructions 12.0 Shoe Holder Strap Installation 12.6 Female Buckle Installation To install the first strap on the foot positioner: Step 1: Start by sliding the strap up through the first slide of the buckle from the bottom. Thread the strap over the first slide and back down through the buckle. Step 2: Place the end of the strap through the precut slot at the top of the foot positioner from the inside going out and pull all the way through. - Page 50 Installation Instructions 12.0 Step 3: With the remaining length of the strap, loop back up and lead under the buckle and up in between the two slides. Step 4: Thread the strap over the second slide and down through the buckle. Pull the strap through until it is tight.
-
Page 51: Male Buckle Installation
Installation Instructions 12.0 Male Buckle Installation To install the male buckle and strap onto the foot positioner: Step 1: Turn the buckle down, with the bottom of the buckle facing up. Slide the strap through the first slide, moving right to left. Thread the strap under the post and back up through the second slide. - Page 52 Installation Instructions 12.0 Step 3: Guide the end of the strap under the first slider. Step 4: Thread the strap over the post and down through the buckle. Pull the strap through until it is tight. Adjust the strap to the desired length. Front View...
-
Page 53: Retractable Seat Belt Installation
Before Each Use 13.0... - Page 54 Installation Instructions 12.0...
-
Page 55: Before Each Use
Before Each Use 13.0 Before Each Use 13.1 Positioning belts, straps and posture supports are NEVER to be used: as client restraints; on a user who is comatose or agitated; or as a motor vehicle restraint without the correct use of approved transit restraint. Safety Checklist 13.2 ... -
Page 56: Simulation
Before Each Use 13.0 Simulation 13.3 As with any sort of positioning intervention, the best way to judge necessary intervention forces and the angles in which they should be applied, is to simulate the forces with your hands. Use your hands to: ... -
Page 57: First-Time Use
First Time Use 14.0 First-Time Use 14.1 During first-time use by the client, it is advised that the dealer or service technician assists and explains the configuration to the customer (the user and/ or the attendant). If needed, the dealer can make final adjustments. User Testing 14.2 It is important that the customer is fully aware of the installation and what can... -
Page 58: Maintenance
We recommended that all products be checked for wear and function on a periodic basis and replaced, if necessary, by a wheelchair professional. Repairs should be done with Stealth Products parts, fasteners, or items appropriate for the service needed. ... -
Page 59: Notes
NOTES 16.0... - Page 60 Stealth Products, LLC. • info@stealthproducts.com • www.stealthproducts.com +1(800) 965-9229 | +1(512) 715-9995 | 104 John Kelly Drive, Burnet TX 78611 P72D09 Revision Date 2019-03-07...
Need help?
Do you have a question about the i-Fit IFCS and is the answer not in the manual?
Questions and answers