
Related Manuals for Stealth Products ADI Aluminum Series


Summary of Contents for Stealth Products ADI Aluminum Series
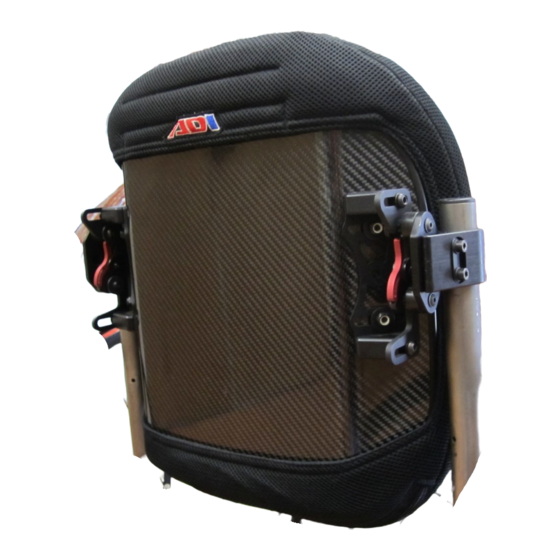
- Page 1 Quick Reference Quick Release Mounting Hardware For All Aluminum & Carbon Series Back Supports...
- Page 2 Customer Satisfaction Stealth Products strives for 100% customer satisfaction. Your complete satisfac- tion is important. Please contact us with feedback or suggested changes that will help improve the quality and usability of these products. You may reach us 104 John Kelly Drive, Burnet, TX 78611...
- Page 3 Important Information Important Information! All persons responsible for fitting, adjustment, and daily use of the devices discussed in these instructions must be familiar with and understand all safety aspects of the devices mentioned. In order for our products to be used suc- cessfully, you must: ...
-
Page 4: Introduction
Introduction Installation Date: Dealer: Dealer Stamp: Serial Number: For UK warranty claims, please contact: MDSS GmbH Schiffgraben 41 30175 Hannover, Germany... -
Page 5: Warranty
Covers: 180 days Hardware: 5 years Electronics: 5 years Limitations Stealth Products, LLC does not warrant damage due to, but not limited to: Misuse, abuse, or misapplications of products. Modification of product without written approval from Stealth Products, LLC. -
Page 6: Table Of Contents
Table of Contents 1.0 Customer Satisfaction……………………………………………………………….…i 2.0 Important Information…………………………………………………………….….ii 3.0 Introduction………………………………………………………………………….….iii 4.0 Warranty…………………………………………………………………………….…...iv 4.1 Limitations………………………………………………………………………………………………iv 5.0 Table of Contents………………………………………………………………………v 6.0 Warning Labels………………………………………………………………………...vi 6.1 Warning Labels……………………………………………………………………………………….vi 6.2 Limited Liability……………………………………………………………………………………….vi 6.3 Testing…………………………………………………………………………………………………….vi 7.0 Parts and Accessories………………………………………………………………..vii 7.1 Tools Required for Installation & Adjustment………………………………………..vii 7.2 Parts Required……………………………………………………………………………………..…vii 8.0 Positioning……………………………………………………………………………….1 8.1 Torque Specification………………………………………………………………………………..1... -
Page 7: Warning Labels
SAFETY necessary. Limited Liability Stealth Products, LLC accepts no liability for personal injury or damage to property that may arise from the failure of the user or other persons to follow the recommendations, warnings, and instructions in this manual. Testing Initial setup and driving should be done in an open area free of obstacles until the user is fully capable of driving safely. -
Page 8: Parts And Accessories
Parts and Accessories Tools Required for Installation & Adjustment 4mm Allen Wrench 10mm wrench Parts Required Back Support Shell, 1 each (A) U-Block Assembly, 2 each, attached to back (BR1104)(B) Quick Release Back Post Clamp, 2 each (BR1100)(C) ... - Page 9 Parts and Accessories NOTICE Only use the hardware supplied with the ADI back on the ADI back; do not substitute any other screws, brackets, or clamps. Use of alternative hardware of mounting brackets voids all warranty. viii...
-
Page 10: Positioning
Positioning Torque Specification Part Number: HBR020 Part Number: HBR027 M6 x 20mm Button Head SS 10-32 x .5” button head, 18-8S/S Use: 4mm Drive Allen Wrench Use: 1/8” Drive Allen Wrench Torque Spec: 77.0 in-lbs/8.7 N-m Torque Spec: 31.7 in-lbs/3.6 N-m Part Number: HBR022 (for 3/4”... -
Page 11: Installation Instructions
Installation Instructions Step 1 Fasten Quick Release Latch Assembly to U-Block NOTICE It is essential that the included split lock washers (HBR066/4 each) be used at all four attachment points to maintain desired angle and depth adjustment of back. 4mm Allen Wrench Required Insert m6 screw (x2) into lock washer and attach latch assembly to left and right side U- block. -
Page 12: Step 2
Installation Instructions Step 2 Fasten Quick Release Clamp Assembly to Wheelchair Back Post 4mm Allen Wrench Required Remove existing wheelchair back according to the original manufacturer’s instructions. Visually determine the desired height of your new ADI back support. Mark on each back post the needed location to attach clamp assemblies. -
Page 13: Step 3
Installation Instructions Step 3 Mounting Hardware Alignment NOTICE For ease of installation & removal, make sure both the clamp and latch assembly are aligned properly. Clamp Alignment: Latch Assembly Alignment: Align clamp assembly parallel to the seat frame Make sure the receiving hooks of the latch by rotating as needed. -
Page 14: Step 4
Installation Instructions Step 4 Attaching Quick Release Back to Mounting Clamps Receiving Post Centered Hooks Bottom Receiving Post With back tilted slightly forward, lower the left and right bottom hooks onto the bottom Centered receiving posts. After bottom hooks are in position, tilt back support rearward until top hooks are fully engaged onto top receiving posts. -
Page 15: Step 5
Installation Instructions Step 5 Height Adjustment CF Series: With a 4mm Allen Wrench, loosen left and right clamp assembly screws and slide clamp up or down. Height Adjustment AL Series: Repeat steps above, or loosen 10mm hex nuts and slide back up or down to achieve desired height. -
Page 16: Step 6
Installation Instructions Step 6 Quick Release Removal of Back Support Lift both right and left locking levers to the “Up” unlocked position. Lift back support UP and OUT at a slight angle. After back support is clear of mounting hardware, remove from wheelchair back post. Protect all backs from blunt forces that may cause damage and/or CAUTION breakage. -
Page 17: First Time Use
First Time Use 10.0 Dealer Assistance 10.1 During first time use by the client, it is advised that the dealer or service techni- cian assists and explains the set-up to the customer (the user and/or the at- tendant). If needed, the dealer can make final adjustments. Do not attach the back with the user in the chair. -
Page 18: Maintenance
Maintenance 11.0 Cleaning 11.1 Use a soft cloth to clean back shell. Hand wash foam pad cover with mild, soapy water or detergent, and let dry. Foam pad should not get wet. Do not hand wash in water temperatures about 160°F (70°C). WARNING SAFETY Institutions MUST clean and disinfect product between multiple patient uses. - Page 19 NOTES 12.0...
- Page 20 Stealth Products, LLC. • info@stealthproducts.com • www.stealthproducts.com +1(800) 965-9229 | +1(512) 715-9995 | 104 John Kelly Drive, Burnet TX 78611 P116D228R3 Revision Date 2016-02-16...
Need help?
Do you have a question about the ADI Aluminum Series and is the answer not in the manual?
Questions and answers