Advertisement
Quick Links
11. Connect the 4-pin JST connector on the driver to the pigtail
harness to your desired 12V signals, determining when the LEDs will be turned on. In the
table below, we have listed the suggested wires to tap.
IMPORTANT: DO NOT plug the LED panel directly into controller without the driver.
The LEDs must be plugged into driver first to control the power.
Upper and Lower DRL
DD WIRE
FUNCTION
WHITE*
Low White, 50% Brightness
BLACK
Ground
YELLOW
Turn Signal
RED*
High White, 100% Brightness
BLUE
Park/DRL
(Solid State)
* Optional override white, do not connect for manual control of colors at all times.
OPTIONAL: DRL Override Feature - This feature allows you to automatically switch the LEDs
to a high-brightness White color when power is applied to the red input signal, "overriding" the
controller color selected. We recommend connecting this to ignition power using the supplied DRL
Power Wire Harness, to automatically switch to White when the vehicle is running. This allows you
to leave the LEDs set to an accent color of your choice, then automatically switch to White while
driving. If you would like to adjust the colors manually at all times, you can skip this feature by
leaving the signal disconnected.
12. Connect the DRL Power Wire harness to the Add a Fuse
the Add a Fuse. Reinstall the OEM fuse in the open slot closest to the pins on the Add a Fuse.
NOTE: If you are installing both the upper and lower DRL boards, tap the red wire from the
pigtail to the DRL power wire harness that was previously installed. You will not need the
second DRL harness.
13. Next, route the DRL harness wires to the headlight harness on each side of the vehicle.
Connect the red wire from the DRL Power Wire harness to the red wire on each driver.
14. Mount drivers and controller, and tuck all wires. Drivers should be mounted outside
of headlight for serviceability, in a location away from the engine block to avoid excessive
head buildup. Test thoroughly, reseal headlights and reinstall onto vehicle.
This installation guide is for the following SKUs:
3 YEAR
DD2222 Camaro 2016 RGBWA DRL Boards
WARRANTY
DD2242 Camaro 2016 RGBWA Lower DRL Boards
PAGE 4
(314) 205-3033
. Tap the wires on the
F
HARNESS
DRIVER
PASSENGER
PIN
LOCATION
WIRE
WIRE
PIN 1
Headlight
Yellow
Yellow
PIN 2
Headlight
Black
Black
PIN 1
Turn Signal
Blue/White
Green/Violet
F40
Fuse Box
DRL Power Wire Harness
PIN 8
Headlight
N/A
Blue/Brown
. Then replace fuse F40 with
G
WWW.DIODEDYNAMICS.COM
PP0082
RGBWA
Thank you for your purchase of this unique product for your Chevrolet
Camaro! With these modules, you will be able to convert your factory
LEDs inside the headlight into full multicolor functionality, along with an
amber turn signal feature. They are a direct replacement for the factory
LED panels inside the light.
Please note: Headlights must be opened before proceeding with installation. Before baking the
headlight, remove the T20 torx screws holding the ballast to the housing and the three T20 torx
screws holding the LED driver to the housing. Disconnect the OEM harness from ballast. Professional
installation is strongly recommended. Please contact Diode Dynamics if you need assistance locating
an installer.
Tools Needed: Torx T10 and T20 Screwdriver
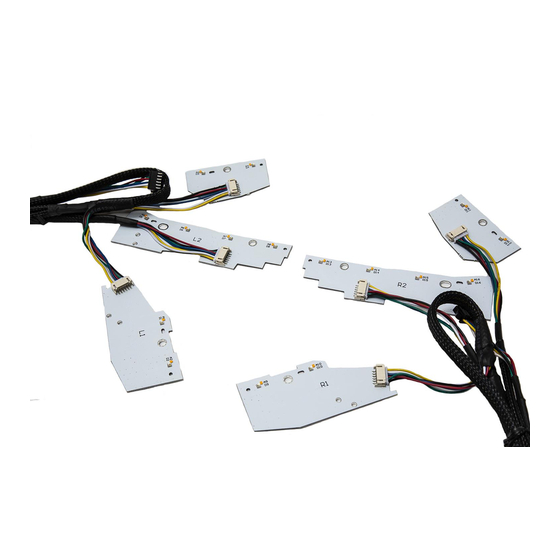
Upper DRL Board Installation:
2016 - 2018 Chevrolet Camaro
DRL LED Board Installation Guide
TM
1. Remove the six T20 torx screws holding the black
bezel in place, including the screw on the backside of
the housing. Set the bezel aside.
Remove the four T20 torx screws holding the white
optics shroud in place and remove the optics shroud
from the assembly.
RGBWA
PAGE 1
Advertisement

Related Manuals for Diode Dynamics RGBWA DRL DD2222


Summary of Contents for Diode Dynamics RGBWA DRL DD2222
- Page 1 NOTE: If you are installing both the upper and lower DRL boards, tap the red wire from the installation is strongly recommended. Please contact Diode Dynamics if you need assistance locating pigtail to the DRL power wire harness that was previously installed. You will not need the an installer.
- Page 2 T20 torx screws holding the reflector in place. Remove the three T20 torx screws holding the LED board to the reflector. Remove the factory board and replace with your new Diode Dynamics LED board using the orignal screws. 3. Install your new Diode Dynamics LED boards.
Need help?
Do you have a question about the RGBWA DRL DD2222 and is the answer not in the manual?
Questions and answers