Right Weigh 201-EBT-04B Installation & Operation Manual
Onboard load scale, exterior digital
Hide thumbs
Also See for 201-EBT-04B:
- Installation & operation manual (40 pages) ,
- Installation, calibration, and maintenance log (4 pages) ,
- Installation and maintenance (4 pages)
Table of Contents
Advertisement
Quick Links
Advertisement
Table of Contents

Related Manuals for Right Weigh 201-EBT-04B


Summary of Contents for Right Weigh 201-EBT-04B
- Page 1 ONBOARD LOAD SCALE EXTERIOR DIGITAL 201-EBT-04B...
- Page 2 WELCOME Thank you for choosing to drive more and scale less! Here at Right Weigh, we are committed to making our products simple to install and easy to use. We understand that installation can vary between vehicles and yours may not be described in this manual. In any event, our technical support team is ready to answer your questions! (503) 628-0838...
-
Page 3: Table Of Contents
EXTERIOR DIGITAL 201-EBT-04B The Bluetooth® word mark and logos are registered trademarks owned by Bluetooth SIG, Inc. and any use of such marks by Right Weigh, Inc. is under license. Other trademarks and trade names are those of their respective owners. -
Page 4: Specifications & Overview
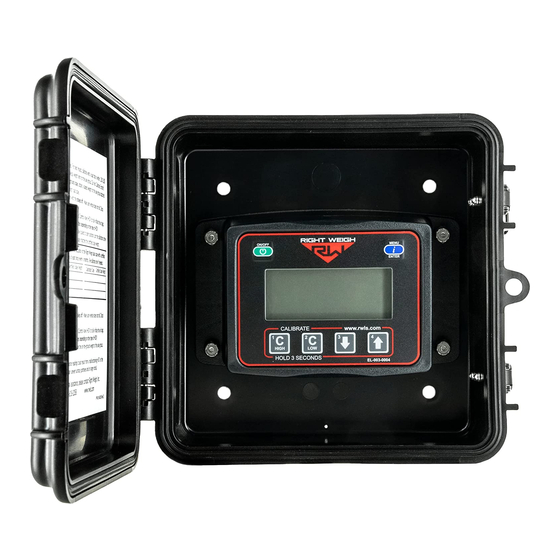
SPECIFICATIONS & OVERVIEW The Right Weigh 201-EBT-04B digital load scale has four internal air pressure sensors. This scale can monitor a tandem axle air suspension drive group where all 4 air bags can have differing pressures. The 4 pressures are averaged together so that a weight can be properly calculated. - Page 5 SCALE INSTALLATION & ELECTRICAL CONNECTIONS The 201-EBT-04B scale is designed to be mounted on the outside of a truck or trailer - a protective box and mounting bracket are included. The following steps will walk you through how to correctly mount and install the scale.
-
Page 6: Scale Installation And Electrical Connections
SCALE INSTALLATION & ELECTRICAL CONNECTIONS INSTALL NEW 1/4” AIR LINE Insert a street tee fitting into the top of the air bag that Insert new air line and Insert suspension air line matches the thread size of the tting into the tee tting and tting into the tee tting vehicle suspension. - Page 7 SCALE INSTALLATION & ELECTRICAL CONNECTIONS AIR UP SUSPENSION AND CHECK FOR LEAKS CONNECT TO POWER AND GROUND Use wire on the back of the gauge to connect to power and ground. Be sure the RED wire is connected to a SWITCHED positive (+) power source (DO NOT CONNECT DIRECTLY TO BATTERY) and the BLACK wire to chassis ground (-).
-
Page 8: Scale Operating Modes
SCALE OPERATING MODES The next few pages cover the operation modes that are built into the 201-EBT-04(B). The load scale can only be setup in one operating mode at a time. If the mode is changed, the calibration data will be reset to factory defaults, requiring re-calibration. -
Page 9: Sensor Average + Estimated Steer Mode
SCALE OPERATING MODES SENSOR AVERAGE + ESTIMATED STEER MODE (S-AVG) In Estimated Steer mode, a 201-EBT-04(B) installed on a tractor drive axle group can also estimate the steer axle weight. In this mode, there is a small number in the lower left of the display - either 1, 2, or 1 & 2 simultaneously - to let you know which axle group is being displayed. - Page 10 SCALE OPERATING MODES INDEPENDENT MODE (IDP) In Independent mode, a 201-EBT-04B can monitor 4 separate axle groups with one height control valve on each. In this mode, there are small numbers on the bottom left of the display to indicate the axle group being monitored (1, 2, 3, 4, or 1 2 3 4 simultaneously).
-
Page 11: Calibration
CALIBRATION The 201-EBT-04B load scale must be calibrated both empty and loaded to work properly. The scale associates the air pressure in the suspension system to the weight you enter at the time of calibration. You will need to calibrate once while the vehicle is empty, and again while the vehicle is loaded for each axle group being monitored. - Page 12 HCV to refill the system. 4: Press the ON/OFF button to turn on the Right Weigh load scale. 5: For S-AVG, 4CAL, and IDP modes, press the blue MENU button to select the proper axle group or calibration set.
-
Page 13: Operating & Weighing
4: Press the ON/OFF button to turn on the Right Weigh load scale. 5: Adjust the suspension or the load itself until the Right Weigh load scale displays a weight value below your legal limit. 6: For S-AVG and 4CAL, press the blue MENU button. -
Page 14: Security Pin Code
SETTING SECURITY PIN CODE Adding a security PIN will prevent tampering with the gauge. Once set, the PIN will be required to change calibration data and to change the PIN code. With the gauge off, hold both the PRESS C LOW and C HIGH buttons, then press the ON/OFF button and release all three. - Page 15 CHANGING SECURITY PIN CODE PRESS With the gauge off, hold both the C LOW and C HIGH buttons, then press the ON/OFF button and release all three. HOLDING Press the MENU button and PRESS “-----” will display on the screen. Enter the previous PIN code.
-
Page 16: Setting
OVERWEIGHT WARNING The overweight warning can be added as a visual warning to the driver to flash anytime the gauge reads above a set weight. With the scale turned on, press and hold both the C HIGH and C LOW buttons until the “C/H” symbol appears. -
Page 17: General Information
RWLS APP - General Information RIGHT WEIGH LOAD SCALES APP Go to the Google Play or App Store and download the Right Weigh Load Scales App! Share Print Menu Gross and Net Weight Tare Weight Scale Name Connection Status Axle Group... - Page 18 (storage frequency dependent on save settings), seeing the app settings, and will take you to a support page for more information on how to contact Right Weigh, Inc. SHARE The share icon will allow you to send your weight data via email or text message.
-
Page 19: Connecting To Gauge
RWLS APP - Connecting To Gauge HOLD PRESS With the gauge off, hold down the MENU button, press the ON/OFF button, and release both simultaneously. PRESS Press the MENU button twice to see the unique identifier. Once the app has been downloaded and opened, you will see the home screen with no gauge connected to it and a gross weight of “0”. - Page 20 RWLS App - Connecting To Gauge On the app home screen, press the “Add Gauge” button on the bottom right and choose whether or not the PRESS gauge is connected to the truck or trailer. CHOOSE SELECT Select the gauge that matches the unique identifier name from step 3 to add the gauge to your home screen.
-
Page 21: Details Screen
RWLS APP - Details Screen To get to the scale details screen, press on the scale name from the home page. This page will display information for that specific scale and includes the ability to rename the scale. RENAME THE SCALE To re-name the scale, select the pencil icon to the right. -
Page 22: Settings Screen
RWLS APP - Settings Screen To get to the settings screen, press the menu button on the top left of the home screen and navigate to “Settings” CHANGING UNITS Change the units to either pounds (LB) or kilograms (KG) SET WARNING AND OVERLOAD WEIGHTS Set warning and overload weight limit defaults... -
Page 23: Troubleshooting
If the HCV is not functioning correctly, the air pressure applied to the suspension system could be inconsistent and/or erratic. To test for an HCV problem, acquire a weight reading from the Right Weigh gauge and write it down (refer to gauge operating instructions for proper procedure). Drive the vehicle around the block and return to the same location. - Page 24 TROUBLESHOOTING APP WON’T CONNECT TO THE GAUGE Scale is connected to a constant power source: The gauge should never be connected to a constant power source, rewire so that it is connected to a switched power source. If the gauge is powered too long it can stop transmitting a Bluetooth signal and may need to be disconnected and reconnected to work again.
- Page 25 The following is a list of additional parts needed for one air line installation. This list is just a suggestion and may not be all of the parts needed for your specific vehicle. Check with your Right Weigh dealer for optional installation kits.
- Page 26 APPENDIX B It is very important that all wiring connections be made watertight. Connections which are not watertight can allow moisture to travel through the individual strands of the wires and make it’s way into the scale, causing permanent damage to the electronics. Heat shrinkable splices are included in the 201-SK Installation Kit.
- Page 27 Right Weigh, Inc. will return the product at its expense via a shipping method (carrier to be at sole discretion of Right Weigh, Inc.) equal to or faster than the method used by the customer. Products or parts thereof not covered by warranty will be repaired or replaced at customer expense upon authorization by the customer.
- Page 28 For additional support contact: Australia and New Zealand: Smart Truck Solutions +61 418 622840 rightweigh.com.au United States and Canada: Right Weigh, Inc. (503) 628-0838 (888) 818-2058 - Toll Free (USA ONLY) www.rwls.com support@rwls.com ©2015-2020 Right Weigh, Inc. All rights reserved.
Need help?
Do you have a question about the 201-EBT-04B and is the answer not in the manual?
Questions and answers