Table of Contents
Advertisement
Quick Links
C
ONTENTS
Important User Information . . . . . . . . . . . . . . . . . . . . . . . . . . .2
General . . . . . . . . . . . . . . . . . . . . . . . . . . . . . . . . . . . . . .2
Manufacturer . . . . . . . . . . . . . . . . . . . . . . . . . . . . . . . . .2
Intended Use . . . . . . . . . . . . . . . . . . . . . . . . . . . . . . . . .2
Warranty . . . . . . . . . . . . . . . . . . . . . . . . . . . . . . . . . . . . .2
Required Tools . . . . . . . . . . . . . . . . . . . . . . . . . . . . . . . . . . . .2
Note: Please read and understand these instructions before assembling the parts.
Note: Remove all items from the shipping cartons and arrange them in a convenient location.
Refer to the illustrations on the following pages.
If you need additional information, contact Wenger Corporation using the information below.
Note: For easier assembly, two people are recommended.
©Wenger Corporation 2012
Wenger Corporation, 555 Park Drive, P.O. Box 448, Owatonna, Minnesota 55060-0448
Questions? Call.....USA: 1-800-4WENGER (493-6437) • Worldwide: 1-507-455-4100 • www.wengercorp.com
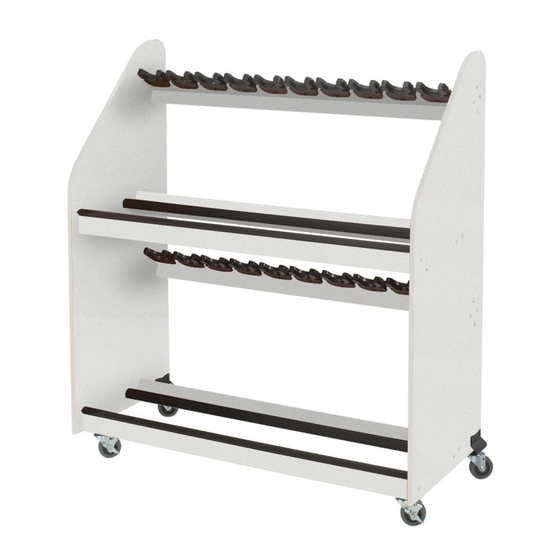
Guitar Storage Rack
Fastener Parts List . . . . . . . . . . . . . . . . . . . . . . . . . . . . . . . . .3
Parts List . . . . . . . . . . . . . . . . . . . . . . . . . . . . . . . . . . . . . . . . .3
Assembly . . . . . . . . . . . . . . . . . . . . . . . . . . . . . . . . . . . . . . . .4
Operation . . . . . . . . . . . . . . . . . . . . . . . . . . . . . . . . . . . . . . . .14
Secure an Instrument . . . . . . . . . . . . . . . . . . . . . . . . . . . . . . .14
Replacement Parts . . . . . . . . . . . . . . . . . . . . . . . . . . . . . . . . .15
Printed in USA 10/12
Assembly Instructions
Part #148J325-01
Advertisement
Table of Contents

Subscribe to Our Youtube Channel
Related Manuals for Wenger Guitar Storage Rack


Summary of Contents for Wenger Guitar Storage Rack
-
Page 1: Table Of Contents
Note: Remove all items from the shipping cartons and arrange them in a convenient location. Refer to the illustrations on the following pages. If you need additional information, contact Wenger Corporation using the information below. Note: For easier assembly, two people are recommended. -
Page 2: Important User Information
Wenger Corporation. Wenger Corporation does not assume any responsibility for any errors that may appear in this manual. In no event will Wenger Corporation be liable for technical or editorial omissions made herein, nor for direct, indirect, special, incidental, or consequential damages resulting from the use or defect of this manual. -
Page 3: Fastener Parts List
ASTENER ARTS Phillips Truss Insert Nut, Head Screw, 1/4-20 #8 x 5/8” Machine Screw, Cap Nut, Carriage Bolt, 1/4-20 x 0.79” 1/4-20 5/16-18 x 5/8”” Wood Dowel, 8mm x 25 mm Wood Screw, 7mm x 50mm Lock Nut, Hole Plug 5/16-18 *Quantities may vary, extra fasteners can be discarded. -
Page 4: Assembly
(Detail B) b. Attach one Lower Guitar Cross Panel (#9) to the Guitar Stiffner Panel (#10) with the Wenger logo using two 8 x 25 mm Wood Dowels (#21) and five 7 x 50 mm Wood Screws (#16). - Page 5 With the lip of the Rear Extrusion facing to the rear, attach the upper Front Stiffner Assembly to each End Panel (#1) using two 7 x 50 mm Wood Screws (#16) on each side. (Detail D) Wenger logo location Lip of Rack...
- Page 6 SSEMBLY CONTINUED 5. Assemble the two Rear Stiffner Assemblies. a. Attach one Lower Guitar Cross Panel (#9) to one of the Guitar Stiffner Panels (#10) using two 8 x 25 mm Wood Dowels (#21) and five 7 x 50 mm Wood Screws (#16). Be sure the three pre-drilled holes in the face surface of the Lower Guitar Cross Panel is facing down.
- Page 7 SSEMBLY CONTINUED 7. Attach the two Rear Stiffner Assemblies to the End Panels. a. With the lip of the Rear Extrusion facing down, attach the lower Rear Stiffner Assembly to each End Panel (#1) using two 7 x 50 mm Wood Screws (#16) on each side. (Detail G) b.
- Page 8 SSEMBLY CONTINUED 8. Assemble the two Yoke Assemblies. a. Attach one Yoke Mount Guitar Panel (#7) to the Yoke Guitar Stiffner Panel (#8) using two 8 x 25 mm Wood Dowels (#21) and five 7 x 50 mm Wood Screws (#16). (Detail H) b.
- Page 9 SSEMBLY CONTINUED 10. Attach the Front Swivel Casters with Brakes. a. Tip the Guitar Rack Assembly to rest the rear on the floor. b. Attach one Front Caster Mount Bracket (#5) to the bottom of each End Panel using two #8 x 1-7/8” Pan Washer Head Screw (#17) through each set of pre-drilled holes.
- Page 10 SSEMBLY CONTINUED 11. Assemble the two Rear Swivel Casters. a. Attach one Swivel Caster (#3) to one Rear Caster Mount Bracket (#4) using four 5/16-18 x 5/8” Carriage Bolts (#19) and four 5/16-18 Lock Nuts (#20). (Detail L) b. Repeat the procedure to assemble the other Rear Swivel Caster.(Detail L) Detail L 12.
- Page 11 Secure each Rear Swivel Caster Assembly to each End Panel using two 1/4-20 x 0.79” Machine Screws (#14) and two 1/4-20 Cap Nuts (#15). (Detail N) Detail N 13. Tip the Guitar Storage Rack Assembly upright onto the Casters. 14. Install Hole Plugs into all unused holes in the End Panels.
- Page 12 Holes in the right and left sides of the individual Yokes allow for placement of Optional Security Cables (#23). See the following page for more information. 17. Tighten all fasteners before using the Guitar Storage Rack and routinely check for secure connections.
- Page 13 SSEMBLY CONTINUED 18. If Optional Security Cables (#23) are being used to secure instruments, pinch the looped end of the Security Cable (#23) and slide it through the top of either the left or right side hole in the Yoke (#12) as shown. The washer end will keep it from sliding completely through.
-
Page 14: Operation
Lock the Front Braking Swivel Casters when the Guitar Storage Rack is in the desired location. Unlock the casters to move the rack to a different location. If there are instruments on the Guitar Storage Rack while it is being moved, more than one person is required to move the rack. -
Page 15: Replacement Parts
EPLACEMENT ARTS Item Qty Description Item Qty Description Item Qty Description Panel, End Panel, Cross, Lower, Guitar Screw, PWHD, #8 x 1-7/8” Caster, Swivel, Brake Panel, Stiffner, Guitar Nut, Insert, 1/4-20 Caster, Plate, Swivel Panel, Stiffner, Guitar w/holes Bolt, Carriage, 5/16-18 x 5/8” Bracket, Caster Mount, Rear 20 Yoke Nut, Lock, 5/16-18... - Page 16 This page is intentionally blank.
Need help?
Do you have a question about the Guitar Storage Rack and is the answer not in the manual?
Questions and answers