Table of Contents
Advertisement
Quick Links
C
ONTENTS
Safety Precautions . . . . . . . . . . . . . . . . . . . . . . . . . . . . . . . . . . 2
Warranty . . . . . . . . . . . . . . . . . . . . . . . . . . . . . . . . . . . . . . . . . . 2
Important User Information. . . . . . . . . . . . . . . . . . . . . . . . . . . . 3
General. . . . . . . . . . . . . . . . . . . . . . . . . . . . . . . . . . . . . . . 3
Manufacturer . . . . . . . . . . . . . . . . . . . . . . . . . . . . . . . . . . 2
Intended Use . . . . . . . . . . . . . . . . . . . . . . . . . . . . . . . . . . 2
Before You Begin . . . . . . . . . . . . . . . . . . . . . . . . . . . . . . . . . . . 3
Required Tools . . . . . . . . . . . . . . . . . . . . . . . . . . . . . . . . . . . . . 4
Fastener Parts List . . . . . . . . . . . . . . . . . . . . . . . . . . . . . . . . . . 4
Parts List. . . . . . . . . . . . . . . . . . . . . . . . . . . . . . . . . . . . . . . . . . 5
Assembly . . . . . . . . . . . . . . . . . . . . . . . . . . . . . . . . . . . . . . . . 6-9
Operation . . . . . . . . . . . . . . . . . . . . . . . . . . . . . . . . . . . . . . . . 10
Replacement Parts List. . . . . . . . . . . . . . . . . . . . . . . . . . . . . . 11
Please read and understand these Assembly Instructions before working with or using the
Violin/Viola Storage Rack.
If you need additional information about the Violin/Viola Storage Rack, contact Wenger Corporation
using the information below.
©Wenger Corporation 2010
Wenger Corporation, 555 Park Drive, P.O. Box 448, Owatonna, Minnesota 55060-0448
Questions? Call.....USA: (800) 733-0393 • International (call collect): (507) 455-4100 • www.wengercorp.com
Violin/Viola Storage Rack
Printed in China 02/10
Assembly Instructions
Part #148H056-02
Advertisement
Table of Contents

Related Manuals for Wenger Violin / Viola Storage Rack


Summary of Contents for Wenger Violin / Viola Storage Rack
-
Page 1: Table Of Contents
Replacement Parts List......11 Please read and understand these Assembly Instructions before working with or using the Violin/Viola Storage Rack. If you need additional information about the Violin/Viola Storage Rack, contact Wenger Corporation using the information below. ©Wenger Corporation 2010... -
Page 2: Warranty
This is your sole remedy for breach of this warranty. Should you have a question or problem with any Wenger product, don’t hesitate to call, even if the product is past warranty. It’s important to us that all our customers be satisfied. -
Page 3: Important User Information
Wenger Corporation. Wenger Corporation does not assume any responsibility for any errors that may appear in this manual. In no event will Wenger Corporation be liable for technical or editorial omissions made herein, nor for direct, indirect, special, incidental, or consequential damages resulting from the use or defect of this manual. -
Page 4: Before You Begin
EFORE EGIN • Read the complete assembly procedure before you begin. • Open both large cartons, and compare the parts to the “Replacement Parts List” listed below. Note that the Left and Right End Panels (2) are identical (until you attach Caster Brackets (1) to them). •... -
Page 5: Parts List
ARTS • Parts appear in 3D to provide visual of pre-drilled hole placement. • Pre-drilled holes vary by size and model of unit. • Some quantities vary depending on the model. • Extra hardware can be discarded. Item Description Item Description Bracket, caster Panel, top, cross... -
Page 6: Assembly
SSEMBLY 1. Assemble both the Upper and Lower Base Supports. a. Insert one Wood Dowel (#6) into each Divider Panel (#13). (Detail A) b. Secure the Divider Panels with Dowels to the Rear base Panel (#14) using three 2" Hex Socket Lag Screws (#5) on each assembly. -
Page 7: Assembly
SSEMBLY CONTINUED g. Insert one Wood Dowel (#6) into each Divider Panel (#13). h. Insert each Round Spacer (#18) into the Rear Base Panel (#14) Secure the Divider Panel with Wood Dowel (#6) to the Lower Front Base Panel (#9) and Upper Front Base Panel (#12) using three 2"... - Page 8 SSEMBLY CONTINUED 5. Assemble both the Upper and Lower Neck Supports: a. Insert Divider Pegs (#17) into Neck Support Top Panel (#11) and secure with 1 " Wood Screw (#16). (Detail H) Insert four Wood Dowels (#6) into the edge of the Cross Board with Pegs (#11).
- Page 9 SSEMBLY ONTINUED 7. Attach the Middle Support Assembly and the Upper Neck Support Assembly to the End Panels (#2) using eight Hex Socket Lag Screws (#5) per side. (Detail K) Upper Neck Support Assembly Middle Support Assembly Detail K 8. Snap the four Casters into the Caster Brackets. The two Locking Casters (#7) attach to the front and the two Non-locking Casters (#8) attach to the back.
-
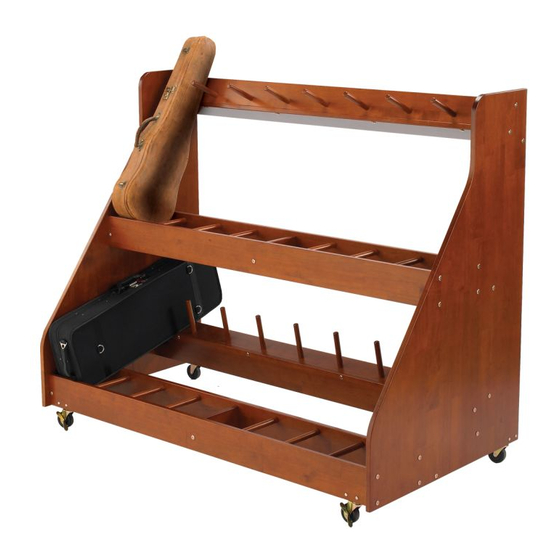
Page 10: Operation
PERATION Before placing instruments on the mobile rack, be sure the casters are in the locked position. Unlock the casters to move the rack. Two people are recommended to move the rack. Move the rack slowly and carefully making sure the instruments stay in place during transport. - Page 11 EPLACEMENT ARTS Item Description Item Description Bracket, caster Panel, top, cross Panel, end, right and left Panel, Top Neck Support Nut, insert Panel, Base, Middle Front Screw, truss-head, 3/4" Panel, divider Screw, Lag, hex socket, 2" Panel, base, rear Dowel, wood Panel, base, lower support Caster, locking Wood Screw, 1 1/4"...
Need help?
Do you have a question about the Violin / Viola Storage Rack and is the answer not in the manual?
Questions and answers