
Related Manuals for Sports Attack I-HACK ATTACK


Summary of Contents for Sports Attack I-HACK ATTACK
- Page 1 BASEBALL PITCHING MACHINES I-HACK ATTACK BASEBALL MACHINE PATENTS APPLIED FOR INSTALLATION MANUAL OPERATION · SETUP · USE & CARE · SERVICE SPORTS ATTACK LLC. | 800.717.4251 | www.sportsattack.com...
- Page 2 Department at 800-717-4251. If a service person is needed, Sports Attack will pay the pre-approved labor charge to get A 15% restocking fee will be your machine back in working order.
-
Page 3: Table Of Contents
This manual contains the information needed to properly set up the I-Hack Attack Baseball Pitching Machine, and to use, care for and maintain the I-Hack Attack in a manner which will ensure its optimum performance. -
Page 4: Safety Instructions
4. Wait until the throwing wheels have come to a complete stop before reaching hands pitch to be inside which could or fingers anywhere near the throwing wheels. hit the batter. CAUTION: Carefully check I-Hack Attack for completeness and condition before connecting to electrical power: ELECTRICAL SHOCK 1. Throwing wheels must be tight on the motor shafts HAZARD 2. - Page 5 The horizontal swivel lock must be securely tightened before the batter approaches the plate. ALWAYS test and adjust the I-Hack Attack before a batter steps up to the plate: 1. Adjust so that I-Hack Attack throws a ball across the plate.
-
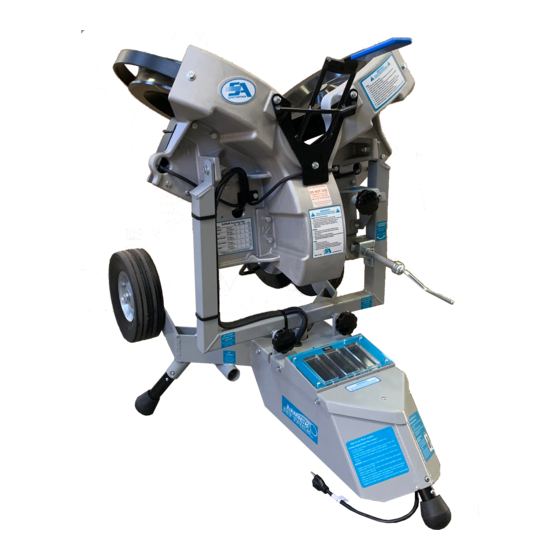
Page 6: Features & Operating Controls
Wheel Elevation Control Inside/Outside Pitch Locators Yoke Touch Screen Under Carriage Figure 3 Set I-Hack Attack upright Controller Electronic Enclosure Box Figure 5 Figure 4 Carefully tilt I-Hack Attack up onto its legs SAFETY HINT Keep your back straight and lift with your legs. -
Page 7: Set-Up & Preparation
4. Turn the on/off switch “OFF” c. Wheel guard and ball chute must be securely fastened to the throwing head. before shutting off the 10. Be certain on/off switch is turned “OFF” , then plug I-Hack Attack into an extension generator and before cord or other power source. (See generator information at right if applicable.) unplugging I-Hack Attack. - Page 8 (LPL) and right pitch locator (RPL) control the amount of horizontal (inside/outside)pitch can cause serious injury or death. location. (See Figure 6). Make sure that no one steps in front of I-Hack Attack while it is connected to electric power. Clear all hitters away from home plate, the batter’s box and the backstop area before connecting I-Hack Attack to electric power.
- Page 9 Make sure that no one steps in plate front of I-Hack Attack while it is connected to electric power. Clear all hitters away from home plate, the batter’s box and the backstop area before connecting I-Hack Attack to electric power.
- Page 10 Make sure that no one steps in plate front of I-Hack Attack while it is connected to electric power. Clear all hitters away from home plate, the batter’s box and the backstop area before connecting I-Hack Attack to electric power.
- Page 11 PROJECTILES Being struck by a pitched ball can cause serious injury or death. Make sure that no one steps in front of I-Hack Attack while it is connected to electric power. Clear all hitters away from home Left Pitch Right Pitch plate, the batter’s box and the...
- Page 12 Being struck by a pitched ball can cause serious injury or death. Make sure that no one steps in front of I-Hack Attack while it is connected to electric power. Clear all hitters away from home plate, the batter’s box and the...
-
Page 13: Shutting Down
Tighten just enough to secure the throwing head. It is not necessary to over tighten. 3. Using the rear leg as a handle, tip I-Hack Attack up and over onto the wheel guard. Storing Legs in Travel Socket 4. Remove (unsocket) both front legs and store by inserting in the travel storage sockets. -
Page 14: Care, Cleaning & Maintenance
Ketone (M.E.K.) may be required to help loosen the build-up of dirt or ball residue. EXAMINE THE MACHINE Examine I-Hack Attack for condition and completeness before every use: 1. For batting practice, be sure the horizontal swivel lock is secured. 2. Throwing wheels must be tight on the motor shafts. Check that the keyway retaining bolts are tight. -
Page 15: Component Replacement
COMPONENT REPLACEMENT THROWING WHEEL REPLACEMENT 1. Turn the on/off switch “OFF” and unplug the power cord. For the bottom throwing wheel, remove 6 bolts holding the wheel guard to the main casting. 2. Hold the wheel so that it cannot move. Turn the keyway retaining bolt counter-clock- wise using a box end wrench. -
Page 16: Exploded View
Cane Tip EXPLODED VIEW Leg - Standard Size (ea.) Undercarriage Horizontal Swivel Lock Handle Swivel Lock Pivot Snap-Button Travel Wheel (with axle, bolt, nut, washers) Yoke Pin, Travel Lock Spring, Travel Lock Fitting, Elevation Control Tension Spring, Elevation Control Handle, Elevation Control Main Casting, Throwing Head Clamp, Cable... -
Page 17: Parts List
To order additional parts, PARTS LIST please call: Sports Attack Customer HA BASE- REF#s DESCRIPTION Service Department BALL PART#s Ph 800-717-4251 Fx 775-345-2883 533-1307 Ball Chute 280-1003 Cane Tip ea. 533-0002 Clamp, Cable 530-0006 Controller Assembly 531-1505 Fitting, Elevation Control 280-3007 Grommet, Wiring...
Need help?
Do you have a question about the I-HACK ATTACK and is the answer not in the manual?
Questions and answers