Table of Contents
Advertisement
Model No. VMEL81911-INT.0
USER’'S MANUAL
Serial No.
Write the serial number in the space
above for reference.
Serial Number
Decal
QUESTIONS?
If you have questions, or if parts
are damaged or missing, PLEASE
CONTACT THE STORE WHERE
YOU PURCHASED THIS
PRODUCT.
If you are unable to contact the
store, please see HOW TO
CONTACT CUSTOMER CARE on
the back cover of this manual.
CAUTION
Read all precautions and instruc-
tions in this manual before using
this equipment. Keep this manual
for future reference.
www.freemotionfitness.com
Advertisement
Table of Contents

Related Manuals for Freemotion e 7.7


Summary of Contents for Freemotion e 7.7
- Page 1 Model No. VMEL81911-INT.0 USER’’S MANUAL Serial No. Write the serial number in the space above for reference. Serial Number Decal QUESTIONS? If you have questions, or if parts are damaged or missing, PLEASE CONTACT THE STORE WHERE YOU PURCHASED THIS PRODUCT.
-
Page 2: Table Of Contents
Note: The decal(s) may not be shown at actual size. FREEMOTION is a registered trademark of ICON IP, Inc. POLAR is a registered trademark of Polar Electro Oy. iPod is a trademark of Apple Computer, Inc., registered in the U.S. and other countries. -
Page 3: Important Precautions
To reduce the risk of serious injury, read all important precautions and instructions in this manual and all warnings on your elliptical before using your elliptical. FreeMotion Fitness assumes no responsibility for personal injury or property damage sustained by or through the use of this product. -
Page 4: Before You Begin
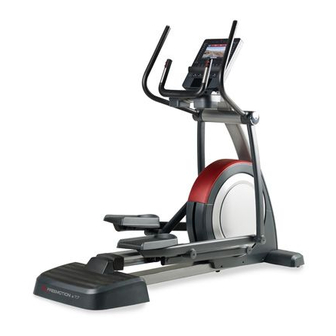
To help us assist you, note the product model FREEMOTION ® E 7.7 elliptical. The E 7.7 elliptical number and serial number before contacting us. The provides an impressive selection of features designed model number and the location of the serial number to make your workouts more effective and enjoyable. -
Page 5: Part Identification Chart
PART IDENTIFICATION CHART Use the drawings below to identify the small parts needed for assembly. The number in parentheses below each drawing is the key number of the part, from the PART LIST near the end of this manual. The number following the key number is the quantity needed for assembly. -
Page 6: Assembly
ASSEMBLY •• Assembly requires two persons. •• In addition to the included tool(s), assembly requires the following tools: •• Place all parts in a cleared area and remove the one Phillips screwdriver packing materials. Do not dispose of the packing materials until you ... - Page 7 2. Orient the Upright (2) as shown. Have a second person hold the Upright near the Frame (1). Locate the wire tie in the lower end of the Upright (2). Tie the wire tie to the Main Wire Harness Wire Tie (103) and to the TV Cable (105).
- Page 8 4. Identify the Right Upper Body Arm (55) and orient it as shown. Attach the Right Pedal Arm (54) to the Right Upper Body Arm (55) with a Snap Ring (70), two Thrust Washers (71), and a Wave Washer (72). Repeat this step for the Left Upper Body Arm (not shown) and the Left Pedal Arm (not shown).
- Page 9 6. Slide two Thrust Washers (71) and a Wave Washer (72) onto the right side of the Upright (2) as shown. Next, slide two Thrust Washers (71) and a Wave Washer (72) onto the Right Roller Arm (53) as shown. With the help of a second person, slide the Right Upper Body Arm (55) and the Right Pedal Arm (54) assembly onto the Upright (2) and the Right...
- Page 10 8. Attach a Bearing Cover (64) to the Right Roller Arm (53) with a 1/4" x 3/8" Screw (80) and a Snap Ring (70) as shown. Repeat this step on the other side of the elliptical. 9. Press the Rear Frame Cover (14) onto the rear of the Frame (1).
- Page 11 10. Orient the Accessory Tray (5) and the Pulse Bar (6) as shown. Connect the indicated ground wire (A) from the Media Module (7) to the Ground Wire (12) on the Pulse Bar (6). Insert the other wires (B) from the Media Module (7) into the hole in the Pulse Bar (6) and pull them out of the end of the Pulse Bar.
- Page 12 12. Remove the four shipping screws from the Upright (2) and discard them. Untie and discard the wire tie on the Main Wire Harness (103) and the TV Cable (105). While a second person holds the Console (3) near the Upright (2), connect the Main Wire Harness (103), the TV Cable (105), the Pulse Wires (6), and the wires from the Media Module (7) to the matching wires on the Console.
- Page 13 14. Attach the Console Back (4) to the Console (3) with four #8––32 x 3/4" Screws (110). 15. Press the Front Shield (51) onto the Left and Right Shields (48, 49). 48, 49...
- Page 14 16. Plug the Power Cord (104) into the Power Receptacle (35) on the frame of the elliptical. Note: To plug the Power Cord (104) into an out- let, see HOW TO PLUG IN THE POWER CORD on page 16. 17. Make sure that all parts are properly tightened before you use the elliptical. Note: Extra parts may be included.
-
Page 15: How To Upgrade The Console
HOW TO UPGRADE THE CONSOLE Your console has been preconfigured to operate with a 17" Digital TV (see the drawings below). To learn about the features of the basic console, see page 19. To learn about the features of the 17" Digital TV, see the user’’s manual included with the 17"... -
Page 16: How To Use The Elliptical
HOW TO USE THE ELLIPTICAL HOW TO PLUG IN THE POWER CORD Follow the steps below to plug in the power cord. This product must be earthed. If it should malfunc- 1. Plug the indicated end of the power cord into the tion or break down, earthing provides a path of least socket on the frame. - Page 17 HOW TO MOVE THE ELLIPTICAL HOW TO EXERCISE ON THE ELLIPTICAL Due to the size and weight of the elliptical, mov- To mount the elliptical, hold the upper body arms or ing it requires two persons. Remove the rear frame the handlebars and step onto the pedal that is in the cover.
- Page 18 RF modulator to work correctly. RF modulators are the elliptical. not available from FreeMotion Fitness, but are avail- able at electronics stores. See the user’’s manual for the equipment you wish to connect to determine if an RF modulator is needed, or contact your local audio/ video service provider.
- Page 19 CONSOLE DIAGRAM FEATURES OF THE CONSOLE When you use the manual mode, you can change the resistance of the pedals and the incline of the ramp The console offers an impressive array of features with the touch of a button. designed to make your workouts more effective and enjoyable.
- Page 20 HOW TO TURN ON THE POWER HOW TO USE THE TOUCH SCREEN IMPORTANT: If the elliptical has been exposed to The console features a tablet with a full-color touch cold temperatures, allow it to warm to room tem- screen. The following information will help you become perature before turning on the power.
- Page 21 HOW TO SET UP THE CONSOLE The Internet browser will open to the iFit.com regis- tration page. Touch the Buy Now button to register Before using the elliptical for the first time, set up the for an iFit account. If you have an activation code, console.
- Page 22 HOW TO USE THE MANUAL MODE 4. Follow your progress. 1. Begin pedaling or press any button on the The console offers several display modes. The console to turn on the console. display mode that you select will determine which workout information is shown.
- Page 23 When your pulse is detected, your heart rate will be Note: If the pedals do not move for a while, the fan shown. For the most accurate heart rate read- will turn off automatically. ing, hold the contacts for at least 15 seconds. 7.
- Page 24 HOW TO USE AN ONBOARD WORKOUT manually override the setting by pressing the Resistance buttons or the Incline/Decline but- 1. Begin pedaling or press any button on the tons. If you press a Resistance button, you can console to turn on the console. then manually control the resistance (see step 3 on page 22).
- Page 25 HOW TO USE A SET-A-GOAL WORKOUT IMPORTANT: The target rpm is intended only to provide motivation. Your actual pedaling speed 1. Begin pedaling or press any button on the may be slower than the target rpm. Make sure console to turn on the console. to pedal at a speed that is comfortable for you.
- Page 26 HOW TO USE AN IFIT WORKOUT For more information about the iFit workouts, please see www.iFit.com. Note: To use an iFit workout, you must have access to a wireless network (see HOW TO USE THE When you select an iFit workout, the screen will WIRELESS NETWORK MODE on page 31).
- Page 27 HOW TO USE THE EQUIPMENT SETTINGS MODE 6. Enable or disable the Internet browser. The console features an equipment settings mode that You can disable the Internet browser, which will allows you to change various settings for the elliptical. help to restrict the bandwidth used on your wireless network.
- Page 28 10. Enable or disable street view. To set a workout time limit, touch the Workout Time Limit button. To enable the workout time limit, touch You can disable the street view for maps workouts, the Enable checkbox. Then, touch the increase which will help to restrict the bandwidth used on and decrease buttons to select the amount of time your wireless network.
- Page 29 HOW TO USE THE ENTERTAINMENT MODE Touch the Default Settings button and then select a default channel and a default volume if desired. The console features an entertainment mode that allows you to connect the console to a remote TV. Touch the Custom Settings button and then select your TV type from the drop-down list if necessary.
- Page 30 HOW TO USE THE MAINTENANCE MODE 4. Calibrate the incline of the ramp. The console features a maintenance mode that allows Touch the Calibrate Incline button. Then, touch the you to update the console firmware, calibrate the Begin button to calibrate the incline of the ramp. incline of the ramp, view machine information, view The ramp will automatically rise to the maximum a button’’s keycode, register the elliptical, and enter a...
- Page 31 HOW TO USE THE WIRELESS NETWORK MODE An information box will ask if you want to connect to the wireless network. Touch the Connect button The console features a wireless network mode that to connect to the network or touch the Cancel but- allows you to set up a wireless network connection.
- Page 32 HOW TO USE THE SOUND SYSTEM HOW TO CHARGE A DEVICE To listen to the console audio, remote TV audio, or Plug an MP3 player, smartphone, or other USB device personal 17" digital TV audio with your personal head- into the USB port on the front of the console to charge phones or ear buds, plug your headphones into the your device.
-
Page 33: Maintenance And Troubleshooting
HOW TO USE THE INTERNET BROWSER To enter a different web address in the URL bar, first slide your finger down the screen to view the URL bar, Note: To use the browser, you must have access to a if necessary. Then, touch the URL bar, use the key- wireless network including an 802.11b/n router with board to enter the address, and touch the Go button on SSID broadcast enabled (hidden networks are not... -
Page 34: Exercise Guidelines
EXERCISE GUIDELINES Burning Fat——To burn fat effectively, you must exer- WARNING: cise at a low intensity level for a sustained period of Before beginning this time. During the first few minutes of exercise, your or any exercise program, consult your physi- body uses carbohydrate calories for energy. -
Page 35: Part List
PART LIST Model No. VMEL81911-INT.0 R1012B Key No. Qty. Description Key No. Qty. Description Frame Disc Upright Ring Console Left Shield Console Back Right Shield Accessory Tray Crank Arm Cover Pulse Bar/Pulse Wire Front Shield Media Module Top Shield Sensor Plate Right Roller Arm Front Pulse Cover Right Pedal Arm... - Page 36 Key No. Qty. Description Key No. Qty. Description #8 x 1/2" Screw Main Wire Harness #8 x 1" Screw Power Cord #10 x 3/8" Screw TV Cable 3/8" x 2 1/2" Screw 3/8" Star Washer 1/4" x 1 1/4" Screw 3/8"...
-
Page 37: Exploded Drawing
EXPLODED DRAWING A Model No. VMEL81911-INT.0 R1012B... - Page 38 EXPLODED DRAWING B Model No. VMEL81911-INT.0 R1012B...
- Page 39 EXPLODED DRAWING C Model No. VMEL81911-INT.0 R1012B...
-
Page 40: How To Contact Customer Care
Logan, UT 84321-9813 United States LIMITED WARRANTY FreeMotion Fitness warrants this product to be free from 6. Use or storage of the product outdoors or in high-humidity defects in workmanship and material under normal use and environments including spa and pool areas.
Need help?
Do you have a question about the e 7.7 and is the answer not in the manual?
Questions and answers