Table of Contents
Advertisement
Quick Links
Advertisement
Table of Contents

Subscribe to Our Youtube Channel
Related Manuals for MONARCH INSTRUMENT Nova-Pro UV365


Summary of Contents for MONARCH INSTRUMENT Nova-Pro UV365
- Page 1 Instruction Manual ® Nova-Pro Ultraviolet UV365 and UV385 LED Stroboscopes / Laser Tachometers Patented Technology 15 Columbia Drive • Amherst, NH 03031 USA Phone: (603) 883-3390 • Fax: (603) 886-3300 E-mail: support@monarchinstrument.com Website: www.monarchinstrument.com...
- Page 2 Safeguards and Precautions Read and follow all instruc ons in this manual carefully, and retain this manual for future reference. Do not use this instrument in any manner inconsistent with these opera ng instruc ons or under any condi ons that exceed the environmental specifica ons stated.
-
Page 3: Table Of Contents
Monarch Instrument’s Limited Warranty applies. See www.monarchinstrument.com for details. Warranty Registration and Extended Warranty coverage available online at www.monarchinstrument.com. Monarch Instrument holds the following US trademarks and registra ons, all rights reserved: illumiNova®, Nova-Pro®, Nova-Strobe™, DataChart™, Track-It™. This product is protected by United States Patent No. 10,080,268. - Page 4 MODES OF OPERATION ..........7 4.1 STROBE Mode ............7 4.1.1 Joys ck ..............7 4.1.2 Touch Keypad Entry ..........8 4.1.3 Doubling or Halving the Flash Rate ......8 4.1.4 External Input ............9 4.2 LAMP Mode ............10 4.3 LASER Mode ............
- Page 5 5.7 DELAY Menu ............22 5.7.1 NONE ..............23 5.7.2 PHASE ..............23 5.7.3 TIME ..............23 5.7.4 VRPM ..............23 STROBE BRIGHTNESS ..........24 6.1 Calcula ng Blur ............24 6.2 Brightness in Degrees of Rota on ......25 6.3 Brightness in Pulse Dura on ........
-
Page 6: Introduction
1. INTRODUCTION The Nova-Pro UV365/385 are portable hand-held UV LED Stroboscope/ Lamps used for inspec on and to stop mo on of moving objects. They emit UVA light at 365nm or 385nm respec vely. They come standard as ba ery powered and have delay func ons which enable the user to delay the flash by degrees or me and do virtual slow mo on inspec on of... - Page 7 Table 1 Nova-Pro UV Features Bezel and Lens Bezel is removable to add or remove the Laser Module. UV Emi ed from here! Laser Module Internal laser used to synch the flash to an external marker on the object under inspec on.
-
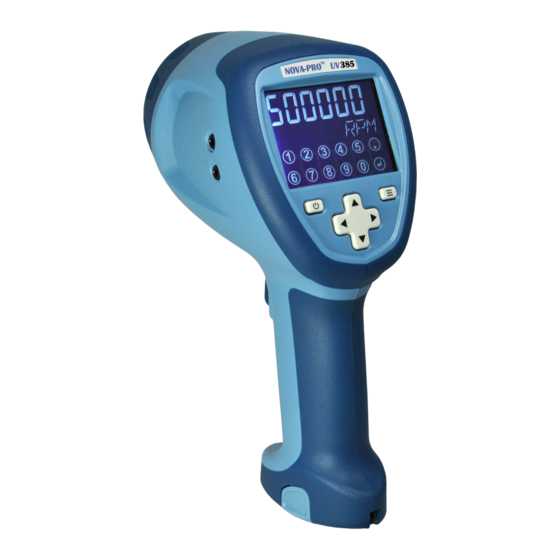
Page 8: User Interface
2. USER INTERFACE The Nova-Pro UV user interface consists of a large backlit display with touch keypad, dedicated keys on the user interface panel and a trigger to ac vate the unit when the power is on. The user interface is described in Figure 2 and Table 2. - Page 9 Table 2 Nova-Pro UV User Interface 6-digit display used to display flash rate and other numeric values. Lock icon—Ac ve when the device is locked on. On Target indicator—Ac ve when the input/laser is locked on to a target. Also used to indicate current selec on in the menus. Laser icon—Indicates that the laser is armed (flashing) or on (solid).
-
Page 10: Getting Started
3. GETTING STARTED 3.1 Power The ba ery powered Nova-Pro UV has a removable Ba ery Pack that should be charged before use (See Ba ery Pack sec on 8). The Ba ery Pack is keyed to ensure correct inser on into the Nova-Pro and Ba ery Charger. -
Page 11: Input / Output Connec Ons
3.2 Input / Output Connec ons The Nova-Pro UV has input and output jacks on the side that can be used for Out ( ) external triggering synchroniza on In ( ) (daisy-chaining two or more strobes). These jacks accept 1/8” [3.5 mm] phone plugs (input-stereo, output-mono). -
Page 12: Modes Of Operation
4. MODES OF OPERATION The Nova-Pro UV has four modes of opera on: STROBE, LAMP, LASER and TACH (Tachometer). Each are described in the sec ons below: 4.1 STROBE Mode In this mode the strobe generates the flash rate from an internal generator set by the user. -
Page 13: Touch Keypad Entry
4.1.2 Touch Keypad Entry Press the MENU bu on to display the numeric keypad. The flash rate will default to 0 and show the units you are entering. Note that this is a capaci ve touch sensi ve keypad and will not respond if the user is wearing gloves. Press the MENU bu on Enter the desired flash rate and press the ↵... -
Page 14: External Input
image, then use the ÷2 bu on un l you see a single image. This will now be the correct speed (see Figure 5). Figure 5 Object rota ng at 3000 RPM, using Flashes Per Minute (FPM) to determine speed ( 2) (X2) (X2) -
Page 15: Lamp Mode
ROS-P shown. 4.2 LAMP Mode For full me ac va on of the UV light source, the Nova-Pro UV365/ UV385 has a Lamp Mode that creates a bright, constant light for inspec on. Be aware that this mode uses considerably more ba ery power and that you should never look directly into the light source. -
Page 16: Laser Mode
4.3 LASER Mode The Laser Mode is only available when the Laser Module is installed. This mode uses the LASER to trigger the strobe flash and is similar to the External Input Mode. Laser icon will blink when Laser Mode is enabled and be on solid when trigger is pulled and laser is on. -
Page 17: Tach (Tachometer) Mode
4.4 TACH (Tachometer) Mode The TACH (Tachometer) Mode requires the Laser Module to be installed OR an external input (sensor) be plugged in. This mode uses the Laser or External signal to measure rota onal speed. Tachometer icon will show in display when the Nova-Pro is in TACH Mode. -
Page 18: Menu Settings
5. MENUS The menu that shows is dependent on the current opera ng mode of the unit and whether the Laser Module is installed. TACHometer MODE MENU but t on MENU bu on POWER but t on POWER bu on DOWN bu on DOWN but t on SEtUP MODE... - Page 19 STROBE LASER MODE MODE MODE ON LAMP SEtUP MODE input # KEYPAD X2 / ≑2 SEtUP MODE BRITE DEGS, TIME (to SET) input input number number MISC DECPT none, 1, 2, 3 (to SET) MEMRY Recall M1, 2, 3 ...10 (to SET) Save M1, 2, 3 ...10 JOG*...
-
Page 20: Menu Overview
5.1 Menu Overview To enter the menus, press the MENU button once or three times depending on the current mode (see overview) until the word SEtUP appears on the top line of the display. To select the current item shown on the lower line press the MENU button again. Not all items will be available in the menu;... -
Page 21: Brightness (Brite) Menu
5.3 Brightness (BRITE) Menu Refer to Sec on 8 for details on Brightness and Flash Dura on before using this feature. The Brightness (BRITE) menu op on sets the flash dura on which affects the brightness. Flash dura on can be adjusted in degrees of rota on (propor onal flash dura on—changes with flash rate) or me in milliseconds (msec—fixed flash dura on). -
Page 22: Time
5.3.2 Time To set the flash dura on in me instead of degrees, press the MENU bu on again (skip the DEG menu). Use the arrows on the joys ck to adjust to the me value. Time can be set from 0.001 mSec to 1.000 mSec. Press the MENU bu on followed by the Power bu on to save the me se ng. -
Page 23: Units Menu
Press the MENU bu on to enter the DECPT menu. The current value is shown on the top line with DECPT on the lower line. The On-Target indicator will be on for the currently selected value. Use the arrows on the joys ck to select the desired value. Press the MENU bu on followed by the Power bu on to save the decimal point se ng. -
Page 24: Input Menu
5.4.3 INPUT Menu This menu sets the pulse polarity of the external signal that will trigger the strobe. The op ons are nEG for nega ve edge or POS for posi ve edge. Press the MENU bu on to enter the INPUT menu. The current edge se ng is shown on the top line with INPUT on the lower line. -
Page 25: Bklit (Backlight)
5.4.5 BKLIT (Backlight) Menu This menu op on turns the backlight of the display ON or OFF. Press the MENU bu on to enter the Backlight menu. Use the arrows on the joys ck to select the desired value. The backlight will change in real me. Press the MENU bu on followed by the Power bu on to save the value. -
Page 26: Recall Memory
loca on. The current flash rate will then be shown in that loca on. To exit without saving a value press the POWER bu on 5.5.2 Recall Memory To RECALL a saved strobe se ng: Once in the Memory (MEMRY) menu, make sure the you are in the Recall Mode as indicated by RM on the display. -
Page 27: None
5.6.1 NONE To cancel the JOG mode, press the MENU bu on when NONE is displayed. 5.6.2 PHASE To Jog by PHASE, press the MENU bu on when PHASE is displayed. The phase value will be shown in degrees. Use the joys ck to set the desired value (refer to sec on 5.1.1). -
Page 28: None
Press the MENU bu on to enter the DELAY menu. The current se ng will be shown and the On-Target indicator will be on for the currently selected value. Use the arrows on the joys ck to select the desired Jog method. -
Page 29: Strobe Brightness
desired value (refer to sec on 5.1.1). VRPM can be set from –60.0 RPM to +60.0 RPM. Press the MENU bu on accept and exit. NOTE: The adjustments happen in real me, so if the strobe is flashing the user can view the effect of changing the RPM. To exit the DELAY Menu, press the Power bu on Press the Power bu on to escape back out of the setup menu. -
Page 30: Brightness In Degrees Of Rota On
(flash dura on/ me per rota on) x 360°, which is (.0001/.01) x 360 = 3.6°. So you will see the sha appear to move 3.6°. As the flash pulse widens you will see greater degrees of rota on which results in more blur and a brighter perceived illumina on (the LEDs are on longer so the average light the eyes see is greater). -
Page 31: Brightness In Pulse Dura On
6.3 Brightness in Pulse Dura on Brightness can also be set to a fixed duration pulse in microseconds. The flash rate remains constant irrespective of the flash rate, thus as the flash rate increases, the image will get brighter and more blurred. Note: There are two limits maintained by the strobe –... -
Page 32: External / Laser Delay
Use this feature to bring a reference mark, such as a keyway, into your line of sight. It may be necessary to adjust the flash rate to keep the target sta c if the speed is dri ing. PHASE Use the JOG Menu to set a PHASE Delay of –30°. ◄... -
Page 33: Time Delay
Figure 9 Triggered Phase TRIGGER POINT -30° -60° -90° The Phase Delay tracks the speed of the target; the strobe is con nuously compu ng the delay angle for the current speed. In the Menu, the adjustments happen in real me, so if the strobe is flashing the user can view the effect of changing the display. -
Page 34: Battery Pack
(0 to 60 RPM). This gives a “slow-motion” effect and enables the target to be examined as it moves through a complete cycle or revolution. The display will show the AUTO icon to indicate the Delay Mode with the virtual speed in RPM on the top line and will indicate VRPM (Virtual RPM) on the lower line. -
Page 35: Low Ba Ery Func Onality
The Nova-Pro Ba ery Pack is specifically keyed to fit in the Nova-Pro and Charger Base one way only. Insert the Ba ery Pack into the Nova-Pro un l the clips lock into place. To remove, squeeze clips on the Ba ery Pack to release from the Nova-Pro. -
Page 36: Ac Power Option
9. AC POWER OPTION The Nova-Pro UV can be ordered specifically with the AC Power Op on for con nuous opera on from AC power. The AC Power Op on can also be ordered as a separate op on for the Nova-Pro. Simply insert the AC Power Op on into the Nova-Pro (matching the keyed slot) un l it clicks into place. -
Page 37: Specifications
11. SPECIFICATIONS Flash Range (FPM/RPM): 30 to 999,999 Display: 6 digit numeric and 5 digit alphanumeric LCD with touch keypad. High contrast blue background/white characters with backlight. Accuracy/Resolu on: 0.001% of se ng or ±1 lsd/6 digits to 0.001 Light Source: UV 365 nm or UV 385 nm 12 LED Array Light Output: 1700µw/cm... -
Page 38: Opera Ng Environment
11.1 Opera ng Environment This equipment is NOT intended for permanent installa on. This equipment is for use in a controlled environment - Environmental situa on A, Pollu on Degree 2. Al tude: up to 2000 m Temperature: 5 °C to 40 °C Humidity: Maximum rela ve humidity 80% for temperatures up to 31 °C decreasing linearly to 50% rela ve... - Page 39 Replacement/op onal 115/230 Vac 50/60 Hz AC Adapter with AC Adapter 6 foot [2M] cable with USA, UK, AUS, Euro adapter plugs. Replacement Charging Sta on for Nova-Pro Li-Ion Ba ery Charging Sta on Packs. Includes 115/230 Vac power supply with USA, UK, AUS, Euro adapter plugs.
- Page 40 Check out our other product lines… Handheld Panel Portable Machine Vision Tachometers Tachometers Stroboscopes Stroboscopes Speed Sensors Temperature/ Vibra on Meters Humidity Sensors Paperless Recorders Track-It® Data Loggers Printed in the U.S.A. Copyright © 2017-2020 Monarch Instrument, all rights reserved. 1071-4248-111 - 0720...
Need help?
Do you have a question about the Nova-Pro UV365 and is the answer not in the manual?
Questions and answers