Table of Contents
Advertisement
TORNADO INDUSTRIES, LLC
3101 WICHITA COURT
FORT WORTH, TX 76140
PHONE 800-VACUUMS
FAX 817-551-0719
WWW.TORNADOVAC.COM
Operations & Maintenance Manual
For Commercial Use Only
BR 9/1 MULTIWASH
MODEL NO: 99409
Form No. L9409 DA 06/20 ©Tornado Industries, LLC. All rights reserved
Save These Instructions
Advertisement
Table of Contents

Related Manuals for Tornado BR 9/1 MULTIWASH


Summary of Contents for Tornado BR 9/1 MULTIWASH
- Page 1 3101 WICHITA COURT FORT WORTH, TX 76140 PHONE 800-VACUUMS FAX 817-551-0719 WWW.TORNADOVAC.COM Operations & Maintenance Manual For Commercial Use Only BR 9/1 MULTIWASH MODEL NO: 99409 Form No. L9409 DA 06/20 ©Tornado Industries, LLC. All rights reserved Save These Instructions...
-
Page 2: Table Of Contents
Please safeguard the original receipt / invoice. If you experience any problems with your unit during the warranty period, the original receipt / invoice will act as proof of purchase. Contact Tornado for any warranty inquiries. - Page 3 NOTES Within 30 days, to activate the warranty, go to; https://tornadovac.com/services/warranty-registration-form.aspx For warranty information go to www.tornadovac.com...
-
Page 4: Important Safety Instructions
IMPORTANT SAFETY INSTRUCTIONS FOR COMMERCIAL USE WHEN USING AN ELECTRICAL APPLIANCE, BASIC PRECAUTIONS SHOULD ALWAYS BE FOLLOWED INCLUDING THE FOLLOWING: READ ALL INSTRUCTIONS BEFORE USING THIS MACHINE WARNING: TO REDUCE THE RISK OF FIRE, ELECTRIC SHOCK, OR INJURY: Do not leave machine unattended when plugged in. Unplug from outlet when not in use and before changing pads or attempting any maintenance or adjustment. - Page 5 GROUNDING INSTRUCTIONS This appliance must be grounded. If it should malfunction or breakdown, grounding provides a path of least resistance for electric current to reduce the risk electric shock. This machine is equipped with a cord having an equipment -grounding conductor and grounding plug. The plug must be inserted into an appropriate outlet that is properly installed and grounded in accordance with all local codes and ordinances.
-
Page 6: Electrical Connection
Introduction This Tornado floor cleaning machine is designed to be used on smooth, even floors indoors. It can be used on most floor surfaces including carpet, wood, PVC, rubber and stone. We are confident the machines will give years of trouble free service, coupled with ease of use and minimum maintenance. -
Page 7: Machine Parts
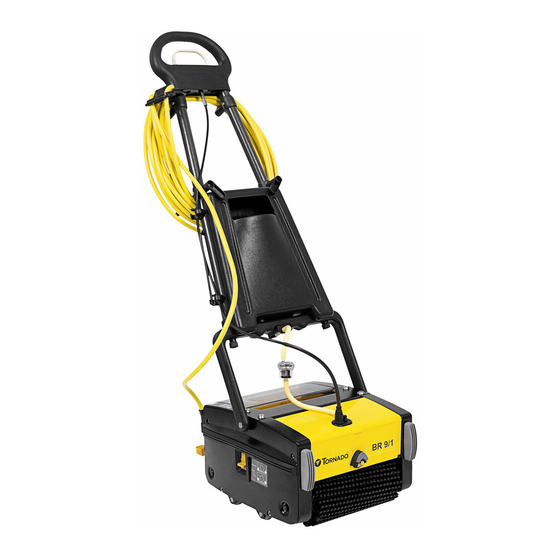
Machine Parts (1) Top handle (2) Solution control handle (3) Solution tank (4) Bottom handle (5) Dirty water tank (6) Inline solution filter (7) Component housing (8) Conveyor drum (9) Brush (10) Handle release pedal (10) -
Page 8: How It Works
(12) Handle knobs (12) 1. The Tornado BR 9/1 MW ships with the handle dismantled. To assemble, verify that all of the parts listed are included. 2. Remove the black band, which holds the bottom handle with the machine body, while holding the bottom handle. -
Page 9: Assembly
Assembly 1. Insert the two tubular handles into the bottom handle and secure them using the knob by tightening lightly. Make sure that the handles are assembled according to their marked position and the cable holding hooks are pointed towards the rear. 2. -
Page 10: Operating The Machine
Solution Control By pulling the solution control handle up, the cleaning solution is dispensed on the floor. The solution stops once the solution control handle is released. Pull Cable Connect / Disconnect Control Insert the free end of solution cable into the valve body fitted in the solution tank. Press and twist clockwise to secure the cable end. - Page 11 (Iii) 4. Pull the machine backwards in the same track, but without discharging any solution. When you reach the starting point, change the track and repeat steps 2 through 4. When you are changing the track allow some overlap with the cleaned area. In case of large halls take a U-turn and (a) Recommended pattern for small rooms move forward.
-
Page 12: Cleaning The Machine
Cleaning the Machine Warning! Switch off the machine and unplug from the electrical supply before performing any cleaning operations. 1. Move the Transport / Working mode control knob to BOTTOM (Transport) position to move the brushes off of the floor (Fig-viii). 2. -
Page 13: Transport Trolley
Accessories Transport Trolley The easily fitted trolley provides for ease of movement when transporting the machine. Warning: Empty all liquid from the machine before using the transport cart. Using the transport cart 1. With the machine handle in the upright position place the cart in the middle alongside the machine. -
Page 14: Technical Specification
Technical Specifications 99409 BR 9/1 MW Specification Voltage V/Hz 115/60 Cleaning Width in/mm 9/229 Abbreviations given in the diagram as listed: Body Height in/mm 8.5/216 Handle Height in/mm 44/1118 Abbreviation / Abbreviation / Description Description Width in/mm 13/330 Symbol Symbol Length in/mm 15/381... - Page 15 L9409 DA...
Need help?
Do you have a question about the BR 9/1 MULTIWASH and is the answer not in the manual?
Questions and answers