Table of Contents
Advertisement
Quick Links
Advertisement
Table of Contents

Related Manuals for Cortex LGE-10


Summary of Contents for Cortex LGE-10
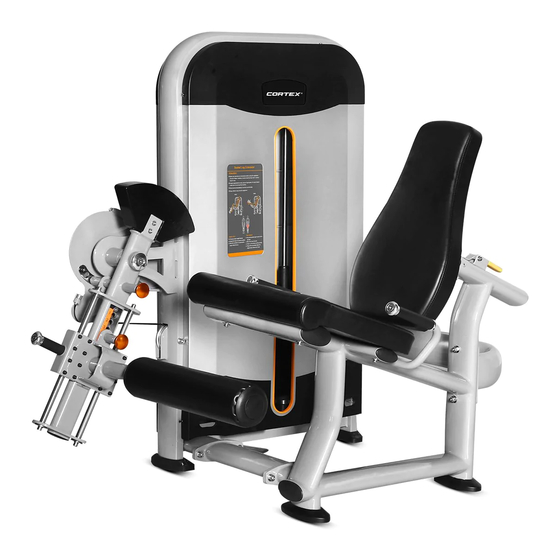
- Page 1 LGE-10 Seated Leg Extension OWNER’S MANUAL IMPORTANT! Please read all instructions carefully before using this product. Retain this manual for future reference. The specifications of this product may vary slightly from the illustrations and are subject to change without notice.
-
Page 2: Warning, Safety & Maintenance
WARNING, Safety & Maintenance Be sure that all users carefully read and understand all MAINTENANCE warning, safety and maintenance info on this Owner’s Manual or labels on the machine before each use. Failure to SCHEDULE do so may result in death or serious injury. Check the function and integrity of the It is imperative that you retain this Owner’s Manual and be following components. -
Page 3: Important Safety Instructions
WARNING Safety and Maintenance of Cables IMPORTANT: Cables are wear items. It is your responsibility to prevent unexpected breakage. Cable inspection should be performed daily. Inspect all cables, the nylon coating on all cables, and the area near the fitting at each end of each cable. Replace any damaged or worn cable immediately. - Page 4 you will have many safe and pleasurable hours of healthful exercise with your equipment. After assembly, you should check all functions to ensure correct operation. If you experience problems, first recheck the assembly instructions to locate any possible errors made during assembly. If you are unable to correct the problem, call the dealer from whom you purchased the machine or call the dealer nearest you.
-
Page 5: Exploded Drawing
Exploded Drawing - 4 -... -
Page 6: Parts List
Parts list DESCRIPTION DESCRIPTION Weight frame End cap 2 Upper connecting frame Connecting board cover Bottom horizontal frame Bolt M10*16 Main frame Bolt M12*55 Guide plate Minor axis Connecting board Bolt M12*130 Adjusting tube Alloy cover Limited board Pulley Weight Nylon nut M12 Fixed plate Flat washer... - Page 7 Flat washer D6 Snap joint Spring washer D6 Bolt M6*12 Bolt M6*30 Hex nut M6 Foam inner cap Aluminum pulley Foam Bolt M5*8 Foam outer cap - 6 -...
- Page 8 - 7 -...
- Page 9 NOTE: Most of the listed hardware has been packaged separately, but some of them have been preinstalled in the identified assembly parts. In these instances, simply remove and reinstall the hardware as assembly is required. Please refer the individual steps for the installation and pay attention to the preinstalled hardware.
-
Page 10: Assembly Instruction
ASSEMBLY INSTRUCTION It is well suggested that two or more people to assemble this machine to NOTE: avoid any possible injury. Remove all the security tape and wrapping before the installation. Step 1 1. Pre lock the Bottom horizontal frame (3) on the weight frame (1) and main frame (4) with Bolt (75), Flat washer (58) and Nylon nut (57). - Page 11 Step 2 1. Put the Cushion (72), Slider (63), Weight block(10kg) (71), Weight block(5kg) (70), and Guide block (65) on the weight frame (1) in sequence. 2. Fixed the Slider (63) on the weight frame (1) with E snap ring (61). 3.
- Page 12 Step4 1. Take out the Pulley (56) preassembled on the weight frame (1). 2. Take the ball head of the cable (86), install following the arrow instruction. 3. Lock the Alloy cover (55) and Aluminum pulley (94) to the weight frame (1) with the bolt (52), flat washer (58) and Nylon nut (57).
- Page 13 Step 5 Lock the Front block cover (89a) and Rear block cover (89b) tightly in the weight frame (1) with bolt (92). - 12 -...
-
Page 14: Warm-Up And Cool-Down
WARM-UP and COOL-DOWN Using your machine will provide you with several benefits. It will improve your physical fitness, tone your muscles and in conjunction with a calorie-controlled diet, help you lose weight. WARM-UP PHASE The purpose of warming up is to prepare your body for exercise and to minimize injuries. Warm up for two to five minutes before strength-training or aerobic exercising.
Need help?
Do you have a question about the LGE-10 and is the answer not in the manual?
Questions and answers