Premier Mounts PP-FCTA-QL Installation Manual
Suspended ceiling adapter
Hide thumbs
Also See for PP-FCTA-QL:
- Installation instructions manual (11 pages) ,
- Installation instructions manual (27 pages)
Table of Contents
Advertisement
Quick Links
Advertisement
Table of Contents

Related Manuals for Premier Mounts PP-FCTA-QL


Summary of Contents for Premier Mounts PP-FCTA-QL
- Page 1 PP-FCTA-QL Installation Guide Installationsanleitung, Guía de Instalacíon, Guida de Installazione, Guide d’Installation, Installatie gids Suspended Ceiling Adapter www.mounts.com | North America 800.368.9700 | International +1-714-632-7100 1321 S. State College Blvd., Fullerton, CA 92831 USA...
-
Page 2: Table Of Contents
PROPER SAFETY EQUIPMENT AND TOOLS FOR THE ASSEMBLY PROCEDURE TO PREVENT PERSONAL INJURY. PREMIER MOUNTS DOES NOT WARRANT AGAINST DAMAGE CAUSED BY THE USE OF ANY PREMIER MOUNTS PRODUCT FOR PURPOSES OTHER THAN THOSE FOR WHICH IT WAS DESIGNED OR DAMAGE CAUSED BY... -
Page 3: Installation Tools
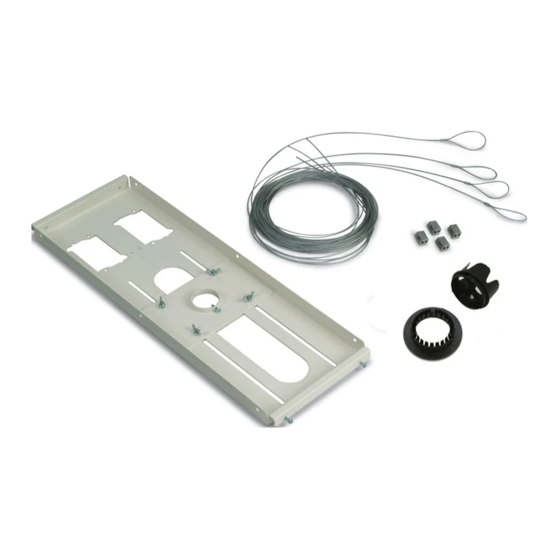
Hammer Parts List Your Premier Mounts product is shipped with all proper installation hardware and components. Make sure that none of these parts are missing and/or damaged before beginning the installation. If there are parts missing and/or damaged, please stop the installation and contact Premier Mounts at (800) 368-9700. -
Page 4: Features
Introduction Please read these installation instructions once thoroughly before attempting to install your Premier Mounts product. Please take a minute to familiarize yourself with the contents of the package and make sure you have all the parts and tools you need to safely complete the installation. -
Page 5: Pp-Fcta-Ql Installation
Your thumb will press up from the bottom, effectively pinching the escutcheon ring into place. Proceed to the ″Mounting the PP-FCTA-QL″ on page 6. Ceiling Tile Hole Cutter... -
Page 6: Mounting The Pp-Fcta-Ql
PP-FCTA-QL Mounting the PP-FCTA-QL 1) Pre-set four (4) M5 x 16mm combo screws on the ceiling plate assembly (two on each end of the plate). 2) Remove any of the 24˝ x 24˝ or 24˝ x 48˝ tiles that are surrounding the marked tile. -
Page 7: Securing The Ceiling Plate
PP-FCTA-QL Securing the Ceiling Plate 1) Once the ceiling plate assembly is resting on the t-bar frame rails, use a screwdriver to tighten the four (4) M5 x 16mm combo screws. 2) Slide the upper plate assembly over the hole that was cut in the tile and center it over the hole. -
Page 8: Ceiling Attachment
PP-FCTA-QL Ceiling Attachment Wood Stud The PP-FCTA-QL must be secured using the Quick Locks and braided cables (supplied). ˝ Anchoring eye bolts are commercially available. Wood Stud Ceiling 1) Determine the mounting location. Eye Lag Bolt 2) Use a 1/8˝ drill bit to pre-drill the mounting holes. - Page 9 PP-FCTA-QL Truss Ceiling Ceiling Truss 1) Loop the braided cable around the truss. 2) Run the open end of the braided cable through the ˝ hole in the loop. 3) Pull the open end down until the braided cable ˝...
-
Page 10: Quick Lock Installation
PP-FCTA-QL Quick Lock Installation Step 1 Cable Output Feed the braided cable into the Quick Lock (see ˝ Cable Input directional input arrows). To release the braided ˝ cable, slide the release pin to disengage. Release Pin Please follow the steps below in numerical order ( , ) to correctly install the Quick Lock Cable Kit. - Page 11 PP-FCTA-QL ˝ Braided Cable Release Pin Mounting Hole ˝ Braided Cable Release Pin Mounting Hole Page 11...
- Page 12 PP-FCTA-QL Step 5 To relieve tension on the braided cable, slide the release pin on the Quick Lock. ˝ 1) Adjust the braided cable tension and placement so that the cable forms a 15° angle away from the ˝ corner of the ceiling plate.
-
Page 13: Securing 1 ½˝ Npt To The Pp-Fcta-Ql
PP-FCTA-QL Securing 1 ½˝ NPT to the PP-FCTA-QL Secure the 1 ½″ (NPT) pipe to the ceiling plate and tighten by using one (1) M5 x 16mm combo head screw to the plate. The M5 x 16mm combo head screw must be used to stabilize the 1 ½″... -
Page 14: Technical Specifications
PP-FCTA-QL Technical Specifications All measurements are in inches. 23.25 590.5 23.70 1.18 30.1 24.45 SLIDING PLATE 4.50 114.3 3.50 88.90 PIPE THREADS 1.5" NTP 1.18 24.75 8.43 1.00 3.25 6.50 Page 14... -
Page 15: Warranty
What Premier Mounts Will Do At the sole option of Premier Mounts, Premier Mounts will repair or replace any product or product part that is defective. If Premier Mounts chooses to replace a defective product or part, a replacement product or part will be shipped to you at no charge, but you must pay any labor costs.
Need help?
Do you have a question about the PP-FCTA-QL and is the answer not in the manual?
Questions and answers