Table of Contents
Advertisement
Quick Links
Advertisement
Table of Contents

Subscribe to Our Youtube Channel
Related Manuals for Flex CS 40 WET


Summary of Contents for Flex CS 40 WET
- Page 1 CS 40 WET FLEX CS 40 WET...
- Page 2 CS 40 WET...
- Page 3 CS 40 WET...
-
Page 4: Table Of Contents
CS 40 WET Contents Symbols used in this manual Technical specifications Overview For your safety Noise and vibration Instructions for use Maintenance and care Disposal information -Declaration of Conformity Exemption from liability Symbols used in this manual WARNING! Denotes impending danger. -
Page 5: Technical Specifications
CS 40 WET Wear ear protection! Use light-weight breathing protection! Disposal information for the old machine (see page Disposal information)! Technical specifications Dry/wet saw CS 40 WET Supply power 120V/60Hz Rated current No-load speed 12000min Blade size 5 " ×7/8 "... -
Page 6: For Your Safety
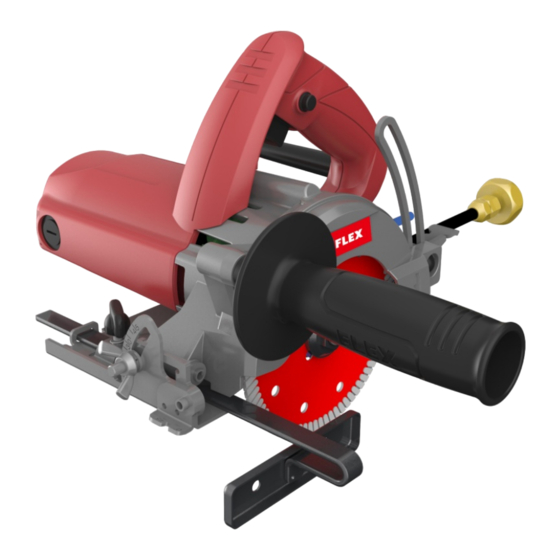
CS 40 WET 1 Trigger switch 10 Tap adaptor 2 Lock-off button 11 Parallel guide 3 Water valve 12 0-45°locking knob 4 Cutting –depth locking lever 13 Base plate 5 Blade guard 14 Parallel-guide retaining screw 6 Outer flange 15 Carbon brush cap... - Page 7 – as intended, – in perfect working order. Faults which impair safety must be repaired immediately. Intended use wet/dry saw CS 40 WET is designed – for commercial use in industry and trade, – for cutting tile and marble, – not for cutting metal, wood and plastic, –...
- Page 8 CS 40 WET Check for misalignment or binding of moving parts, breakage of parts, and any other condition that may affect the tool's operation. If damaged, have the tool serviced before using. Many accidents are caused by poorly maintained tools.
-
Page 9: Noise And Vibration
CS 40 WET Specific safe operation guide Ensure that the directional arrow marked on the blade corresponds with the rotational direction of the motor. Always keep the blade-securing arbor and collars clean. Ensure that the blade-securing means is securely tightened with the wrench provided. -
Page 10: Instructions For Use
CS 40 WET or poorly maintained, the vibration emission may differ. This may significantly increase the exposure level over the total working period. However if the tool is used for different applications, with different accessories or poorly maintained, the vibration emission may differ. This may significantly decrease the exposure level over the total working period. - Page 11 CS 40 WET Use the socket wrench supplied to unscrew the spindle bolt in a clockwise direction while using the solid wrench to fix the spindle. Remove the bolt and the outer flange. Inner flange (A) remains on the spindle.
- Page 12 CS 40 WET counterclockwise direction while using the solid wrench to fix the spindle. CAUTION! Do not over-tighten! Adjustment the water valve Turn the water valve to the position for maximum water flow onto the blade. Turn the water valve to the position to stop the water flow.
- Page 13 CS 40 WET Hold the base plate flat against the edge of the work piece and lift the body of tool until the blade is at the correct depth. Tighten the depth locking lever. Changing the blade WARNING! Do not attempt to cut small pieces.
- Page 14 CS 40 WET Loosen the 0-45° locking knob. Tilt the body of saw until the required angle is reached. Tighten the locking knob to secure the base plate. Switch on and off The main switch requires two actions to turn the tool on. The tool can only be put into service if the handle is firmly grasped and both buttons are depressed.
-
Page 15: Maintenance And Care
CS 40 WET Operating instructions Tile cutting CAUTION! Always open the water valve before you start cutting the tile material with the blade supplied with this saw or other wet-cutting blades. The volume of water flow can be adjusted with the water valve. -
Page 16: Disposal Information
If the power cord of the electric power tool is damaged, it must be replaced with a specially prepared power cord (attachment type X). This power cord is available from FLEX customer service. Spare parts and accessories Other accessories, in particular insertion tools, can be found in the manufacturer’s catalogues. -
Page 17: Note
EN 60745 in accordance with the regulations of the directives 2004/108/EC (until 19.04.2016), 2014/30/EU (from 20.04.2016), 2006/42/EC, 2011/65/EC. Responsible for technical documents: FLEX-Elektrowerkzeuge GmbH, R & D Bahnhofstrasse 15, D-71711 Steinheim/Murr 16.10.2015 FLEX-Elektrowerkzeuge GmbH Bahnhofstrasse 15, D-71711 Steinheim/Murr Exemption from liability...
Need help?
Do you have a question about the CS 40 WET and is the answer not in the manual?
Questions and answers