Advertisement
Quick Links
INSTALLATION MANUAL
Level of Difficulty
Easy
Parts List
1
Pro Series grille guard
1
Driver / left mounting bracket
1
Passenger / right mounting bracket
1
Driver / left top bracket
1
Passenger / right top bracket
1
Driver / left light mount bracket
1
Passenger / right light mount bracket
1
Support flange
2
Hex bolt, M6
4
Flat washer, M6
2
Nylock nut, M6
2
Hex bolt, M8
2
Button head bolt, M8
2
Clip nut, M8
4
Flat washer, M8
4
Lock washer, M8
4
Button head bolt, M10
4
Nylon lock nut, M10
8
Flat washer, M10
1
Allen wrench, 5mm
1
Allen wrench, 6mm
Tools Required
Socket set
Wrench set
Ratchet
--
ARIESAUTOMOTIVE.COM
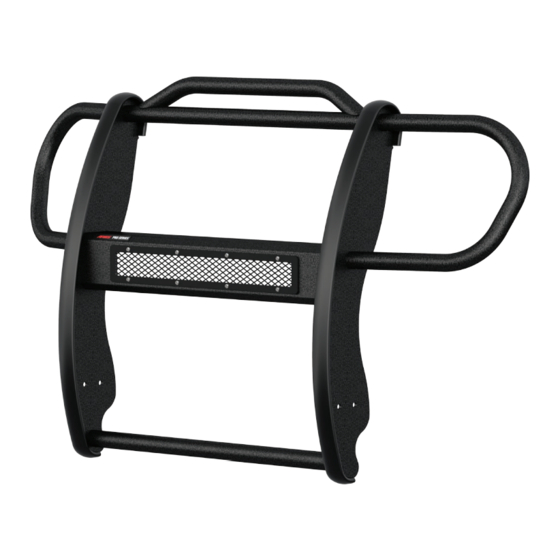
Product Photo
Brackets and Hardware
•
NEED ASSISTANCE?
•
877.287.8634
Passenger / right
top bracket
Passenger / right
frame mounting bracket
•
P1055-INS-RA
•
PAGE 1
P1055
Driver / left
top bracket
Driver / left
frame mounting bracket
Support flange
Advertisement

Related Manuals for Aries Pro Series


Summary of Contents for Aries Pro Series
- Page 1 INSTALLATION MANUAL P1055 Level of Difficulty Product Photo Easy Parts List Pro Series grille guard Driver / left mounting bracket Passenger / right mounting bracket Driver / left top bracket Passenger / right top bracket Driver / left light mount bracket...
- Page 2 Torque Specifications Notes and Maintenance Before you begin installation, read all instructions thoroughly. M6 bolt 3 ft-lbs. Proper tools will improve the quality of installation and reduce the time required. M8 bolt 7 ft-lbs. To protect the product, wax after installing. Regular waxing is recommended M10 bolt 16 ft-lbs.
- Page 3 PROCEDURE: REMOVE CONTENTS FROM BOX. VERIFY ALL PARTS ARE PRESENT. READ INSTRUCTIONS CAREFULLY BEFORE STARTING INSTALLATION. CUTTING MAY BE REQUIRED. ASSISTANCE IS HIGHLY RECOMMENDED. VERY IMPORTANT: This Grille Guard is not compatible with optional Forward Collision Warning Systems featuring bumper mounted radar controlled sensor. Installation also excludes all models with factory installed front tow hooks.
- Page 4 Driver Side Installation Pictured Remove hardware attaching the top of the grille to the radiator core support. Remove the hardware attaching the bottom of the bumper cover to the bottom of the radiator core support. Front Fig 1 (Fig 2) Bottom of bumper cover pictured Front Front (Fig 3) Remove hardware attaching fender to fender...
- Page 5 Driver Side Installation Pictured Front (Fig 5) With assistance, carefully pull bumper cover and grille assembly off of vehicle (passenger/right side pictured) (Fig 6) Driver/left impact bumper bracket (Fig 7) Driver/left Top Bracket (Fig 8) Remove hex bolt (large arrow). Select the driver/left Top Mounting Bracket.
- Page 6 Driver Side Installation Pictured Front Front (Fig 12) Driver/left Frame Mounting Bracket (Fig 13) Reuse (2) factory hex bolts (arrow) to attach driver/left Frame Bracket to bottom of bumper bracket (2) 10mm x 35mm Button Head Bolts (4) 10mm Flat Washers (2) 10mm Nylon Lock Nuts (1) 8mm button head bolt Front...
- Page 7 Driver Side Installation Pictured Front (Fig 16) Remove both block offs from bumper (arrow). NOTE: Pictured from behind bumper (Fig 17) Before reinstalling the bumper cover/grille, cover edges on brackets with removable tape (masking tape for example). Carefully guide bumper cover/grille assembly over the bumper brackets and back into position.
- Page 8 Driver Side Installation Pictured Front (2) 10mm Button Head Bolts (4) 10mm Flat Washers (2) 10mm Nylon Lock Nuts (Fig 19B) Reinstall the Grille Guard Product Registration CURT Group stands behind our products with industry leading warranties. You can help us continue to improve our product line and help us understand your needs by registering your purchase by visiting: warranty.curtgroup.com/surveys At CURT Group, customer is king.
Need help?
Do you have a question about the Pro Series and is the answer not in the manual?
Questions and answers