Table of Contents
Advertisement
Advertisement
Table of Contents

Subscribe to Our Youtube Channel
Related Manuals for SATO CT4-ex-RF


Summary of Contents for SATO CT4-ex-RF
- Page 1 CT4-ex-RF Operator Manual...
- Page 2 Before You Start Thank you for purchasing this SATO CT4-ex-RF printer (hereafter referred to as “the printer”). This manual supplies basic information on how to operate the printer. Read the manual carefully to understand each function before operation. First edition: Aug. 2017...
- Page 3 Regulatory Approval You are cautioned that changes or modifications not expressly approved by the party responsible for compliance could void your authority to operate the equipment. This device complies with Part 15 of the FCC Rules. Operation is subject to the follow- ing two conditions: (1) this device may not cause harmful interference, and (2) this de- vice must accept any interference received, including interference that may cause un- desired operation.
- Page 4 EN55032 Warning This is a class A product. In a domestic environment, this product may cause radio interference, in which case the user may be required to take adequate measures. EN55032 Warnung Warnung! Dies ist eine Einrichtung der Klasse A. Diese Einrichtung kann im Wohnbereich Funkstörungen verursachen.
- Page 5 (Pb) (Cd) (Cr6+) (PBB) (Hg) (PBDE) 电池组 ABS PC 本表格依据 SJ/T 11364 的规定编制。 GB/T 26572 GB/T 26572 本标志中的年数,是根据 2006 年 2 月 28 日公布的 “电子信 息产品污染防止管理办法” 和 SJ/T11364 “产品污染防止标识 要求”,适用于在中华人民共和国(除台湾、香港和澳门外) 生产或进口的电子信息产品的 “环保使用期限”。在遵守使用 说明书中记载的有关本产品安全和使用上的注意事项、且没有 其他法律和规定的免责事由的情况下,在从生产日开始的上述 年限内,产品的有毒、有害物质或元素不会发生外泄或突变, 使用该产品不会对环境造成严重污染或对使用者人身、财产造 成严重损害。 注 1): “环保使用期限”不是安全使用期限。尤其不同于基于电气性能安全、电磁 安全等因素而被限定的使用期限。产品在经适当使同后予以废弃时...
-
Page 6: Table Of Contents
Table of Contents 1 Safety Precautions ..................... 5 2 Precautions for Installation and Handling ............... 8 3 Checking the Bundled Accessories ............... 10 4 Parts Identification ....................11 5 Power On the Printer ....................14 6 Loading the Label and the Carbon Ribbon ............16 7 Starting Up the Printer ..................... -
Page 7: Safety Precautions
1 Safety Precautions This section describes how to safely operate the printer. Be sure to read and understand all instructions carefully before you install and use the printer. Pictographic Symbols This operator manual and printer labels use a variety of pictographic symbols. These symbols show the safe and correct operation of the printer and how to prevent injury to others and property damage. - Page 8 SATO repair it, so absolutely do not attempt reseller or technical support center. Using repairs on your own.
- Page 9 CAUTION ■ Carrying the Printer ■ Handling the SD card • Do not carry the printer with media • Be careful not to impart shock to the SD loaded in it. The media could fall out and card by dropping or distorting. Doing so cause an injury.
-
Page 10: Precautions For Installation And Handling
2 Precautions for Installation and Handling Printer operation can be affected by the printer environment. Refer to the following instructions for installation and handling of the CT4-ex-RF printer. Select a Safe Location Place the printer on a surface that is flat and level. - Page 11 Installation Space Make sure that there is sufficient space for operation, replacement of consumables, cleaning, etc. around the printer as the following illustrations. Top View 547 mm (21.5 inches) 150 mm 150 mm (5.9 inches) (5.9 inches) Side View...
-
Page 12: Checking The Bundled Accessories
3 Checking the Bundled Accessories After unpacking the printer, make sure that you have all the bundled accessories. If there are any missing items, contact the SATO reseller where you purchased the printer. AC adapter and Quick Guide and power cord... -
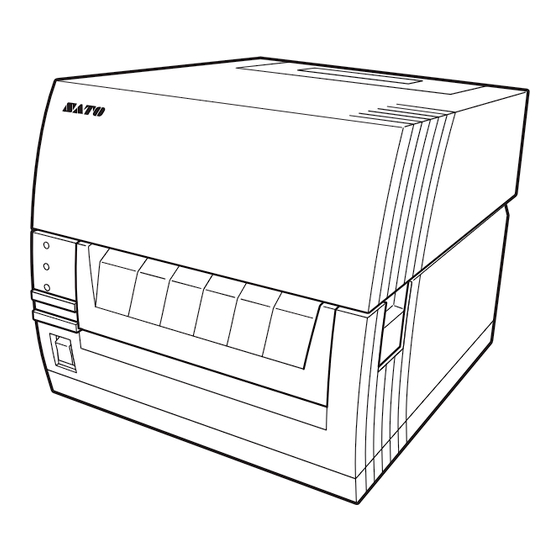
Page 13: Parts Identification
4 Parts Identification Appearance of the Printer Front View Window Open it to use the fan-fold media. Top Cover Cover open/close latch Front cover Open it to operate the DIP switches or potentiometers, and to check the error code. Operator Panel POWER indicator Lights (green) when the Power switch is turned on. - Page 14 Rear View LAN connector ( Page 31) USB connector ( Page 31) SD card slot Page 33 and 45) SD card is used for backup of printer setting information. RS-232C connector Page 31 and 45) DC input connector When the Top Cover Is Open Direct Thermal Model Upper blade of the cutter Print head (Consumables)
- Page 15 Thermal Transfer Model Upper blade of the cutter Ribbon unit Load the carbon ribbon here. When the Front Cover Is Open Inside the Front Cover Cutter unit connector Potentiometers DIP switches ERROR status LED Cutter Section Lower blade of the cutter Cutter unit The upper blade of the cutter is installed inside the top cover.
-
Page 16: Power On The Printer
5 Power On the Printer Setting the Power Supply (AC adapter) WARNING • The AC adapter and power cord bundled with the printer is for exclusive use. You must not use them for other electrical equipment. Also, be sure not to connect an- other AC adapter to this printer. - Page 17 Power On the Printer Flip the Power switch of the printer. “I” is ON. POWER indicator When the Power switch is turned on, the POWER indicator lights. ON LINE indicator (The ON LINE indicator also lights.) Power switch Power Off the Printer After checking the power is properly turned on, power off the printer.
-
Page 18: Loading The Label And The Carbon Ribbon
6 Loading the Label and the Carbon Ribbon Use genuine media and ribbons for the printer, for optimum print quality. See page 20 for how to replace the carbon ribbon. Setting the Carbon Ribbon (Thermal transfer model only) CAUTION • The print head and its surroundings are hot after printing. Be careful not to get burned when replacing the carbon ribbon immediately after printing. - Page 19 Carbon Ribbon of over 92 mm (3.6 inches) Wide Set the carbon ribbon ② from the right side of the ① ribbon supply spindle (in the back), and push the core ③ guide to lock. Core guide of the ribbon supply spindle ...
- Page 20 Carbon Ribbon of up to 76 mm (3.0 inches) Wide Set the carbon ribbon with the bundled ribbon adapter in the ribbon unit. When you use the carbon ribbon of 76 mm (3.0 inches) or 59 mm (2.3 inches) wide, move the tab of the ribbon adapter as shown by the arrow to set it in the lower position.
- Page 21 Pass the carbon ribbon from the ribbon supply (in the back) under the print head to reach the ribbon rewinder (in the front). Make sure to pass the carbon ribbon between the print head and the label stopper. Do not pass under the label Label stopper stopper.
- Page 22 Close the top cover. Press the points on the top, as shown by the arrows, until the top cover closes with a click. Setup of the carbon ribbon is complete. Replacement of the Carbon Ribbon When the printer is in the middle of printing, replace it while the power is on. CAUTION Be careful not to touch the upper blade of the cutter to avoid being hurt when you set the ribbon unit inside the top cover.
- Page 23 Loading Labels The media roll and fan-fold media can be used for printing in the printer. The media roll and fan-fold media each require a special way of loading. Use genuine media for the printer, for optimum print quality. Keep media out of direct sunlight, high temperature and humidity, desiccation, etc.
- Page 24 Loading Media Roll When you use the fan-fold media, see the explanations on page 24. CAUTION • The print head and its surroundings are hot after printing. Be careful not to get burned when replacing the media immediately after printing. •...
- Page 25 Draw in the media and pass it through the media sensor and under the tab. Media sensor Close the top cover. Press the points on the top, as shown by the arrows, until the top cover closes with a click. ...
- Page 26 Loading Fan-Fold Media CAUTION • The print head and its surroundings are hot after printing. Be careful not to get burned when replacing the media immediately after printing. • Touching the edge of the print head with your bare hand could cause injury. •...
- Page 27 While holding the media ② guide slide lever pressed, adjust the width of the media holder to fit to the size ① of the media. Draw in the media and pass it through the media sensor and under the tab. Media sensor Close the top cover.
- Page 28 Fine-tuning the Print Position and Stop Position of the Label Fine-tuning the Print Position If the standard print position is not adequate, fine-tune it with the “Print position potentiometer” inside the front cover. Use the cross slot side of the attached tuning driver alongside the media holder.
- Page 29 Thickness (including liner) is from 0.08 to 0.19 mm (0.003 to 0.007 inches). For details, contact your SATO reseller or technical support center. Cutting accuracy is ± 1.5 mm (0.06 inches). Workable cutting pitch of the cutter unit is from 20 to 400 mm (0.79 to 3.9 inches).
- Page 30 Cutting the Media with Perforated Line As for the media roll, cutting must be avoided on the perforated line and in the area within 1 mm (0.04 inches) near side from the perforated line (gray area of figure 1). As for the fan-fold media, cutting must be avoided in the area from 4 to 25 mm (0.16 to 1.0 inches) apart from the folded perforated line (gray area of figure 2).
-
Page 31: Starting Up The Printer
7 Starting Up the Printer Note the operations and functions necessary to use the printer. Before Use The following is a basic flow of the work of the printer. Power ON Usual condition Online (ON LINE) Error The printer is ready for printing. The printer is not ready, for The ON LINE indicator lights. -
Page 32: Setting The Dip Switch
Adjustment of offset • Partial cut is the cutting function to cut the media and leave a part of it intact. There are notes to use it. For details, contact your SATO reseller or technical support center. • The head check is just for a reference to check a broken element of the print head, and it is not a function to guarantee barcode readability. -
Page 33: Connecting The Interface
Connecting the Interface You may need to set a DIP switch inside the front cover depending on the selected interface. ( Page 30) LAN connector USB connector RS-232C connector Using the USB Connector Connect the printer and computer with the USB cable, and power on the printer while the computer is powered on. -
Page 34: Automatic Adjusting Of The Media Sensor
3 times and one of the numbers “0”, “1” or “2” appears on the ERROR status LED. Try again to perform automatic adjustment of the sensor. And if the error occurs again, contact your SATO reseller or technical support center. Figure 1 Media Ⓐ... -
Page 35: Using The Sd Card
Using the SD Card After you store the setting contents of the printer in an SD card, they can be read out in another CT4-ex-RF. Be sure to use an SD card initialized in the printer. ( Page 34) Use the recommended SD card for the printer, for optimum performance. - Page 36 Insert the SD card in the SD card slot. Open the top cover. Open the front cover, and make notes about the settings of number 1, 2 and 3 of the DIP switches. Set number 1 of the DIP switches to OFF, number 2 to OFF, and number 3 to OFF. ...
-
Page 37: Printing The Hex (Hexadecimal) Dump
Printing the HEX (hexadecimal) Dump “Printing the HEX dump” means to print hexadecimally the data transfered from the computer to the printer. The function is helpful to check if the data from computer is properly transfered to the printer, for example. Power off the printer and open the top cover. - Page 38 To finish printing, press the button to stop printing and FEED power off the printer. Samples of Test Print * The printing contents may differ depending on the specifica- tions of the printer.
-
Page 39: Initial Values
8 Initial Values The initial values of the principal items in the printer are listed as follows. The setting items and setting values can be checked by the test print. ( Page 1. Print method Direct thermal/ Thermal transfer 2. Head density 305 dpi 3. - Page 40 28. RS-232C setting Portrait: 19200 Data bit: 8 bits Parity: None Stop bit: 1 bit Flow control: Status 4 29. Non-standard setting Setting of standard or non-standard: Standard code 30. Other setting USB serial number return: Return serial number...
-
Page 41: Troubleshooting
Or perform the automatic adjusting of the media sensor. If the trouble persists, contact your SATO reseller or technical support center. The cutter is not connected. Or Contact your SATO reseller or technical c u t t i n g w a s n o t p e r f o r m e d support center. - Page 42 Use an SD card initialized in the printer. If the trouble persists or the SD card is not used, contact your SATO reseller or technical support center. The overheating protection is Wait until the ERROR status LED goes out.
- Page 43 Is the power cord damaged? Use a new power cord. Purchase a new power cord certainly exclusively for the printer from the SATO reseller where you purchased the printer. Be absolutely sure not to use any power cord other than one exclusively made for the printer.
- Page 44 * The printer cleaning kit is optional. Contact your SATO reseller or technical support center to purchase it. Caution...
- Page 45 Use genuine media and carbon ribbon for the of SATO product designed for printer. the printer loaded? * The printer cleaning kit is optional. Contact your SATO reseller or technical support center to purchase it. Caution • Disconnect the power cord from the AC outlet before cleaning.
- Page 46 (print setting). correction (printer setting) set properly? * The printer cleaning kit is optional. Contact your SATO reseller or technical support center to purchase it. Caution • Disconnect the power cord from the AC outlet before cleaning.
-
Page 47: Options
10 Options Connecting the Simple Input Device Key-Bo (Optional) Before you connect the Simple Input Device Key-Bo to the printer, set number 7 and 8 of the DIP switches inside the front cover to ON. While the Simple Input Device Key-Bo is connected, the other interface cannot be used. -
Page 48: Daily Cleaning
Especially, be sure not to use it to clean the print head. • Be sure to power off the printer before cleaning. * The printer cleaning kit and cleaning sheet are optional. Contact your SATO reseller or technical support center to purchase them. - Page 49 Cleaning of the media sensor * Wipe the media sensor with a cotton cloth soaked with the printer cleaning fluid. * The printer cleaning kit and cleaning sheet are optional. Contact your SATO reseller or technical support center to purchase them.
- Page 50 Repeat these steps twice or thrice to clear waste from the print head. If some waste still remains, repeat these steps several more times. * The cleaning sheet is optional. Contact your SATO reseller or technical support cen- ter to purchase it.
-
Page 51: Basic Specifications
12 Basic Specifications Print Method Direct thermal/thermal transfer combination Head Density 12 dots/mm (305 dpi) (resolution) Printable Area Length 400 mm (15.7ˮ) × Width 104 mm (4.1ˮ) maximum 2 to 4 inches/sec (50.8 to 101.6 mm/sec) Print Speed * Print speed could be limited depending on the type of the printing layout, media or carbon ribbon. - Page 52 Size of Ribbon/ Ribbon Length: 100 m (328 ft.) winding maximum Form of Ribbon/ Ribbon width: 111 mm (4.4ˮ) maximum Winding Direction of Winding Direction: Face-out Ribbon Type of Winding: Winding with Core Dispensing Mode Continuous, Cutter, Partial Cut Width 198 mm (7.8ˮ) × Depth 247 (9.7ˮ) mm × Height 181 mm Size/ Weight (7.1ˮ) /Approximately 3.2 kg (7.1 lb) (Except AC adapter) Power requirements (AC adapter)
- Page 53 UPC-A/UPC-E, JAN/EAN, CODE39, CODE93, CODE128, GS1-128 (UCC/EAN128), CODABAR (NW-7), ITF, Industrial 2 of 5, Matrix 2 of 5, Customer barcode, UPC add-on code, GS1 DataBar Omnidirectional, GS1 DataBar Truncated, Barcodes GS1 DataBar Stacked, GS1 DataBar Stacked Omnidirectional, GS1 DataBar Limited, GS1 DataBar Expanded, GS1 DataBar Expanded Stacked * GS1 DataBar means RSS.
- Page 54 Barcode Ratio 1:2, 1:3, 2:5 Selectable arbitrarily Magnification Ratio Letters: Length 1 to 12 times larger, Width 1 to 12 times larger (Letters, Barcodes) Barcodes: 1 to 12 times larger Status return function Graphic function Continuous number function ...
Need help?
Do you have a question about the CT4-ex-RF and is the answer not in the manual?
Questions and answers