Table of Contents
Advertisement
Quick Links
Advertisement
Table of Contents

Related Manuals for BZB Gear BG-UHD-88M


Summary of Contents for BZB Gear BG-UHD-88M
- Page 1 BG-UHD-88M 4K/18G HDCP-2.2 8x8 HDMI Matrix w/ Audio...
- Page 2 SAFTY AND NOTICE Do not substitute or use any other Power Supply other than the enclosed unit, or a BZB Gear approved Replacement Part. Doing so will void the warranty and potentially expose the user to dangerous voltages resulting in an electrical shock.
-
Page 3: Table Of Contents
Table of Contents Introduction ..........................4 Features ............................. 4 Panel Descriptions ........................5 Front Panel ........................5 Back Panel ......................... 6 Remote Control......................... 7 Output and Input select ..................... 7 EDID Set Up ........................7 Application Diagram ........................ 8 Specifications ........................... 9 RS232 Pin Assignment ...................... -
Page 4: Introduction
Introduction The BG-UHD-88M is an 8x8 HDMI Matrix Switcher with Audio Embedding and Extraction, it is compatible with high dynamic range (HDR) formats and is HDCP 2.2 compliant. It supports 4K/UHD video @ 60Hz with 4:4:4 chroma sampling, as well as HDMI data rates up to 18Gbps. -
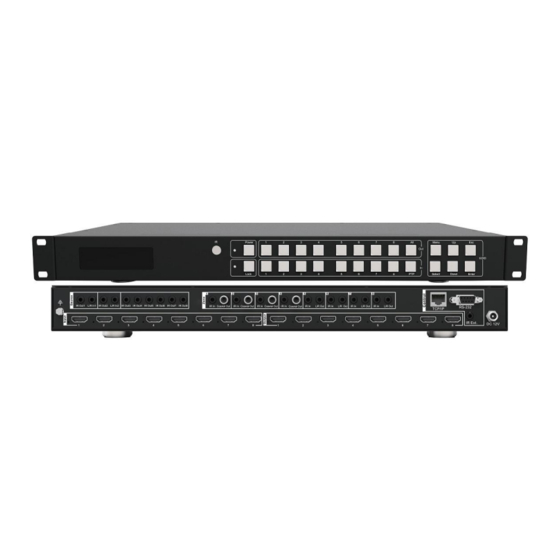
Page 5: Panel Descriptions
LED display – Show the status of input-output selection, EDID info and so on. ② IR receiver window – Receiver IR signal from the remote control of BG-UHD-88M. ③ Power LED indicator – Indicate the status of the power for the matrix. -
Page 6: Back Panel
Note: Press and hold the “Menu” button for 10 seconds can RESET the matrix. ⑧ Up selection button – Press to change segment’s value. ⑨ ESC – Press to quite EDID set mode. ⑩ Lock LED indicator – Indicate the status of Lock. ⑪... -
Page 7: Remote Control
Remote Control Description Output and Input select A. OUTPUT-X select INPUT-Y: 1. Press OUTPUT-X (X means 1 to 8 of outputs) Press INPUT-Y ( Y means 1 to 8 of inputs ) 2. Press OUTPUT-X (X means 1 to 8 of outputs) press the left and right arrow buttons to select the input. -
Page 8: Application Diagram
Application Diagram... -
Page 9: Specifications
Specifications Signal HDMI Compliance HDMI 2.0 HDCP Compliance HDCP 2.2 and HDCP 1.x Video Resolutions 18Gbps (4K@60Hz 4:4:4 8bit) HDMI Cable Distance 1.5 meters for 4K@60Hz 4:4:4 RS232 Baud Rate 57600 IR Carrier Frequency 30-55KHz at 5 volts Chroma Subsampling 4:4:4, 4:2:2, 4:2:0 Color Space RGB, YCbCr4:4:4, YCbCr4:2:2, YCbCr4:2:0... -
Page 10: Rs232 Pin Assignment
RS232 Pin Assignment BG-UHD-88M (DCE) Remote Control Console (DTE) Assignment Assignment Baud Rate: 57600 bps Data Bit: 8-bit Parity: None Stop Bit: 1-bit Flow Control: None NOTE: Use Straight Through DB9 Cable to connect the matrix with computer, DO NOT use Crossover Cable (Null Modem Cable). - Page 11 LCD ON/OFF Set LCD Always On Or Auto Turn Off In Power On State Reset System To Default Setting RESET (Should Type ‘Yes’ To Confirm, ‘No’ To Discard) Reset System And Network To Default Setting RESET ALL (Should Type "Yes" To Confirm, "No" To Discard) Set OUTPUT: xx On Or Off, xx=[01,02,…08] OUT xx ON/OFF Set OUTPUT: xx Color Space Convert Mode...
-
Page 12: Package Contents
NET RB Set Network Reboot and Apply New Config!!! NET TN xxxx Set Telnet Port Package Contents BG-UHD-88M 1x 12V/3A DC Power Supply, 1x Power Cord 8x IR Emitter Cable 9x IR Receiver Cable 1x Remote Control 1x Rack Mounting Ears... -
Page 13: Gui Control
GUI Control PC System Microsoft Windows Operation System Installation 8x8 HDMI Matrix controller is a green software. You just need to copy “8x8 HDMI Matrix Controller vx.x.exe” to the PC which is used to control the Matrix by RS232 COM or TCP to complete installation. -
Page 14: General" Page
“General” page ① Select control mode: RS232 COM mode (Auto COM ports detected) or TCP mode ② List detected COM ports ③ List all Matrix devices after search operation ④ Click to search all Matrix devices that connected in same subnet ⑤... -
Page 15: Set Tcp Control Configuration
Set TCP control configuration Click Config button to show TCP configuration window. ① Set tag to identify Matrix device ② Set IP mode: Subnet should support DHCP protocol when set Auto IP mode, then Matrix device will obtain IP automatically. Otherwise, set Static IP mode and designate a useable IP for Matrix device ③... -
Page 16: Edit Input Port Tags
① Input port tags ② Click to edit Input port tags ③ Output port tags ④ Click to edit Output port tags NOTE: 1. Edit boxes are read only, click “Edit” button to pop up window to edit the tags. 2. -
Page 17: Edit Output Port Tags
Edit Output port tags After action of ④, edit form will pop-up as below: Define tags for respective Output port, then displays connect the Output ports can be easily remembered. Click buttons with “×” caption to delete tag which is no use any more, if tag is still used by any other Output port, delete action will be discarded. -
Page 18: Pop-Up Tag Messages
④ Display Output from Input with tag information when mouse moves over ② buttons ⑤ Pre-Setting items: Default is Port to Port ⑥ Click to edit selected pre-setting item ⑦ Set selected pre-setting item to Matrix NOTE: When Change to this “Setting” page, software will try to refresh source selection status of Output port. -
Page 19: Pop-Up Menu
Pop-up Menu When mouse moves over ② setting buttons, and click mouse right button, menu will pop up like as: All Outputs: All Outputs from same Input “1 Output” to “7 Outputs”: Set current Output (where mouse right clicked) and the next x-1 ( x range is from 1 to 7, set total x Outputs at the same time ) Output(s) from same Input Port to Port: Output1 from Input1, Output2 from Input2, Output3 from Input3, etc. -
Page 20: Edit Selected Pre-Setting Item
Edit selected pre-setting item After action of ⑥, edit form will pop-up as below: ① Pre-Setting name ② Set all Output ports from same Input ③ Select Input for respective Output “EDID control” page ① Set EDID mode for selected Input port or All Input ports, click “Set” button to complete action. -
Page 21: Ir Configuration" Page
NOTE: When set User1/User2 EDID mode, should Download EDID content to User1 Memory/User2 Memory first. User1/User2 default EDID content is 1080p, Stereo Audio 2.0. ② Copy EDID from Output port to selected Input port or All Input ports, click “Copy” button to complete action. -
Page 22: Fw Upgrade" Page
“FW upgrade” page ① Click to open firmware file (file extension is “.fw”). ② Firmware upgrade progress bar ③ Click the button to upgrade firmware. ④ Firmware upgrading messages display ⑤ Click to clear the messages displayed in the memo box. NOTE: If failure occurs during upgrading firmware process, the following steps SHOULD be done sequentially to establish next upgrading procedure: Power down the Matrix... -
Page 23: Maintenance
Warranty Policy products are warranted against defects in material and workmanship for one year BZB Gear from the date of shipment (free second-year warranty upon registration; see Second Year Assurance). During the warranty period, will, at its option, repair or replace products BZB Gear that prove to be defective. -
Page 24: Exclusive Remedies
A fixed charge established for each product will be imposed for all equipment returned for warranty repair where cannot identify the cause of the reported failure. BZB Gear Exclusive Remedies BZB Gear’s warranty, as stated is in lieu of all other warranties, expressed, implied, or statutory, including those of merchantability and fitness for a particular purpose. -
Page 25: Once You Have Obtained An Rma Number
Once you have obtained an RMA number After obtaining an RMA number from , you must send the product - freight prepaid - to BZB Gear . The RMA number must be prominently displayed on the outside of your BZB Gear BZB Gear package. -
Page 26: Second Year Assurance
Second Year Assurance BZB Gear wants to assure you peace of mind. We're so confident in the quality of our products that along with the manufacturer's one-year limited warranty, we are offering free second-year warranty coverage upon registration*! Taking advantage of this program is simple, just follow the steps below: 1. -
Page 27: Mission Statement
We believe everyone deserves to see, hear, and feel the advancements made in today’s AV world without having to break the bank. BZB Gear is the solution for small to medium-sized applications requiring the latest professional products in AV.
Need help?
Do you have a question about the BG-UHD-88M and is the answer not in the manual?
Questions and answers