Chord DAVE Manual
Hide thumbs
Also See for DAVE:
- Operating instructions manual (14 pages) ,
- Manual (32 pages) ,
- Quick start manual (2 pages)
Chapters
Table of Contents

Related Manuals for Chord DAVE


Summary of Contents for Chord DAVE
- Page 1 Chord Electronics The Pumphouse, Farleigh Lane, East Farleigh, Kent, ME16 9NB, Great Britain. Product Communication | English +44 (0) 1622 721444 info@chordelectronics.co.uk chordelectronics.co.uk DAVE V.1.1 Manual...
-
Page 2: Table Of Contents
Protection against liquids & heat Making a claim & warranty exclusions Dismantling & radio frequency interference Connecting your equipment 3.0 Getting to know DAVE 4.0 Setting up DAVE Placement Getting to know DAVE 4.2 Connecting your source to The front panel DAVE 3.4 The rear panel... -
Page 3: Safety Instructions
Chord Electronics DAVE | Manual Safety instructions Introduction Protection against liquids & heat Dismantling & radio frequency interference Connecting your equipment Safety instructions 3 // 35... -
Page 4: Introduction
Dismantling & radio frequency DAVE | Manual Protection against interference liquids & heat Connecting your equipment Introduction DAVE is an incredibly powerful and versatile digital-to-analogue convertor preamplifier and headphone amplifier. Before operation, we strongly advise you read this user manual thoroughly. -
Page 5: Protection Against Liquids & Heat
Be aware that liquids, including It is advised that you do not water that has dried, can leave operate DAVE in an area of direct minerals that can affect the sunlight or on top of significant PCB and other components, heat-producing devices. -
Page 6: Dismantling & Radio
2. Separate DAVE from adapters within this user manual. amplifiers using toroidal transformers. If DAVE develops a fault or the 3. Operate mobile phones at casework becomes damaged, immediately disconnect from a distance to avoid the power supply and connected interference. -
Page 7: Connecting Your Equipment
DAVE | Manual Protection against interference liquids & heat Connecting your equipment Connecting your equipment Before connecting DAVE to any Do not disconnect DAVE from Never disconnect the power cable during third-party equipment, consult the power cable without first operation. Only disconnect when DAVE the manufacturer’s user guide to... -
Page 8: Warranty
Chord Electronics DAVE | Manual Warranty Warranty period & registering your purchase Making a claim & warranty exclusions Warranty 8 // 35... -
Page 9: Warranty Period & Registering
Making a claim & warranty DAVE | Manual your purchase exclusions Warranty period & registering your purchase At point of sale, Chord Please use the form Electronics Ltd. provides DAVE below to record the with a comprehensive five-year details of your purchase... -
Page 10: Making A Claim & Warranty Exclusions
Upon receipt, Chord Electronics will make an assessment within 30 days and provide a reasonable solution. All warranty repairs must be carried out by Chord Electronics or an approved service centre, to guarantee the quality and safety of the repair. 10 // 35... -
Page 11: Getting To Know Dave
Chord Electronics DAVE | Manual Getting to know DAVE Getting to know DAVE The front panel The top panel The rear panel The remote control Getting to know DAVE 11 // 35... -
Page 12: Getting To Know Dave
Chord Electronics Getting to know DAVE The top panel DAVE | Manual The front panel The rear panel The remote control Getting to know DAVE DAVE is an extraordinarily powerful leading-edge DAC/ preamplifier/headphone amplifier, featuring multi-award- winning FPGA technology. To get the very best out of the... -
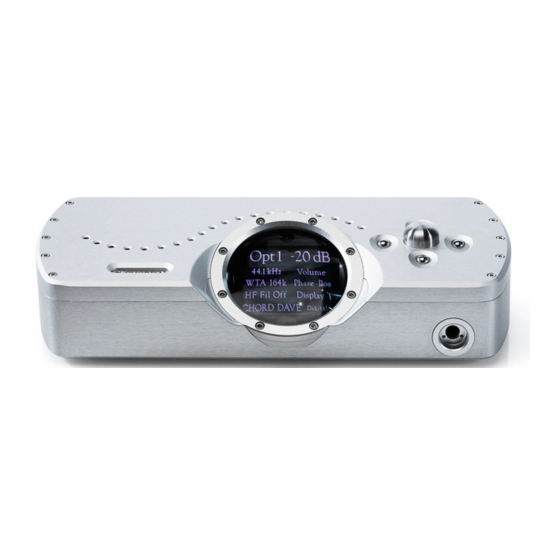
Page 13: The Front Panel
Whilst an IR remote control DAVE features a single is supplied, the front panel of headphone output available on DAVE is the main user interface the front of the device. This can and can entirely control all user- accommodate headphones up configurable options, inputs and to 800 Ω... -
Page 14: The Rear Panel
Chord Electronics Getting to know DAVE The top panel DAVE | Manual The front panel The rear panel The remote control The rear panel The rear panel offers a comprehensive connectivity suite, featuring both standard connections and those which are used with other Chord Electronics devices. -
Page 15: The Remote Control
10 metres (with clear line-of-sight) to the infra-red receiver within DAVE, which is located above the LCD screen. For best operation, do not On/off operate DAVE within a cabinet or place other materials/products Menu Activate menu Mute Mute playback on top of the device. -
Page 16: Setting Up Dave
Chord Electronics DAVE | Manual Setting up DAVE Placement Connecting your source to DAVE Connecting a BLU MK II or Hugo M Scaler to DAVE Connecting a preamplifier/amplifier to DAVE Powering DAVE Setting up DAVE 16 // 35... -
Page 17: Placement
Allocating 10cm of space around the device to convection-cool during operation is advised. As the infra-red remote control requires a direct line of sight to the viewing portal, avoid placing objects on top of DAVE or putting it within enclosures. 17 // 35... -
Page 18: Connecting Your Source To
Connecting a BLU MK II or Hugo M Scaler to DAVE Connecting your source to DAVE DAVE has a selection of different To set up your system: inputs and you can connect several sources at once if you 1) First, you must ensure that wish. -
Page 19: Connecting A Blu Mk Ii Or Hugo M Scaler To Dave
Also ensure you have devices. You must also connect downloaded the drivers for your source inputs to the BLU BLU MK II or Hugo M Scaler MKII or M Scaler and not DAVE. from our website. Using the dual BNC cables; chordelectronics.co.uk/ product/... -
Page 20: Connecting A Preamplifier
WARNING: Read section 6 before integrated or power amp, you initiating playback. should connect the outputs of DAVE to the inputs of your preamp, integrated or power amp; 1) Locate the outputs on the back of the unit shown below. -
Page 21: Powering Dave
DAVE. To turn DAVE on, locate the large power switch on the back of the device. It may take 15 seconds for DAVE to complete a safety check. During this stage, music playback will not be possible and mute will be displayed. -
Page 22: How To Navigate The Menus
Chord Electronics DAVE | Manual How to navigate the menus The screen & navigating the menu Sample rate How to navigate the menus 22 // 35... -
Page 23: The Screen & Navigating The Menu
DAVE a new selection via the menu, dial. DAVE needs to write this to its internal memory. This will cause Use the up and down buttons to the display to temporarily show a cycle through menu options on black screen. - Page 24 Special operation – DBNC: 88.2 kHz to 768 kHz 24-bit *USB is natively compatible with all Mac OS X and Linux machines without the use of drivers. Windows machines may require a driver, available on the Chord Electronics website. **Dual BNC is reserved for special operation with Chord Electronics’ partnering products.
-
Page 25: Playback Modes
Chord Electronics DAVE | Manual Playback modes Playback modes Headphone mode Preamplification mode DAC mode Playback modes 25 // 35... - Page 26 When headphones are connected to DAVE, for protection, the device will enter Headphone mode, where only the headphone outputs are enabled. It will not be possible to manually...
-
Page 27: Headphone Mode
When you remove the headphone jack, DAVE unmutes the rear outputs, the volume will revert back to the volume last used while in ‘Digital pre mode’ or will revert to line... - Page 28 Headphone mode DAC mode Preamplification mode Providing headphones are WARNING: For the protection of not connected to DAVE, your hearing and equipment, please do not Preamplification mode can navigate between the be manually engaged. Select Preamp and DAC modes or...
-
Page 29: Dac Mode
When to DAVE in DAC mode. Doing so could result in permanent this mode is selected, a 3 V damage to any connected equipment, along with your unbalanced and 6 V balanced hearing. -
Page 30: Play Back Modes
Chord Electronics DAVE | Manual Special features DSD and PCM mode Crossfeed Settings memory & galvanic isolation Display messages Special features 30 // 35... -
Page 31: Dsd And Pcm Mode
DAVE | Manual Crossfeed galvanic isolation Display messages DSD and PCM mode DAVE has two decoding options Please note, after either specifically tailored for PCM decoding function, DAVE will or DSD playback. You can play mute for approx 20 seconds both PCM and DSD music using while the new program activates. -
Page 32: Crossfeed
This option is only available in Headphone mode. DAVE has four available modes of crossfeed, shown as Crossfeed on the display: Crossfeed 0: No crossfeed. Crossfeed 1: Minimal crossfeed. Crossfeed 2: Moderate crossfeed. -
Page 33: Settings Memory & Galvanic Isolation
USB powered down (or with the power input, allowing for greater sonic supply removed). You do not have performance. DAVE features a to perform any special actions. Class 2 Type-B USB input with this protection. Please ensure with you cable’s manufacturer,... -
Page 34: Display Messages
Positive output phase Display 1-3 3 menu viewing options Display 4 Message mode - will turn off DAVE screen after 30 seconds Positive and inverted phase is for system matching. Some products invert absolute phase so we give the option to match (or correct) your system phase using the phase option on DAVE.
Need help?
Do you have a question about the DAVE and is the answer not in the manual?
Questions and answers