Chord Prima Manual
Hide thumbs
Also See for Prima:
- User manual (18 pages) ,
- Quick start manual (2 pages) ,
- Quick start manual (2 pages)

Related Manuals for Chord Prima


Summary of Contents for Chord Prima
- Page 1 Chord Electronics The Pumphouse, Farleigh Lane, East Farleigh, Kent, ME16 9NB. Great Britain. Product Communication | English +44 (0) 1622 721 444 info@chordelectronics.co.uk chordelectronics.co.uk Prima V.1.0 Manual...
-
Page 2: Table Of Contents
Protection against liquids & heat your purchase Dismantling & Radio Making a claim & warranty exclusions frequency interference Connecting your equipment 3.0 Getting to know PRIMA 4.0 Setting up PRIMA Placement Getting to know PRIMA Connecting an input to The top panel Prima 3.4 The rear panel... -
Page 3: Safety Instructions
Chord Electronics PRIMA | Manual Safety instructions Introduction Protection against liquids & heat Dismantling & Radio Frequency interference Connecting your equipment Safety instructions 3 // 28... -
Page 4: Introduction
Protection against interference liquids & heat Connecting your equipment Introduction PRIMA is a device that converts your sources to 705.6 or 768kHz 24-bit PCM and achieves reconstruction of the original analogue signal in the ADC to a better than 16-bit accuracy under all conditions. -
Page 5: Protection Against Liquids & Heat
It is advised that you do not operate Be aware that liquids, including the Prima in an area of direct water that has dried, can leave sunlight or on top of significant minerals that can affect the heat- producing devices. -
Page 6: Dismantling & Radio
2. Separate the Prima from amplifiers using If the Prima develops a fault or toroidal transformers. the casework becomes damaged, immediately disconnect from 3. Operate mobile the mains power supply and... -
Page 7: Connecting Your Equipment
15 seconds, however, this may is disconnected during operation there is a risk cause damage to connected of damage to connected equipment. When connecting the Prima to equipment. any equipment, make sure that all devices are off, including the Prima. Once connected, switch all... - Page 8 Chord Electronics PRIMA | Manual Warranty Warranty period & registering your purchase Making a claim & warranty exclusions Warranty 8 // 28...
- Page 9 Making a claim & warranty PRIMA | Manual your purchase exclusions Warranty period & registering your purchase At point of sale, Chord Please use the form Electronics Ltd. provides the below to record the Prima with a comprehensive details of your purchase...
- Page 10 & warranty exclusions WARRANTY EXCLUSIONS: The In the unlikely event of a warranty does not cover connected claim, you must provide Chord equipment, personal injury or Electronics with the details of development natural patina of the metalwork and will be null and void...
-
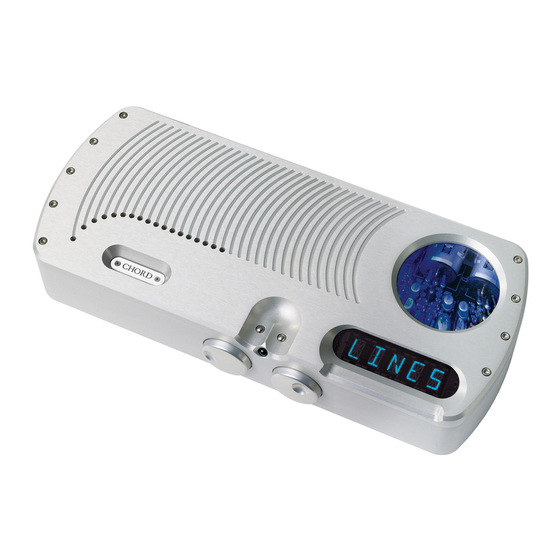
Page 11: Getting To Know Prima
Chord Electronics PRIMA | Manual Getting to know Prima Getting to know Prima The top panel The rear panel The remote control Getting to know Prima 11 // 28... -
Page 12: Getting To Know Prima The Top Panel
Étude power manual. amps. Despite its compact dimensions and space-saving footprint, the Prima is every bit a pedigree Chord amplifier. With a ability to connect up to 5 inputs, Prima offers volume and balance control, giving you full autonomy over your system. -
Page 13: Display
PRIMA | Manual The top panel The remote control The top panel Prima gives you a complete control with a remote control (page 15) but you also have a button for main line selection and tape line seclection. On the front there is also a dial for both Volume and balance. -
Page 14: Warranty
The rear panel The rear panel houses the device’s wide-ranging connectivity, inputs and outputs. The Prima has several inputs and output allowing for high flexability. Mulitple inputs can be used all at the same time. When installing any cable, you must make sure that they securly click into place. - Page 15 OP1+2 ZONE LOCK NOTE: The volume buttons will only work BAL- BAL+ with Prima. To change inputs when DAVE is VOL+ also in the system use the side buttons to HIFI Prima Volume control change settings. Please see DAVE manual on using the remote control.
- Page 16 Chord Electronics PRIMA | Manual Setting up Prima Placement Connecting an input to Prima Connecting Prima to a Power amplifier Connecting Prima to a recording device Setting up Prima 16 // 28...
-
Page 17: Placement Connecting An Input To Prima
Prima Connecting Prima to a recording device Placement Whilst the Prima operates normally within a stack of Chord Electronics Emsable stands along with units such as the DAVE and Etude, it is recommended that you allow the device to breathe. - Page 18 Connecting Prima to a recording device Connecting an input to Prima Please note that each input is In order to connect up Prima arranged as a stereo pair, right to a source, you must connect and then left. Later, when you...
-
Page 19: Connecting Prima
Connecting Prima to a Power amplifier Using The XLR outputs shown 4) Allow both the Prima and below, it is simple to connect the power amplifier to power up. Prima to a power amplifer such as Étude: 5) Initiate playback. -
Page 20: To A Recording Device
Connecting Prima to a recording device Connecting Prima to a recording device Prima comes equipped with 1) Turn off the Prima and 4) Select the appropriate input recording outputs. These are any other connected on the recording device. the two RCA connectors next equipment. - Page 21 Chord Electronics PRIMA | Manual How to navigate the menu Basic navigation Volume and balance control Display Viewing settings How to navigate the menu 21 // 28...
- Page 22 PRIMA | Manual Volume and balance control Viewing settings Basic navigation With Prima powered on you will need to select your input. do this by using the left button to select the pair of inputs to be played. The right button will select the pair of inputs to be sent only to the recording output.
- Page 23 Typically, this should dial, slowly increase the volume remain in the centre of its of Prima, to a safe listening level. rotation for balanced sound between the left and right The volume range runs from outputs.
- Page 24 0 to 98 and is shown in the diagram below; shown in the diagram below displayed on the PRIMA as you alter the volume. If the outputs are muted, a volume change will un-mute the outputs to prevent large changes in volume from damaging your loudspeakers.
- Page 25 The PRIMA stores the gain to the tape line output. The Prima setting for each input line. After stores the gain setting for each the gain setting has been shown input line.
-
Page 26: Special Features
Chord Electronics PRIMA | Manual Special features Gain Special features 26 // 28... -
Page 27: Gain
Gain on recording line inputs: are shown below as they are Most modern input devices Press Tape on the pre amp displayed on the Prima. such as CD players have an remote followed by the VOL + unbalanced output voltage of 2V...
Need help?
Do you have a question about the Prima and is the answer not in the manual?
Questions and answers