Welbilt FRYMASTER FilterQuick FQG120T easyTouch Installation, Operation And Maintenance Manual
Hide thumbs
Also See for FRYMASTER FilterQuick FQG120T easyTouch:
- Service manual (50 pages) ,
- Quick start (2 pages) ,
- Installation, operation and maintenance manual (55 pages)
Advertisement
Quick Links
FilterQuick
Gas Fryer
Installation, Operation and Maintenance
Manual
This manual is updated as new information and models are released. Visit our website for the latest manual.
FOR YOUR SAFETY
Do Not Store or use gasoline
or other flammable vapors
and liquids in the vicinity of
this or any other appliance.
*8197638*
Part Number: FRY_IOM_8197638 05/2020
Original Instructions
FQG120T
™
READ THE INSTRUCTIONS BEFORE USING THE FRYER.
Read these instructions for use carefully to
familiarize yourself with the appliance before
connecting it to its gas supply.
Keep these instructions for future reference.
Your Growth Is Our Goal
easyTouch®
CAUTION
Advertisement

Related Manuals for Welbilt FRYMASTER FilterQuick FQG120T easyTouch


Summary of Contents for Welbilt FRYMASTER FilterQuick FQG120T easyTouch
- Page 1 Your Growth Is Our Goal FilterQuick FQG120T ™ easyTouch® Gas Fryer Installation, Operation and Maintenance Manual This manual is updated as new information and models are released. Visit our website for the latest manual. FOR YOUR SAFETY CAUTION Do Not Store or use gasoline READ THE INSTRUCTIONS BEFORE USING THE FRYER.
- Page 2 NOTICE IF, DURING THE WARRANTY PERIOD, THE CUSTOMER USES A PART FOR THIS FRYMASTER EQUIPMENT OTHER THAN AN UNMODIFIED NEW OR RECYCLED PART PURCHASED DIRECTLY FROM FRYMASTER, OR ANY OF ITS AUTHORIZED SERVICERS, AND/OR THE PART BEING USED IS MODIFIED FROM ITS ORIGINAL CONFIGURATION, THIS WARRANTY WILL BE VOID. FURTHER, FRYMASTER AND ITS AFFILIATES WILL NOT BE LIABLE FOR ANY CLAIMS, DAMAGES OR EXPENSES INCURRED BY THE CUSTOMER WHICH ARISE DIRECTLY OR INDIRECTLY, IN WHOLE OR IN PART, DUE TO THE INSTALLATION OF ANY MODIFIED PART AND/OR PART RECEIVED FROM AN UNAUTHORIZED SERVICER.
- Page 3 NOTICE U.S. This device complies with Part 15 of the FCC rules. Operation is subject to the following two conditions: 1) This device may not cause harmful interference, and 2) This device must accept any interference received, including interference that may cause undesired operation. While this device is a verified Class A device, it has been shown to meet the Class B limits.
- Page 4 WARNING To ensure the safe and efficient operation of the fryer and hood, the electrical plug for the 120-volt line, must be fully engaged and locked in its pin and sleeve socket. NOTICE This appliance is intended to be used for commercial applications, for example in kitchens of restaurants, canteens, hospitals and in commercial enterprises such as bakeries, butcheries, etc., but not for continuous mass production of food.
- Page 5 WARNING Use caution when dropping wet food or water into the hot oil. It may cause spattering of the oil, which may cause severe burns WARNING Do not overfill the frypot to avoid overflow of hot oil that may cause severe burns, slipping and falling. WARNING Use caution and wear appropriate safety equipment when adding oil to the fryer, to prevent splashing of hot oil, which may cause severe burns.
- Page 6 Table of Contents Warranty Statement ................i Section 1 Introduction ..................1-1 Section 2 Installation ................... 2-1 Section 3 Operation Instructions ............... 3-1 Section 4 Preventative Maintenance ..............4-1 Section 5 Operator Troubleshooting..............5-1...
- Page 7 FILTERQUICK™ FQG120T GAS FRYER CHAPTER 1: INTRODUCTION NOTE: The Frymaster FQG120T fryer requires a start-up, demonstration and training be- fore normal restaurant operations can begin. General Read the instructions in this manual thoroughly before attempting to operate this equipment. This manual covers all configurations of models and FQG120T fryers.
- Page 8 Safety Information Before attempting to operate your unit, read the instructions in this manual thoroughly. Throughout this manual, you will find notations enclosed in double-bordered boxes similar to the ones that follow. CAUTION CAUTION boxes contain information about actions or conditions that may cause or result in a malfunction of your system.
- Page 9 If necessary, the user should consult the dealer or an experienced radio and television technician for additional suggestions. The user may find the following booklet prepared by the Federal Communications Commission helpful: "How to Identify and Resolve Radio-TV Interference Problems". This booklet is available from the U.S.
- Page 10 2. Inspect for and record all visible loss or damage and ensure that this information is noted on the freight bill or express receipt and is signed by the person making the delivery. 3. Concealed loss or damage that was unnoticed until the equipment was unpacked should be recorded and reported to the freight company or carrier immediately upon discovery.
- Page 11 Service information may be obtained by contacting your local FAS/Distributor. Service may also be obtained by calling the Frymaster Service Department at 1-800-551-8633 or 1-318-865-1711 or by email at fryservice@welbilt.com. When requesting service or ordering parts, please have the following information ready:...
- Page 12 FILTERQUICK™ FQG120T GAS FRYER CHAPTER 2: INSTALLATION INSTRUCTIONS General Installation Requirements Proper installation is essential for the safe, efficient, trouble-free operation of this appli- ance. Qualified, licensed, and/or authorized installation or service personnel, as defined in Section 1.6 of this manual, should perform all installation and service on Frymaster equipment. Conversion of this appliance from one type of gas to another should only be performed by qualified, licensed, and/or authorized installation or service personnel as defined in Section 1.6 of this manual.
- Page 13 DANGER The appliance area must be kept free and clear of combustible material at all times. WARNING Do not block the area around the base or under the fryers. DANGER No structural material on the fryer should be altered or removed to accommodate placement of the fryer under a hood.
- Page 14 The duct system, the hood and filter bank must be cleaned on a regular basis and kept free of grease according to the NFPA Standard No. 96. A copy of the standard may be obtained from the National Fire Protection Association, Battery March Park, Quincy, MA 02269 or at www.NFPA.org.
- Page 15 be grounded in accordance with National Electrical Code, ANSI/NFPA 70, or the Canadian Electrical Code, CSA C22.2, as applicable. All units (cord connected or permanently connected) should be connected to a grounded power supply system. A wiring diagram is located on the inside of the fryer door.
- Page 16 When the fryer is leveled in its final position, install the restraints provided by the KES to limit its movement so that it does not depend on or transmit stress to the connection. Install the re- straints in accordance with the provided instructions. If the restraints are disconnected for ser- vice or other reasons, they must be reconnected before the fryer is used.
- Page 17 2. Frymaster recommends that the minimum distance from the flue outlet to the bottom edge of the hood be 24 in. (600 mm) when the appliance consumes more than 120,000 BTU per hour. 3. Test the fryer electrical system: a. Plug the fryer electrical cord(s) into a grounded electrical receptacle. b.
- Page 18 DANGER When pressure-testing incoming gas supply lines, disconnect the fryer from the gas line if the test pressure is ½" PSI [3.45 kPa (14 inches W.C.)] or greater to avoid damage to the fryer’s gas piping and gas valve(s). NOTE: External gas regulators are not normally required on this fryer. A safety control valve pro- tects the fryer against pressure fluctuations.
- Page 19 The FQG120T-T™ gas fryer CE Approved Gas Categories by Country has received the CE mark COUNTRIES CATEGORIES PRESSURE (MBAR) for the countries and gas AUSTRIA (AT) II2H3B/P categories indicated in the G30, G31 table below. NOTE: I2E(R)B G20, G25 20, 25 BELGIUM (BE) G30, G31 28-30, 37...
- Page 20 NOTE: Some fryers are configured for a rigid connection to the gas supply line. These units are connected to the gas supply line at the rear of the unit. When using thread compound, use very small amounts on male threads only. Use a pipe thread compound that is not affected by the chemical action of LP gases (Loctite™...
- Page 21 2.5.2 Equipment Installed at High Altitudes The fryer input rating (BTU/hr.) is for elevations up to 2,000 ft (610 m). For elevations above 2,000 ft (610m), the rating should be reduced four percent for each additional 1,000 ft (305m) above sea level. The correct orifices are installed at the factory if operating altitude is known at time of the customer’s order.
- Page 22 Conversions can only be executed by qualified, factory-authorized personnel. Typical non-CE gas valve for electronic-ignition equipped fryers. 2-11...
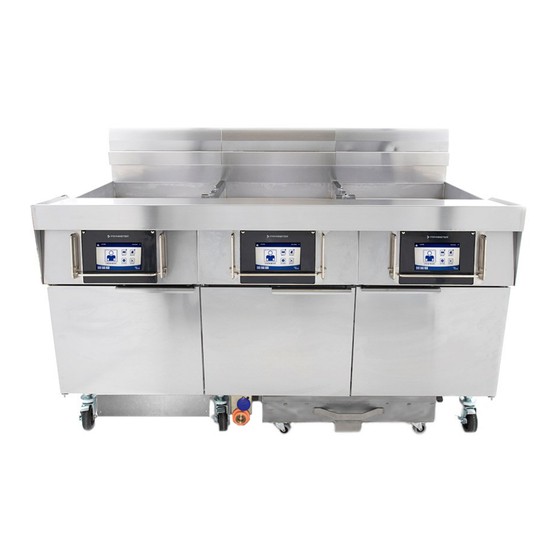
- Page 23 FILTERQUICK™ FQG120T GAS FRYER CHAPTER 3: OPERATING INSTRUCTIONS FINDING YOUR WAY AROUND THE FQG120T GAS FRYER Basket Flue Holder Control Panel (FQ4000 Controller shown) Bezel Power Reset Switch Port Valve Hose/Wand Pump Switch Hose/Wand Pre-Filter Filter Handle Pre-Filter Connection Screen Wrench Screen TYPICAL CONFIGURATION (3FQG120T SHOWN) NOTE: The appearance of your fryer may differ slightly from that...
- Page 24 Equipment Setup and Shutdown Procedures WARNING The on-site supervisor is responsible for ensuring that operators are made aware of the inherent hazards of operating a hot oil filtering system, particularly the aspects of oil filtration, draining and cleaning procedures. CAUTION Before lighting the fryer, make sure the fryer is OFF and the frypot drain valves are closed.
- Page 25 3.1.2 Lighting the Fryer 1. Ensure the controller is in the OFF position. 2. Ensure the gas is “ON”. For CE Fryers For Non-CE Fryers Placing the ON/OFF switch on the controller After placing the ON/OFF switch on the in the OFF position also turns off the gas controller in the OFF position, turn the gas valve.
- Page 26 WARNING In the event of prolonged power failure, the ignition module will shut down and lock out the system. Turn the controller to "OFF" and then back "ON" after power has been re- established. 5. If the pilot flame fails, the ignition module will shut down and lock out the system. To restart, turn the controller "OFF", wait approximately 5 minutes for the system to recycle itself, then re- peat step 3.
- Page 27 For CE Fryers For Non-CE Fryers Placing the ON/OFF switch on the After placing the ON/OFF switch on the controller in the OFF position also turns controller in the OFF position, turn the gas off the gas valve. NOTE: There is not a valve knob to the OFF position.
- Page 28 Filtration 3.3.1 Introduction The FQG120T filtration system allows the oil in one frypot to be safely and efficiently filtered while the other frypots in a battery remain in operation. Section 3.3.2 covers preparation of the filter system for use. Operation of the system is covered in the FQ4000 easyTouch FQ120 Controller Operation Manual .
- Page 29 4. Replace the filter leaf assembly in the filter pan, en- suring that the filter pick up tube is lowered and se- curely mounted into the brackets in the filter pan (see Figure 3). 5. Push the filter pan back into the fryer, positioning it all the way to the back of the cabinet.
- Page 30 3.3.3 Disassembly and Reassembly of the Leaf Screen Filter Assembly Disassembly 1. Using Figure 5 as a guide, grasp the frame with your thumbs on the handles at the corner of the assembly and pull outward in opposite directions to separate the frame at the corner.
- Page 31 Reassembly 1. Using Figure 6 as a guide, place the inner insert screen between the filter screens and place either stainless steel channel onto the screens by placing the small corner with the pin and hinged channel over the other side (see Figure 7). Repeat with second channel. NOTE: Channel must be put back starting with the comer pin.
- Page 32 FILTERQUICK™ FQG120T GAS FRYER CHAPTER 4: PREVENTATIVE MAINTENANCE FRYER PREVENTATIVE MAINTENANCE CHECKS AND SERVICE DANGER The filter pan must be emptied and cleaned at the end of frying operations each day. Some food particles can spontaneously combust if left soaking in certain shortening material.
- Page 33 There are no periodic preventive maintenance checks and services required for your filtration system other than: 1. Daily perform a clean and filter of each frypot (see Clean and Filter procedure instructions in the FQ4000 FQ120 easyTouch controller manual). 2. Daily cleaning of the filter pan with a solution of hot water and a multi-purpose detergent. If you notice that the system is pumping slowly or not at all, verify that the filter pan screen is on the bottom of the filter pan, with the paper or pad on top of the screen.
- Page 34 MONTHLY CHECKS AND SERVICE 4.4.1 Deep Cleaning (Boiling Out/Cold Clean) the Frypot – Minimally Monthly DANGER Never operate the appliance with an empty frypot. The frypot must be filled with water or oil before lighting the burners. Failure to do so will damage the frypot and may cause a fire.
- Page 35 4.4.3 Check FQ4000 Controller Set Point Accuracy - Monthly 1. Insert a good-grade thermometer or pyrometer High Limit Probe Temperature Probe probe into the oil, with the end touching the fryer temperature-sensing probe. 2. When the controller product icons are visible (indicating that the frypot contents are within the cooking range), press the button once to...
- Page 36 ANNUAL/PERIODIC SYSTEM INSPECTION This appliance should be inspected and adjusted periodically by qualified service personnel as part of a regular kitchen maintenance program. Frymaster recommends that a Factory Authorized Servicer inspect this appliance at least annually as follows: 4.7.1 Fryer - Annual Inspect the cabinet inside and out, front and rear for excess oil.
- Page 37 To ensure good fryer health and a safe environment, the fryer should be checked and adjusted periodically by qualified service personnel as part of a regular kitchen mainte- nance program. 4.7.3 Stainless Steel Care DANGER DO NOT let water splash into the tank of hot oil. It will splatter and can cause severe burns.
- Page 38 FILTERQUICK™ FQG120T GAS FRYER CHAPTER 5: OPERATOR TROUBLESHOOTING Introduction This chapter provides an easy reference guide to some of the common problems that may occur during the operation of your equipment. The troubleshooting guides that follow are intended to help you correct, or at least accurately diagnose, problems with your equipment. Although the chapter covers the most common problems reported, you may encounter problems that are not covered.
- Page 39 Troubleshooting Fryers 5.2.1 Controller and Heating Problems PROBLEM PROBABLE CAUSES CORRECTIVE ACTION A. No power to fryer. A. Verify that the fryer is plugged in and No display on the B. Failed controller or another that the circuit breaker is not tripped. controller.
- Page 40 PROBLEM PROBABLE CAUSES CORRECTIVE ACTION Main burner flames are small and appear lazy; oil does Improper gas pressure. Contact your FAS for service. not come up to temperature quickly. A. Turn the gas valve knob to the ON position. A. Gas valve is not turned on. B.
- Page 41 5.2.2 Error Messages and Display Problems PROBLEM PROBABLE CAUSES CORRECTIVE ACTION It is normal for this message to appear during startup if the lines FQ4000 displays Gas valve off, failed controller, failed have air in them. Check that the E19 or E28 transformer, contactor or open high- gas valve is on.
- Page 42 Troubleshooting the Auto Filtration PROBLEM PROBABLE CAUSES CORRECTIVE ACTION Change or overwrite the filter after setting by re-entering the filter after Fryer filters after Filter after setting incorrect. value in Manager Settings, Filter each cook cycle. Attributes in section 1.8 in the FQ4000 controller manual.
- Page 43 PROBLEM PROBABLE CAUSES CORRECTIVE ACTION A. Ensure oil level is at the top oil fill line (at the top oil level sensor). A. Oil level too low. B. Ensure the oil temperature is at B. Oil temperature is too low. setpoint.
- Page 44 pulled forward, out of the cabinet for at least 30 seconds. Once the pan has been out for 30 seconds the controller returns to idle cook mode. Ensure the pan is dry and assembled correctly. Push the filter pan back into the fryer.
- Page 45 5.3.3 Filter Busy When FILTER BUSY is displayed the filter interface board is waiting on another vat to be filtered or waiting on another function to finish. Wait 15 minutes to see if problem is corrected. If not, call your local FAS. 5.3.4 OQS (Oil Quality Sensor) Troubleshooting Problem Corrective Action...
- Page 46 Code ERROR MESSAGE EXPLANATION AND TOP OFF DISABLED - CALL SERVICE confirmation is missing VALVE INTERFACE BOARD FAILURE - Valve Interface Board connections lost or FILTRATION AND TOP OFF DISABLED - CALL board failure. Call service. SERVICE AUTOMATIC INTERMITTENT FILTRATION AIF RTD reading out of range.
- Page 47 Code ERROR MESSAGE EXPLANATION CLEAN FLOAT SWITCH – XXX F OR XXX C - The float switch does not detect oil. Clean CALL SERVICE the float switch and ensure it moves freely up and down. DRAIN VALVE OPEN – XXXF OR XXXC Drain valve is opened during cooking.
- Page 48 All of our products are backed by KitchenCare® – our aftermarket, repair, and parts service. CLEVELAND DELFIELD® FRYMASTER® KOLPAK® MANITOWOC® MERRYCHEF® CONVOTHERM® FITKITCHEN™ GARLAND LINCOLN MERCO® MULTIPLEX® ©2020 Welbilt Inc. except where explicitly stated otherwise. All rights reserved. Continuing product improvement may necessitate change of specifications without notice. Part Number FRY_IOM_8197638 05/2020...
Need help?
Do you have a question about the FRYMASTER FilterQuick FQG120T easyTouch and is the answer not in the manual?
Questions and answers