
Related Manuals for gefran QE1008-W SET


Summary of Contents for gefran QE1008-W SET
- Page 1 QE1008-W SET SYSTEM FOR TIE BAR MEASUREMENT WITH WIRELESS TRANSMISSION Operating manual C.0034_v5.1_ENG...
-
Page 3: Table Of Contents
INDEX 1. PREFACE ..........................4 2. WEEE INFORMATION ......................5 3. INTENDED USE ........................6 4. BASIC SAFETY REGULATIONS ..................6 4.1. Explanation of symbols ....................6 4.2. Basic safety regulations ....................6 4.3. Organisational measures .....................6 5. Liability and warranty ......................7 5.1. -
Page 4: Preface
PREFACE Dear Customer Sensormate AG would like to thank you most sincerely for choosing a sensor system from the QE1008-W product series. This operation manual is intended for sales partners, customers and skilled service personnel. We seek to ensure that the product works to your full satisfaction. Adherence to this operation manual ensures optimum function and service life of the QE1008-W sensor system. -
Page 5: Weee Information
WEEE INFORMATION „Umsetzung der Richtlinie 2012/19/EU über “Implementation of Directive 2012/19/EU on Elektro- und Elektronik-Altgeräte (EEA)“ waste electrical and electronic equip¬ment Das Symbol der durchgekreuzten Mülltonne auf (WEEE)” dem Gerät oder der Geräteverpackung weist da- The symbol showing a crossed-out wheeled bin rauf hin, dass Sie das Produkt am Ende seines on equipment or its packaging indicates that the Lebenszyklus separat entsor¬gen müssen. -
Page 6: Intended Use
This product has been built according to the latest technology and certified safety regulations. INTENDED USE This product is intended exclusively for the defined purpose (→ see Chapter 6) and services (→ see Chapter 7). Any other use or usage beyond this scope is not regarded as the intended use. Use for the intended purpose includes reading, understanding and adhering to the operation manual. -
Page 7: Liability And Warranty
LIABILITY AND WARRANTY 5.1. Area of application The area of application of the QE1008-W sensors is described in Chapter 3 (Intended use) and Chapter 7 (Technical data). 5.2. Exclusion of liability and warranty Exclusion of liability and warranty arises: - If the QE1008-W is used outside of the specified area of application (see Chapter 3). -
Page 8: Product Description
PRODUCT DESCRIPTION 6.1. Introduction The double magnet strain measurement sensors QE1008-W are used for accurate force and strain measurements on ferromagnetic surfaces. The use of two QE1008-W sensors enables the system to take exact measurements of bending compensated tie bar strains. -
Page 9: Scope Of Delivery
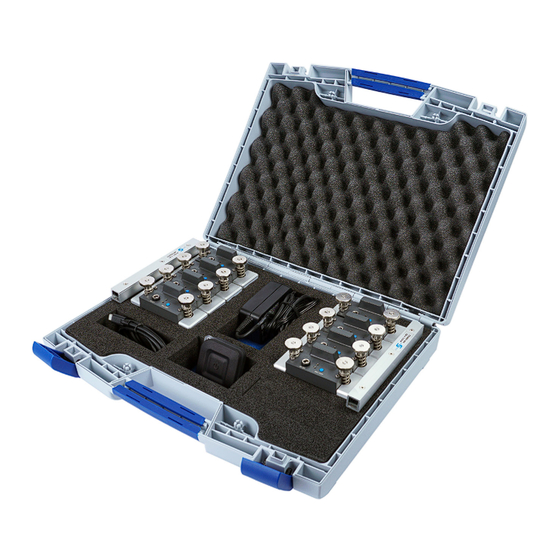
6.2. Scope of delivery Example with 8 + 1 sensors (order code: QE1008-W-09-BLE) 01 8 sensors incl. rechargeable batteries 02 2 x charge bars 03 Socket adapter for charger 04 USB-C to USB-A cable 05 QE Booster (Bluetooth receiver) 06 1x replacement sensor (optional) 07 Charger with 2x connection cables for the charge bars 08 Foil repair kit 09 Operation manual under the foam insert... -
Page 10: Technology
6.3. Technology Two strong magnets press the strain gauge of the patented sensor QE1008-W onto the material to be measured. The strain gauge is located under the foil between the two magnets. The magnets press the strain gauge that strongly onto the surface that transmission through friction occurs. The surface strains are hereby transmitted directly onto the strain gauge which creates the same effect of an applied strain gauge (bonding). -
Page 11: Technical Data
TECHNICAL DATA 7.1. QE1008-W (Sensor) Strain gauge type Foil (GF = 2.0) Bridge resistance 350Ω Measuring range ± 800με Output signal for radio transmission IEEE 802.15.4 Signal range 30...100m Sensitivity tolerance ± 0.2% Transverse sensitivity 0.9 ± 0.2 % Accuracy <... - Page 12 Dimensions of QE1008-W Dimensions in [mm] Subject to technical modifications...
-
Page 13: Bluetooth Transceiver-Module
7.2. BLUETOOTH TRANSCEIVER-MODULE Dimensions: QE Booster Dimensions in mm 7.3. USB TRANSCEIVER-MODULE Dimensions: QE1008-W-USB-G 0.9m 64.5 Dimensions in mm Subject to technical modifications... - Page 14 TECHNICAL DATA TRANSCEIVER-MODULE QE1008-W-USB-G QE Booster Max. pairable sensors External via USB (5.0 VDC-500 Stand alone with integrated litium Power supply battery USB-A male USB-C female Connector type Battery type LiPo 3.7V 340 mAh Battery life 12 h Charging time ~ 2 h Charging requirements USB (5.0 VDC-500 mA)
-
Page 15: Terminology
TERMINOLOGY Terms Explanation Strain gauge FS = Full Scale Calibrated measuring range Accuracy Combined errors for linearity and hysteresis Linearity Delta of signal curve to straight line "zero point - FS" Hysteresis Delta of signal curve "load/relief" Repeatability Dispersion of signal for multiple measurements Tons Metric ton: 1t = 9.81kN US-tons... -
Page 16: Mounting And Installation
MOUNTING AND INSTALLATION These sensors are precision instruments with a resolution of 0.001mm. The devices must therefore be handled with great care. This instruction manual must be read and observed by every user. 9.1. Mounting for bending compensated tie bar strain measurement 9.1.1. - Page 17 9.1.2. Positioning the sensor Turn both knurled nuts so that they are flush with the end of the threaded rod. The long edge of the sensor must be placed onto the surface to be measured and then tilted. The magnets pull the sensor onto the tie bar. Subject to technical modifications...
- Page 18 If the magnets do not automatically jump onto the measuring surface, press down the knurled nuts one after the other. The magnets should now jump onto the tie bar. The attraction force of the magnets is now optimal. – The sensor on the tie bar may only be moved fractionally. –...
- Page 19 Remove the 2nd sensor from the carrying case and complete steps 1 to 4. – The sensor must be positioned parallel to the tie bar! – The 2nd sensor pair must be placed exactly opposite (180°) and parallel to the 1st sensor at the same position! Incorrect! Incorrect! Not 180°...
-
Page 20: Operation And Control
10. OPERATION AND CONTROL 10.1. Sensor QE1008-W 01 Knurled nut 05 LEDs red and green (status displays) 02 Steel spring 06 Button 03 Charging socket 6VDC 07 Aerial 04 Slot number Using the sensors in a new environment a new assignment as described in chapter 8.7 should be done. -
Page 21: Qe Booster
10.2. QE Booster The QE Booster can be used together with a device with Android, IOS or with Windows 10. Down- load the free „Sensormate“ app from the Stores and install it. (for additional information see next section: Sensormate App) 10.2.1. -
Page 22: Sensormate App
10.3. Sensormate App 10.3.1. Installation of the application software: • Download the Sensormate App from the Stores and install it on your device. → For Android devices: https://play.google.com/store/apps/details?id=ch.Sensormate.Inspectmate&hl=en_US → For IOS devices: https://apps.apple.com/de/app/sensormate/id1509011013 → For Windows 10 devices: https://www.microsoft.com/de-de/p/sensormate/9nj60q0cmbzl 10.3.2. Operation Device list / Main menu •... - Page 23 Measurement • To monitor a measurement, select the menu item „Measurement“. → A live display is shown. • The following symbols are shown in the measured value display: → The sensor is not connected → Battery condition is low → The sensor is defective •...
-
Page 24: Wireless Receiver Qe1008-W-G
10.4. Wireless receiver QE1008-W-G 01 Aerial 02 8 dual LEDs represent 8 assignment slots (1.1) (1.2) (2.1) (2.2) (3.1) (3.2) (4.1) (4.2) 03 Blue function button LED status LED green: flashing LED red: → Ready (normal operation) LED red: → Rechargeable battery virtually empty LED green: flashing LED red:... - Page 25 10.4.1. Activating the system First use of sensors Before using the QE1008-W sensors for the first time, make sure that the supplied display software is installed on the computer. • Use the Sensormate App if on your PC is installed Windows 10. (see section: „Sensormate App“) •...
- Page 26 10.4.2. Assigning a QE1008-W sensor The wireless receiver communicates with all sensors on the same channel. Each sensor is logged on to the corresponding assignment slot with a slot number. If a QE1008-W sensor can no longer be used, a new sensor must be reassigned in its place (e.g.: Sensor 1.1 →...
- Page 27 Remove the replacement sensor from the carrying case and place it carefully within range of the receiver. Press and hold the button on the sensor (~4 seconds) until the LEDs flash alternately red/ green. Release the button → the receiver automatically locates the QE1008-W sensor and assigns it to the previously selected address.
- Page 28 10.4.3. New assignment of all QE1008-W sensors For a new assignment of all QE1008-W sensors, all current (saved) assignments of the wireless receiver can be deleted at the same time. You cannot delete just one saved assignment on the receiver. Sequence step 1 The wireless receiver must be connected to the computer.
- Page 29 Remove the QE1008-W sensor and corresponding slot number from the carrying case and place carefully within range of the receiver. Press and hold the button on the sensor (~4 seconds) until the LEDs flash alternately red/ green. Release the button → the receiver automatically locates the QE1008-W sensor and assigns it to the previously selected assignment slot with corresponding slot number.
-
Page 30: Measuring The Tie Bar Strain Distribution
10.5. Measuring the tie bar strain distribution During the tie bar strain measurement, the machine must not be operated or closed at high speed as vibrations can affect the measurement. 10.5.1. Preparation The sensor system must be activated in accordance with Chapter 10.4.1. Before measuring, make sure that the sensors or the strain gauge are stretched and compressed (settle). -
Page 31: Measuring The Tie Bar Bending (Tie Bar Crack Detection)
10.6. Measuring the tie bar bending (tie bar crack detection) The software can display each sensor separately and thus measure the bending per tie bar simultaneously and without additional device. If the inner bending is less than the outer one by factors (e.g.: 80 to 400µε), this is an indication that the tie bar (the column) is cracked on the inside and no longer carries locally. -
Page 32: Troubleshooting
11. TROUBLESHOOTING Mounting • The sensor is positioned too loosely → The sides of the magnets are not all seated evenly. → Tighten the knurled nut ½ turn. → The spiral spring may be too tight. → Loosen the knurled nut. Strain measurement •... -
Page 33: Maintenance Of Qe1008-W Sensors
12. MAINTENANCE OF QE1008-W SENSORS 12.1. Inspection 12.1.1. Foil To avoid damage on the foil, it should be checked always bevor using the sensor. Immediately remove any impurities. 12.1.2. Magnet The surfaces of the magnets are ground and can rusting. They must therefore be protected by anti-corrosive. -
Page 34: Servicing
Replacing the batteries Switch off the sensor Carefully remove the plastic cover. Replace the rechargeable batteries Close the cover using the four M2.5 x 20mm pan-head screws Plastic cover rechargeable batteries NiMH Normal AAA batteries can be used in an emergency. These may only be used temporarily and must be replaced as soon as possible with rechargeable batteries! Normal AAA batteries must NOT be charged! -
Page 35: Accessories And Spare Parts
13. ACCESSORIES AND SPARE PARTS Accessories Designation Order code Item number Sensor (1 item) QE1008-W F065869 USB transceiver-module QE1008-W-USB-G F061962 Bluetooth transceiver-module QE Booster F081356 Charge bar CB-4-QE1008-W F062885 Charger for charge bar POWER SUPPLY F069657 Repair-Kit foil REPAIR-KIT FOIL F060472 Spare parts list Designation... -
Page 36: Notes
15. NOTES Subject to technical modifications... - Page 38 SENSORMATE AG Steigweg 8 Tel. +41 (0)52 242 18 18 info@sensormate.ch CH-8355 Aadorf Fax +41 (0)52 364 32 72 www.sensormate.ch Schweiz...
Need help?
Do you have a question about the QE1008-W SET and is the answer not in the manual?
Questions and answers