Advertisement
Table of Contents
CONTENTS
Fasteners . . . . . . . . . . . . . . . . . . . . . . . . . . . . . . . . . . . . . . . . . . . . . . . . . . . . . . . . . . . . . . . . . . . . . . . . . . . . . . . . .2
Part List . . . . . . . . . . . . . . . . . . . . . . . . . . . . . . . . . . . . . . . . . . . . . . . . . . . . . . . . . . . . . . . . . . . . . . . . . . . . . . . . . .2
Required Tools . . . . . . . . . . . . . . . . . . . . . . . . . . . . . . . . . . . . . . . . . . . . . . . . . . . . . . . . . . . . . . . . . . . . . . . . . . . . .2
Assembly . . . . . . . . . . . . . . . . . . . . . . . . . . . . . . . . . . . . . . . . . . . . . . . . . . . . . . . . . . . . . . . . . . . . . . . . . . . . . . . . .2
Warranty . . . . . . . . . . . . . . . . . . . . . . . . . . . . . . . . . . . . . . . . . . . . . . . . . . . . . . . . . . . . . . . . . . . . . . . . . . . . . . . . .8
Note: Please read and understand the Tourmaster Storage Cart Assembly Instructions before
assembling the parts.
Note: Remove all items from the shipping cartons and arrange them in their approximate final
position. Refer to the illustrations on the following pages. If you need additional information
about your Tourmaster Storage Cart, write or telephone Wenger Corporation at the number
below.
Note: The Tourmaster Storage Cart always requires two people to move the Cart when loaded.
©Wenger Corporation 2003
Wenger Corporation, 555 Park Drive, P.O. Box 448, Owatonna, Minnesota 55060-0448
Questions? Call.....USA: (800) 733-0393 • International (call collect): (507) 455-4100 • www.wengercorp.com
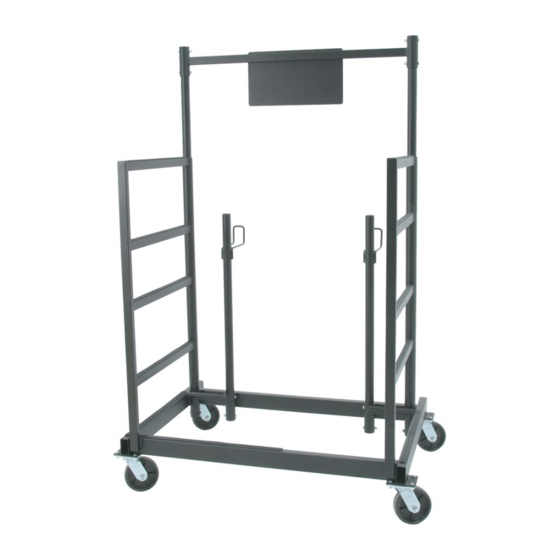
Tourmaster Storage Cart
Printed in USA 02/03
Assembly Instructions
Part #024F960-02
Advertisement
Table of Contents

Subscribe to Our Youtube Channel
Related Manuals for Wenger Tourmaster Storage Cart


Summary of Contents for Wenger Tourmaster Storage Cart
- Page 1 Refer to the illustrations on the following pages. If you need additional information about your Tourmaster Storage Cart, write or telephone Wenger Corporation at the number below. Note: The Tourmaster Storage Cart always requires two people to move the Cart when loaded. ©Wenger Corporation 2003 Printed in USA 02/03 Part #024F960-02 Wenger Corporation, 555 Park Drive, P.O.
- Page 2 9/16" Socket and Ratchet 9/16" Open End Wrench ASSEMBLY Before starting the Tourmaster Storage Cart assembly, do the following. 1. Read and understand this assembly instruction. 2. Remove all items from the shipping cartons and arrange the parts similar to the diagram below.
- Page 3 ASSEMBLY CONTINUED 1. Place the Storage Cart Frame onto the floor with the bottom surface facing upward. Bottom Surface Step 1 2. Using a 9/16" socket and ratchet and a 9/16" open end wrench, attach a Caster (9) to the Frame (8) with four Hex Head Cap Screws, 3/8-16x1"...
- Page 4 ASSEMBLY CONTINUED 5. Using a 9/16" open end wrench and 9/16" socket and ratchet, remove the lower Capscrew (1) and Locknut (3) from the Right Hand Swing Arm Post Post Assembly (6). Step 5 Insert the Right Hand Swing Arm Post Assembly (6) into the right Outer Tube on the right side of the Storage Cart Frame (8).
- Page 5 ASSEMBLY CONTINUED 8. Attach the Left Hand Swing Arm Post Assembly (7) to the Frame left Outer Tube on the left side in the same way as described in steps 5, 6, and 7 above. Step 8 9. Take the short end of the Cinch Strap and place the loop under the highest Swing Arm on the Loop, under Arm right side and pass the buckle over the top of...
- Page 6 ASSEMBLY CONTINUED 12. Using a 9/16" open end wrench and 9/16" Frame Inner Tube socket and ratchet, attach the Back Rail Support Post (10) to the Frame Inner Tube with two Hex Head Capscrews, 3/8-16x2-1/2” (1) and two Locknuts, 3/8-16 (3). Step 12 13.
- Page 7 ASSEMBLY CONTINUED 16. Using a 9/16" open end wrench and 9/16" socket and ratchet, attach the Cross Bar (4) to the two Swing Arm Posts (6 and 7) with four Hex Head Capscrews, 3/8-16x2-1/2” (1) and four Locknuts, 3/8-16 (3). Step 16 17.
- Page 8 This is your sole remedy for breach of this warranty. Should you have a question or problem with any Wenger product, don’t hesitate to call, even if the product is past warranty. It’s important to us that all our customers be satisfied.
Need help?
Do you have a question about the Tourmaster Storage Cart and is the answer not in the manual?
Questions and answers