Table of Contents
Advertisement
Quick Links
C
ONTENTS
Safety . . . . . . . . . . . . . . . . . . . . . . . . . . . . . . . . . . . . . . . . . . .2
General . . . . . . . . . . . . . . . . . . . . . . . . . . . . . . . . . . . . . .2
Installation . . . . . . . . . . . . . . . . . . . . . . . . . . . . . . . . . . .2
Warranty . . . . . . . . . . . . . . . . . . . . . . . . . . . . . . . . . . . . . . . . .2
Important User Information . . . . . . . . . . . . . . . . . . . . . . . . . . .3
Intended Use . . . . . . . . . . . . . . . . . . . . . . . . . . . . . . . . .3
Installation . . . . . . . . . . . . . . . . . . . . . . . . . . . . . . . . . . .3
Required Tools . . . . . . . . . . . . . . . . . . . . . . . . . . . . . . . . . . . .3
Parts List and Fasteners . . . . . . . . . . . . . . . . . . . . . . . . . . . .4
Fasteners . . . . . . . . . . . . . . . . . . . . . . . . . . . . . . . . . . . .4
Side Closure Parts and Hardware List . . . . . . . . . . . . . .4
Note: Please read and understand the High Density Sports Storage Side Closure Accessory Owner's
Manual before attempting installation, assembly, or use.
Note: Remove all items from the shipping containers and sort the components by type, size, etc.
Refer to the illustrations on the following pages. If you need additional information about your
High Density Sports Storage Side Closure Accessory, write, email, or telephone Wenger
Corporation at the number or address below.
©Wenger Corporation 2006
Wenger Corporation, 555 Park Drive, P.O. Box 448, Owatonna, Minnesota 55060-0448
Questions? Call.....USA: (800) 733-0393 • International (call collect): (507) 455-4100 • www.wengercorp.com
High Density Sports Storage
Side Closure Accessory
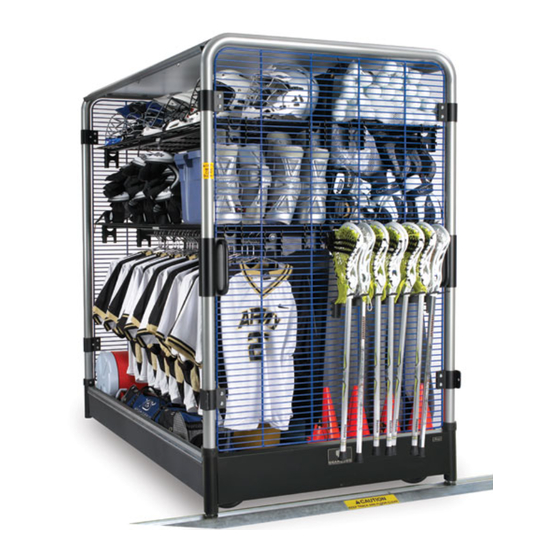
X-Cart with Side Closure
Side Closure Installation . . . . . . . . . . . . . . . . . . . . . . . . . . . . .5
Before Starting the Side Closure Installation . . . . . . . . .5
Attach the Top Brackets . . . . . . . . . . . . . . . . . . . . . . . . .5
Attach the Outer Brackets . . . . . . . . . . . . . . . . . . . . . . .6
Attach Velcro Tape to the Cart . . . . . . . . . . . . . . . . . . . .7
Attach the Side Closure Panels to the Cart . . . . . . . . . .8
Attach the Connector Plates . . . . . . . . . . . . . . . . . . . . . .10
Attach the Outer Brackets to the Cart . . . . . . . . . . . . . .11
Insert Dome Plugs . . . . . . . . . . . . . . . . . . . . . . . . . . . . .11
Replacement Parts . . . . . . . . . . . . . . . . . . . . . . . . . . . . . . . . .12
Side Closure . . . . . . . . . . . . . . . . . . . . . . . . . . . . . . . . . .12
Printed in USA 06/06
Owner's Manual
Part #240A096-02
Advertisement
Table of Contents

Subscribe to Our Youtube Channel
Related Manuals for Wenger Gearboss


Summary of Contents for Wenger Gearboss
-
Page 1: Table Of Contents
Note: Remove all items from the shipping containers and sort the components by type, size, etc. Refer to the illustrations on the following pages. If you need additional information about your High Density Sports Storage Side Closure Accessory, write, email, or telephone Wenger Corporation at the number or address below. -
Page 2: Safety
This is your sole remedy for breach of this warranty. Should you have a question or problem with any Wenger product, don’t hesitate to call, even if the product is past warranty. It’s important to us that all our customers be satisfied. -
Page 3: Important User Information
Safety Section. NTENDED • The Wenger High Density Sports Storage System Side Closure Accessory is intended for indoor use in normal ambient temperature and humidity conditions — it must not be exposed to prolonged outside weather conditions. -
Page 4: Parts List And Fasteners
ARTS IST AND ASTENERS ASTENERS The full scale fasteners shown below are contained in the Side Closure Accessory Hardware Pack. Any fasteners remaining when the installation is complete should be discarded. (6) Flat Washer, 3/8x1-1/4-inch (2) Dome Plug (10) Hex Nut Insert Bit, 3/8-inch (8) Carriage Bolt, 3/8-16x1-1/4-inch (9) Acorn Nut, 3/8-16 (7) Screw, Self-drill,... -
Page 5: Side Closure Installation
LOSURE NSTALLATION The following Installation Instructions are the same for the Side Closure Installation to a 32-inch X-Cart, a 48-inch X-Cart, or a Team Cart. EFORE TARTING THE LOSURE NSTALLATION Warning: Personal injury or damage to property can happen if the instructions in this manual are not followed. -
Page 6: Attach The Outer Brackets
LOSURE NSTALLATION CONTINUED TTACH THE UTER RACKETS 1. Place one of the Side Closure Panels onto the work surface with flat side of the Top Bracket facing downward as shown at the right. 2. Insert two Carriage Bolts, 3/8-16x1-1/4-inches, through the two clearance holes in the Outer Bracket and Side Closure Panel. -
Page 7: Attach Velcro Tape To The Cart
LOSURE NSTALLATION CONTINUED TTACH ELCRO APE TO THE 1. Attach the Velcro Tape to the Top Panel Extrusion on the side that the Side Closure Panels will be installed. a. Peel about 12-inches of the Protective Liner from one end of the Velcro Tape. b. -
Page 8: Attach The Side Closure Panels To The Cart
LOSURE NSTALLATION CONTINUED TTACH THE LOSURE ANELS TO THE 1. Place the Side Closure Panel into position in the Cart. a. Fit the Top Bracket Upper Channel onto the Top Panel Extrusion Outer Leg as shown in the illustration below. b. - Page 9 LOSURE NSTALLATION CONTINUED TTACH THE LOSURE ANELS TO THE CONTINUED 2. Place the Side Closure Panel into the Cart. a. Fit the Top Bracket Upper Channel onto the Top Panel Extrusion Outer Leg. b. Place the bottom surface of the two Outer Brackets onto the top surface of the Chassis Side Rail.
-
Page 10: Attach The Connector Plates
LOSURE NSTALLATION CONTINUED TTACH THE ONNECTOR LATES 1. Assemble a Connector Plate to the Right Side Closure Panel and the Middle Side Closure Panel. a. Align the Connector Plate Clearance Holes (square) to the Connector Plate Mounting Holes on the Right Side Closure Panel and the right side of the Middle Side Closure Panel. b. -
Page 11: Attach The Outer Brackets To The Cart
LOSURE NSTALLATION CONTINUED TTACH THE UTER RACKETS TO THE Note: Make sure that the Side Closure Panel Assembly is centered (left-to-right) on the Cart. 1. Using a cordless drill with a 3/8-inch hex nut drive bit, attach each of the six Outer Brackets to the Chassis Side Rail with six Self-drive Screws, 1/4-14x3/4-inch, as shown below. -
Page 12: Replacement Parts
EPLACEMENT ARTS LOSURE Item Description Side Closure Panel Side Closure Outer Bracket Side Closure Connector Plate Side Closure Top Bracket Acorn Nut, 3/8-16 Flat Washer, 3/8x1-1/4-inch Screw, Self-drill, 1/4-14x3/4-inch Carriage Bolt, 3/8-16x1-1/4-inch Dome Plug...
Need help?
Do you have a question about the Gearboss and is the answer not in the manual?
Questions and answers