Table of Contents
Advertisement
Advertisement
Table of Contents

Related Manuals for Morita Lubrina 2


Summary of Contents for Morita Lubrina 2
- Page 3 Thank you for purchasing the Lubrina 2, dental handpiece maintenance device. For optimum safety and performance as well as to avoid causing harm to people, read this manual thoroughly before using the device and pay close attention to warnings and cautions.
-
Page 4: Table Of Contents
Table of Contents 1 Accident Prevention ......................4 1.1 Customers ........................4 1.2 Dealers .......................... 4 1.3 Preventing Accidents ....................4 1.4 Disclaimers ........................4 2 Precautions .......................... 5 3 Intended Use and Usage Flow.................... 6 4 Components ......................... 7 5 Parts Identification and Function .................. - Page 5 8 Cleaning the Device and Replacing Parts ............... 29 8.1 Daily Cleaning ......................29 8.1.1 Main Unit ......................29 8.1.2 Couplings ......................29 8.2 Regular Cleaning: Once a Month ................30 8.2.1 Front Door ......................30 8.2.2 Air Regulator ....................30 8.3 Parts Replacement .....................
-
Page 6: Accident Prevention
Replacement parts and service will continue to be available during that period. ■ The useful life of the Lubrina 2 is 5 years (based on self-certification) from the date of installation provided it is regu- larly and properly inspected and maintained. -
Page 7: Precautions
• If you find any abnormality of the device (smoke, burning smell, etc.), turn the power off and disconnect the power cord plug from the power outlet immediately. Then contact your local dealer or J. MORITA OFFICE. • To prevent infection, always wear appropriate personal protective equipment such as surgical gloves when us- ing or cleaning the device. -
Page 8: Intended Use And Usage Flow
3 Intended Use and Usage Flow █ Intended Use The Lubrina 2 is for lubricating and flushing debris and foreign objects from inside dental handpieces. █ Usage Flow Maintenance Procedure Sterilization Cleaning Disinfection Lubrication Inspection Packing Lubrication Handpieces can be lubricated using the Lubrina 2. -
Page 9: Components
4 Components █ Main Unit █ Accompanying Items (Parts of Device and Consumables) Oil Absorbent Pad Oil Absorbent Sheet Spray Stands (Qty: 1) (Qty: 1) (Qty: 2) Power Cord Air Tube Door Oil Absorbent Sheet (Qty: 1) (Qty: 1) (Qty: 1) * Cord type and plug shape depend on your country or region. -
Page 10: Parts Identification And Function
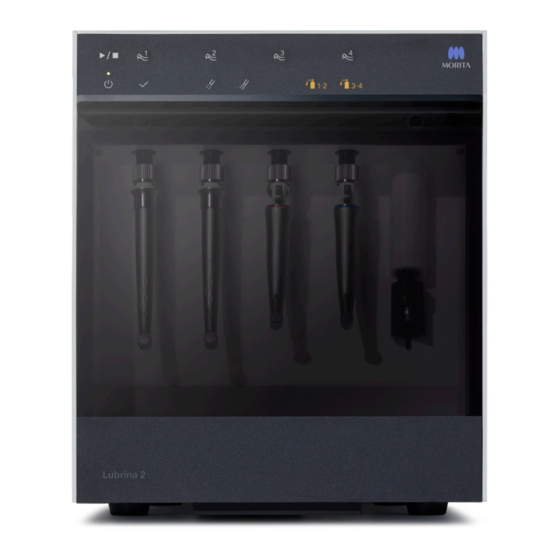
5 Parts Identification and Function 5.1 Parts Identification █ Front Side █ Front View Couplings (sold separately) Operation Panel Front Door Oil Absorbent Sheet Chuck Lubrication Unit Oil Collection Tray Power Switch Door Oil Absorbent Sheet Door Hinge Front Door █... -
Page 11: Operation Panel: Name And Function Of Switches And Indicator Lamps
Contra Angle Handpiece: Speed Increasing Model Air Scaler Air Solfy (J. MORITA product) Air Motor Air Torx (J. MORITA product) Tri Auto ZX (J. MORITA product) Tri Auto ZX2 (J. MORITA product) Endodontic Motor Dentaport ZX (J. MORITA product) Root ZX II (J. MORITA product) Tri Auto mini (J. - Page 12 5 Parts Identification and Function █ Indicator Lamps Operation Lamp Line Selection Lamps Power Lamp Completion Lamp Lubrication Mode Selection Lamps Empty Spray Can Lamps Power Lamp Operation Lamp This lights up when the Power Switch is This lights up when handpiece lubrication turned on.
-
Page 13: Setup
6 Setup 6.1 Main Unit 6.1.1 Installation Install the main unit with at least the clearance shown below provided around the unit. █ Front View █ Top View More than 5 cm More than 5 cm • To prevent infection, always wear appropriate personal protective equipment such as surgical gloves, when using or cleaning the device. Then have the personal protective equipment disposed of appropriately. -
Page 14: Air Tube
Insert the air tube all the way into the tube joint. Otherwise, the air tube could be discon- nected while air is supplied. Use only the air tube that comes with the Lubrina 2. Any other tube might become discon- Air Tube nected unexpectedly. -
Page 15: Power Cord
• Be sure to use the ground connection. Otherwise, there are risks of fire or electric shock if the Lubrina 2 malfunctions or electric leakage occurs. • When connecting the power cord, connect the power cord connector to the unit first and then connect the power cord plug to the power outlet. -
Page 16: Spray Cans
Oil F1 Spray Spray █ Spray Stand Spray stands provided with the Lubrina 2 can be used for J. MORITA’s maintenance sprays and other manufactur- er’s sprays which have the same can shape. Maintenance sprays from other manufacturers that have the same can shape: W&H Service Oil F1**, etc. -
Page 17: Spray Stands
6.2 Spray Cans 6.2.1 Spray Stands █ Setting Rear Cover (R) 1. Open the rear cover (R). 2. Depending on a spray can’s volume, the correct orientation of the spray stand differs. Check the spray can volume and make sure the protrusion hub in the middle of the spray stand is correctly facing up or down, de- pending on the spray can as shown in the table below, and then set it straight down. -
Page 18: Spray Cans
• If a spray can is tilted or is otherwise not set correctly, oil might spray out into your eyes. Never use any cleaning sprays for air bearing handpieces (e.g., ASTRON CLEANER from J. MORITA). Doing so will damage the Lubrina 2 and handpieces. Lock Lever Make sure the lock levers are all the way up. -
Page 19: Spray Stand Adjustment
6.2 Spray Cans █ Removing 1. Turn the lock lever down in clockwise direction. 2. Check that the lock lever is horizontal, and then remove the spray can. * If the spray can is still connected to the inlet port, pull the can straight down. Lock Lever 6.2.3 Spray Stand Adjustment If the spray can is loose vertically even when the lock lever is properly... -
Page 20: Couplings
• For handpieces from other manufacturers, use the optional couplings designed specifi- cally for the Lubrina 2 or genuine couplings of your dental treatment unit. • Do not use couplings made for other manufacturers’ maintenance devices. Doing so Lubrina 2 Lubrina could result in releasing oil mist or poor handpiece maintenance. -
Page 21: Oil Absorbent Sheet
6.4 Oil Absorbent Sheet 6.4 Oil Absorbent Sheet Set an oil absorbent sheet in the unit. Check that the longer direction is oriented towards the front side of the unit. * The sheet can be installed either way up. Shorter Length Longer Length Oil Absorbent Sheet Front Side... -
Page 22: Door Oil Absorbent Sheet And Front Door Sheet Stopper
6 Setup 6.6 Door Oil Absorbent Sheet and Front Door Sheet Stopper 1. Insert the front door sheet stopper into the door oil absorbent sheet Front Door Sheet Stopper with the bumps on the front door sheet stopper aligned with the holes on the door oil absorbent sheet. -
Page 23: Usage
Atmospheric Pressure: 70 kPa to 106 kPa ■ Do not transport or store the device with spray cans installed. 7.2 Maintenance Categories Maintenance categories for the Lubrina 2 are shown in the table below. p. 26 “7.3.4 Switching Maintenance Mode” Applications... -
Page 24: Basic Operation
7 Usage 7.3 Basic Operation Be sure to check the following points before using the Lubrina 2. • Is the air pressure setting between 0.3 MPa and 0.5 MPa? (Recommendation: 0.4 MPa) • Does each coupling have proper O-rings? • Are all connection nuts for couplings properly secured? 7.3.1 Turning Power On/Off... -
Page 25: Handpiece Body Lubrication
7.3 Basic Operation 7.3.3 Handpiece Body Lubrication The initial settings are Mode 1 for Lines 1 & 2, and Mode 2 for Lines 3 & 4. Check the handpiece type and change the mode as necessary. p. 9 “5.2.1 Recommended Mode” p. - Page 26 7 Usage 2. Press the Start/Stop Switch. The Line Selection Lamp for the current lubrication process will blink, and the lamps for the reserved lines will light up. Press the Start/Stop Switch again to stop the process. • Do not press the Start/Stop Switch after selecting a Line that the handpiece is not connected. Otherwise, oil mist might spray out into your eyes.
- Page 27 7.3 Basic Operation Air Turbine Handpieces Release Ring Hold the handpiece with one hand, push up the release ring with the other, and pull the handpiece out. Wipe excess oil from the handpiece with a soft cloth or gauze after 2.
-
Page 28: Switching Maintenance Mode
7 Usage 7.3.4 Switching Maintenance Mode █ Mode 1/Mode2 Switching Procedures The initial settings are Mode 1 for Lines 1 & 2, and Mode 2 for Lines 3 & 4. Check the handpiece type and select the most appropriate lubrication mode for each handpiece. p. -
Page 29: Other Maintenance Modes
7.4 Other Maintenance Modes 7.4 Other Maintenance Modes 7.4.1 Air Blow Mode Use Air Blow Mode to remove excess oil when performing lubrication for handpieces other than J. MORITA prod- ucts or after direct lubrication from a spray can. █ Procedures 1. - Page 30 7 Usage █ Procedures 1. Attach the handpieces and close the front door. 2. Select the Line Selection Switches for the lines with the handpieces attached. Hold Down 3. Check that the selected lines are correct, and then hold down the Mode 2 Switch for two seconds. * The illustration above shows that Lines 1 through 3 are selected.
-
Page 31: Cleaning The Device And Replacing Parts
• To prevent infection, always wear appropriate personal protective equipment such as surgical gloves, when using or cleaning the device. • To prevent malfunction, be sure to turn the Power Switch off before performing the Lubrina 2 maintenance. * Order parts from your local dealer or J. MORITA OFFICE. -
Page 32: Regular Cleaning: Once A Month
Place a dry cloth underneath the air regulator and push up on the drain valve. Make sure that no water comes from the valve. If large quantities of water come out, there could be a problem with the air compressor and it may result in poor maintenance. Contact your local dealer or J. MORITA OFFICE. p. 12 “6.1.2 Air Tube”... -
Page 33: Parts Replacement
Remove the used oil absorbent sheet and replace it with a new one. Check that the sheet orientation is correct. * A single sheet can absorb approximately one can of the MORITA MULTI SPRAY. p. 19 “6.4 Oil Absorbent Sheet”... -
Page 34: Nozzle Skirt
8 Cleaning the Device and Replacing Parts 8.3.4 Nozzle Skirt Turn the power off. Pull out the nozzle skirt and replace it with a new one. Make sure it is oriented the right way up, as shown in the illustra- Nozzle Skirt tion. -
Page 35: Troubleshooting
9 Troubleshooting If the Lubrina 2 does not seem to be working properly, first inspect the locations described below. * If you cannot inspect the device yourself or if the device fails to work properly after being adjusted or after parts are re- placed, contact your local dealer or J. - Page 36 9 Troubleshooting Ref. Symptoms Possible Causes Remedies Page Oil mist is released. Handpiece shape Depending on the shape of the handpiece, it will p. 12 likely scatter more oil during the maintenance and Installation surfaces get will increase excess oil on the handpiece after the oily.
-
Page 37: Maintenance
* The Lubrina 2 should be inspected every six months in accordance with the inspection items listed below. * Maintenance and inspection are generally considered to be the duty and obligation of the user, but if, for some reason, the user is unable to carry out those duties, the user may rely on qualified medical device service per- sonnel. -
Page 38: Consumables
10 Maintenance 10.3 Consumables Oil Absorbent Pads Oil Absorbent Sheets Door Oil Absorbent Sheets (Qty: 5) (Qty: 5) (Qty: 5) Code No.: 7373465 Code No.: 7376847 Code No.: 7376839 Nozzle Skirt (Qty: 1) Code No.: 7373791 Instructions for Use 2019-01-16... -
Page 39: Technical Specifications
Approx. 8 kg Outer Dimensions Width 300 mm x Depth 300 mm x Height 365 mm Manufacturer: J. MORITA MFG. CORP. █ Product Description Used to maintain optimum performance and prolong useful life of dental handpieces. Delivers oil and air automatically to handpiece. -
Page 40: Intended User
11 Technical Specifications 11.2 Intended User a) Engaged person (peoples) in dental clinic b) Language Understanding: English or other languages offered in the Instruction for Use. Understanding of precautions and warnings. c) Experience: Not relevant 11.3 Symbols * Some symbols may not be used. Manufacturer Date of manufacture Serial number... -
Page 41: Electromagnetic Disturbances (Emd)
• This device needs special precautions regarding EMD and needs to be installed and put into service according to the EMD information provided in the ACCOMPANYING DOCUMENTS. • Use of parts other than those accompanied or specified by J. MORITA MFG. CORP. could result in increased electromagnetic emissions or de- creased electromagnetic immunity of this device and result in improper operation. - Page 42 Guidance and Manufacturer’s Declaration – Electromagnetic Immunity This device is intended for use in the electromagnetic environment specified below. The customer or the user of this device should assure that it is used in such an environment. Immunity Test IEC 60601 Test Level Compliance Level Electromagnetic Environment –...
- Page 43 11.2 Intended User Guidance and Manufacturer’s Declaration – Electromagnetic Immunity This device is intended for use in the electromagnetic environment specified below. The customer or the user of this device should assure that it is used in such an environment. Immunity Test IEC 60601 Test Level Compliance Level...
- Page 44 █ Essential Performance None █ Cable Length Interface(s): Max. Cable Length, Shielding Cable Classification AC Power Cable 2.3 m (3-wire), Un-shielded AC Power Line Instructions for Use 2019-01-16...
- Page 48 Pub. No.: K325-91001-505 (EN) Printed in Japan...
Need help?
Do you have a question about the Lubrina 2 and is the answer not in the manual?
Questions and answers
HELLO I JUST REPLACED BOTH CANS IN MY MACHINE AND THE HANDPIECE LIGHTS KEEP FLASHING AND WILL NOT WORK WHAT IS WRONG
The handpiece lights on a Morita Lubrina 2 may be flashing and not working after replacing both cans due to the following possible causes:
1. O-ring Issues – The O-ring may be dislocated, preventing proper attachment. Solution: Replace the O-ring with a new one.
2. Debris on Coupling or Handpiece Connection – Dirt or debris may be interfering with the connection. Solution: Remove any debris from the coupling or handpiece connection.
3. Deformed Coupling or Handpiece Connection – If the coupling or handpiece is damaged, the connection may not be secure. Solution: Have the coupling or handpiece repaired.
If the issue persists after checking these factors, further inspection or contacting the dealer may be necessary.
This answer is automatically generated
@Mr. Anderson I removed the coupling tried different handpieces and no luck I still have all handpiece lights flashing Thank you for your time