
Related Manuals for BEA LZR P110


Summary of Contents for BEA LZR P110
- Page 1 -P110 ® LASER SCANNER FOR PEDESTRIAN DOORS User’s Guide for software version 0600 and higher See tracking label on product for serial number SLIDING SWINGING REVOLVING...
-
Page 2: Installation And Maintenance
SAFETY The device emits invisible IR and visible laser radiation. IR laser: wavelength 905nm; output power <0.10 mW (Class 1 according to IEC 60825-1) Visible laser: wavelength 635 nm; max. output power <1 mW (Class 2 according to IEC 60825-1) The visible laser beams are inactive during normal functioning. -
Page 3: Power Led
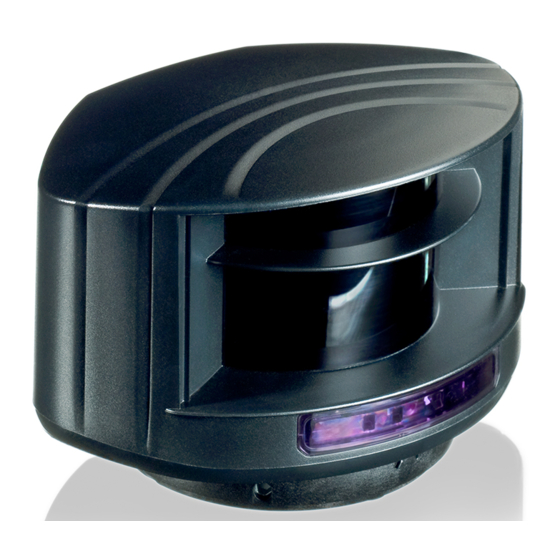
DESCRIPTION protection cover laser sweep emission laser sweep reception visible laser beams (3) LED-signals (4) notches for tilt angle adjustment (2) adjustable bracket screws for position lock (2) connector cable conduits (4) LED-SIGNAL 1. Detection LED: relay 1 - optional field LED flashes quickly 2. -
Page 4: How To Use The Remote Control
HOW TO USE THE REMOTE CONTROL 4 hours after last use, the sensor locks the access to the remote control session. Cut and restore power supply. The remote control session is accessible again during 4 hours. After unlocking, the red If the red LED flashes quickly after unlocking, you To end an adjustment session, LED flashes and the sensor... - Page 5 P. 5 P. 9 P. 13 Please go to the section that fits your door application: REVOLVING SLIDING SWINGING MOUNTING On sliding doors, the LZR should be installed on one of the two door frame corners. 10 cm 45° 45° Use the mounting template to Pass the cable +/- 10 cm though Position the bracket and fasten...
- Page 6 POSITIONING Unlock the sensor and activate the visible laser beams in order to position the curtains parallel to the door. The visible laser beams indicate approximately the postion of the curtain closest to the door. 0° 90° They stay activated for 15 minutes or can be turned off the same way they were activated. 45°...
-
Page 7: Factory Values
SAFETY FIELD CONFIGURATION 5.1 SAFETY FIELD TEACH-IN Launch a teach-in after changing the sensor position or when new objects are added to or changed in the detection zone. The sensor will learn its surroundings and adapt the detection field shape to these. Objects in the detection field will be cut out. -
Page 8: Optional Configuration
OPTIONAL CONFIGURATION 6.1 VIRTUAL PUSH BUTTON TEACH-IN (VPB) Make sure the white and yellow wires are connected to the corresponding inputs before configuring the virtual push buttons. Install 1 or 2 virtual push buttons to open the door «manually». Apply the virtual push button sticker(s) within the optional field. - Page 9 P. 5 P. 9 P. 13 Please go to the section that fits your door application: REVOLVING SLIDING SWINGING MOUNTING On swinging doors, the LZR should be installed in the upper corner of the door leaf. Make sure that the sensor does not touch the wall when the door is open.
- Page 10 POSITIONING Unlock the sensor and activate the visible laser beams in order to position the curtains parallell to the door. 90° The visible laser beams indicate approximately the postion of the curtain closest to the door. They stay activated for 15 minutes or can be turned off the same way they were activated. 45°...
- Page 11 SAFETY FIELD CONFIGURATION 5.1 SAFETY FIELD TEACH-IN Launch a teach-in after changing the sensor position or when new objects are added to or changed in the detection zone. The sensor will learn its surroundings and adapt the detection field shape to these. Objects in the detection field will be cut out.
- Page 12 OPTIONAL CONFIGURATION 6.1 ACTIVATING/ DEACTIVATING THE DETECTION CURTAINS Depending on the needed field depth, activate or deactivate the detection curtains. λ1 λ2 λ3 λ4 All curtains are active curtain is inactive curtain is active λ λ λ λ λ λ 2 are active λ...
- Page 13 P. 5 P. 9 P. 13 Please go to the section that fits your door application: REVOLVING SLIDING SWINGING MOUNTING On revolving doors, the LZR should be installed in the upper corner of the door leaf. 10 cm 45° 45° Use the mounting template to Pass the cable +/- 10 cm though Position the bracket and fasten...
- Page 14 POSITIONING Unlock the sensor and activate the visible laser beams Unlock the sensor and activate the visible laser beams in order to position the curtains parallell to the door. in order to position the curtains parallell to the door. 90° The visible laser beams indicate approximately the postion of the curtain closest to the door.
- Page 15 SAFETY FIELD CONFIGURATION 5.1 SAFETY FIELD TEACH-IN Launch a teach-in after changing the sensor position or when new objects are added to or changed in the detection zone. The sensor will learn its surroundings and adapt the detection field shape to these. Objects in the detection field will be cut out.
- Page 16 OPTIONAL CONFIGURATION (RELAY 1) 6.1 SLOW-DOWN FUNCTION The optional field can be used to slow down the door. λ1 λ2 λ3 λ4 All curtains are active on both fields curtain is inactive on both fields curtain is active on optional field and slows down the door (R1) curtain is active on safety field and stops the door (R2) λ...
- Page 17 OTHER REMOTE CONTROL CONFIGURATIONS In order to configure the FIELD DIMENSIONS field dimensions of the optional field (relay 1), you same as 0.5 m 5.0 m have to cancel the virtual safety field push button function by launching a new VPB teach- in without any movement in the detection field.
-
Page 18: Troubleshooting
TROUBLESHOOTING There is no power. No blue LED Check cable and connexion. The polarity of the power Check the polarity of the power supply. supply is inverted. All LEDs have been de- Activate the LEDs by remote control. activated by remote control. Only the blue LED The test input is not Check wiring. -
Page 19: Technical Specifications
TECHNICAL SPECIFICATIONS Technology: laser scanner, time-of-flight measurement Detection mode: motion and presence Max. detection range: 5.0 m x 5.0 m Uncovered zone: 5 - 25 cm (adjustable) Remission factor: > 2 % Angular resolution: 0.3516 ° Min. detected object size (typ.): 2.1 cm @ 3 m ;... - Page 20 BEA SA | LIEGE SCIENCE PARK | ALLÉE DES NOISETIERS 5 - 4031 ANGLEUR [BELGIUM] | T +32 4 361 65 65 | F +32 4 361 28 58 | INFO@BEA.BE | WWW.BEA-SENSORS.COM BEA hereby declares that the LZR -P110 is in conformity with the European directives 2011/65/EU, 2014/30/EU and 2006/42/EC.
Need help?
Do you have a question about the LZR P110 and is the answer not in the manual?
Questions and answers