Advertisement
Available languages
Available languages
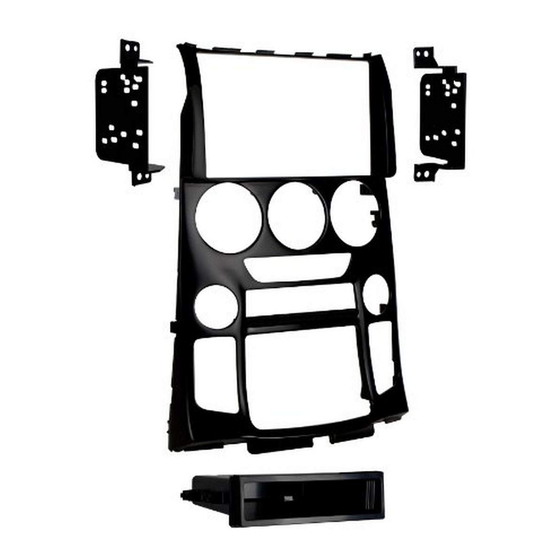
KIT COMPONENTS
• A) Radio housing • B) Radio brackets • C) Pocket • D) (4) #8 x 3/8" Phillips screws • E) (2) PC-7871 Panel clips • F) (12) #8 x 1/2" Phillips screws
A
B
Metra. The World's Best Kits.
®
Hyundai Genesis Coupe (w/o NAV)
Visit
MetraOnline.com
specific applications
KIT FEATURES
• ISO DIN radio provision with pocket
• Painted Matte Black
C
D
F
MetraOnline.com
for more detailed information about the product and up-to-date vehicle
E
© COPYRIGHT 2019 METRA ELECTRONICS CORPORATION
99-7352B
I N S TA L L AT I O N I N S T R U C T I O N S
2013-2015
TABLE OF CONTENTS
Dash Disassembly ..................................................2
Kit Assembly ..........................................................3
WIRING & ANTENNA CONNECTIONS (sold separately)
Wiring Harness: 70-7304 •AX-HYKIA1-SWC
& AX-HYKIA-SPDIF (for amplified models)
Antenna Adapter: Not required
TOOLS REQUIRED
• Panel removal tool • Phillips screwdriver
• Small flat-blade screwdriver
Attention!
Let the vehicle sit with the key
out of the ignition for a few minutes before
removing the factory radio. When testing the
aftermarket equipment, ensure that all factory
equipment is connected before cycling the
key to ignition.
REV. 2/7/19 INST99-7352B
Advertisement
Table of Contents

Related Manuals for Metra Electronics 99-7352B


Summary of Contents for Metra Electronics 99-7352B
- Page 1 When testing the aftermarket equipment, ensure that all factory equipment is connected before cycling the key to ignition. Metra. The World’s Best Kits. MetraOnline.com ® © COPYRIGHT 2019 METRA ELECTRONICS CORPORATION REV. 2/7/19 INST99-7352B...
- Page 2 DASH DISASSEMBLY 1. Unclip and remove the shifter trim 5. Remove (4) Phillips screws securing panel. (Figure A) the factory gauges to the radio/climate control panel. (Figure E) 2. Unclip and remove the display trim 6. Remove (4) Phillips screws securing panel above radio.
- Page 3 KIT PREPARATION 1. Attach the pocket assembly to the radio 1. Secure the radio brackets to the pocket housing using the (4) #8 x 1/2” Phillips with the (4) #8 x 3/8” Phillips screws screws provided. (Figure A) supplied. (Figure A) 2.
- Page 4 Log onto www.installerinstitute.com or call 800-354-6782 for more information and take steps toward a better tomorrow. Metra recommends MECP certified technicians Metra. The World’s Best Kits. MetraOnline.com ® © COPYRIGHT 2019 METRA ELECTRONICS CORPORATION REV. 2/7/19 INST99-7352B...
- Page 5 Además, no quite el radio de fábrica con la llave en la posición o de encendido ni con el vehículo funcionando. Metra. The World’s Best Kits. MetraOnline.com ® © COPYRIGHT 2019 METRA ELECTRONICS CORPORATION REV. 2/7/19 INST99-7352B...
- Page 6 DESMONTAJE DEL TABLERO 1. Desenganche y quite el panel de moldura 5. Quite los (4) tornillos Phillips que sujetan de la palanca de velocidades. (Figura A) los indicadores de fábrica al panel de control del radio/clima. (Figura E) 2. Desenganche y quite el panel de la 6.
- Page 7 ENSAMBLE DEL KIT 1. Coloque el ensamble de la cavidad en 1. Atornille los soportes del radio al el panel del radio 95-7352B utilizando canvidad con los (4) tornillos Phillips #8 los (4) tornillos Phillips #8 x 3/8” de 3/8” suministrados. (Figura A) suministrados.
- Page 8 800-354-6782 para obtener más información y avance hacia un futuro mejor. Metra recomienda técnicos con certificación del Programa de Certificación en Electrónica Móvil (Mobile Electronics Certification Program, MECP). Metra. The World’s Best Kits. MetraOnline.com ® © COPYRIGHT 2019 METRA ELECTRONICS CORPORATION REV. 2/7/19 INST99-7352B...
Need help?
Do you have a question about the 99-7352B and is the answer not in the manual?
Questions and answers