Table of Contents
Advertisement
Available languages
Available languages
Spot Light Source Instruction Manual
● 操作者および保守要員の方は、本装置の操作または保守を行なう前に、この取扱説明書をよくお読みください。
● この取扱説明書の内容を完全に理解するまでは、装置の運転または保守を行なわないでください。
● 本装置の管理者は、本装置の内容を理解していない者に操作をさせないでください。
● この説明書は常時簡便に参照できるように、装置付近に保管してください。
● この説明書を紛失・損傷した場合は、速やかに弊社または弊社代理店にご注文ください。
● 本装置を譲渡される場合は、次の所有者にこの説明書を必ず添付してください。
● Those who are engaged in operation and maintenance of this equipment should read this instruction man-
ual thoroughly before initiating operation or maintenance.
● Do not operate the equipment or perform maintenance unless this manual has been fully understood.
● The person responsible for the equipment must not let anyone operate the equipment who does not have
full understanding of the equipment.
● Keep this manual readily accessible so that it can be consulted at any time.
● Should this manual be lost or ruined, order it from us directly or from our sales office.
● When transferring this equipment to another owner, be sure to attach this manual to the equipment.
スポット光源 取扱説明書
@ W2-0095-12
2016.09.P
Advertisement
Table of Contents

Summary of Contents for Hamamatsu Photonics LIGHTINGCURE LC8
- Page 1 スポット光源 取扱説明書 Spot Light Source Instruction Manual ● 操作者および保守要員の方は、本装置の操作または保守を行なう前に、この取扱説明書をよくお読みください。 ● この取扱説明書の内容を完全に理解するまでは、装置の運転または保守を行なわないでください。 ● 本装置の管理者は、本装置の内容を理解していない者に操作をさせないでください。 ● この説明書は常時簡便に参照できるように、装置付近に保管してください。 ● この説明書を紛失・損傷した場合は、速やかに弊社または弊社代理店にご注文ください。 ● 本装置を譲渡される場合は、次の所有者にこの説明書を必ず添付してください。 ● Those who are engaged in operation and maintenance of this equipment should read this instruction man- ual thoroughly before initiating operation or maintenance. ● Do not operate the equipment or perform maintenance unless this manual has been fully understood. ● The person responsible for the equipment must not let anyone operate the equipment who does not have full understanding of the equipment. ● Keep this manual readily accessible so that it can be consulted at any time. ● Should this manual be lost or ruined, order it from us directly or from our sales office. ● When transferring this equipment to another owner, be sure to attach this manual to the equipment. @ W2-0095-12 2016.09.P...
-
Page 3: Table Of Contents
目 次 各部の名称 ....................4 保守点検 .....................19 安全上の注意事項 .................6 故障診断 .....................19 1-1. 警告表示の分類 .................. 6 仕様 .....................49 1-2. 安全上の注意 ..................6 外形寸法図 ..................50 1-3. 警告ラベルの貼り位置 ..............7 別売品(オプション) ................51 概要 ......................8 メンテナンス部品 ................52 設置場所・設置方法 ................8 保証とアフターサービス ..............53 外部制御 ....................9 アラーム表示 ..................10 ● 同梱品... -
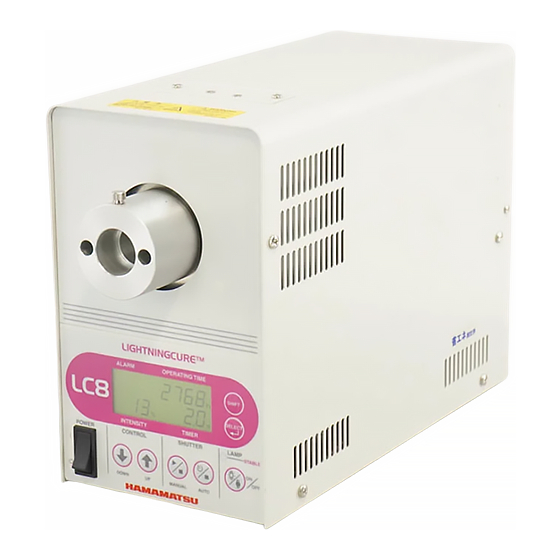
Page 4: 各部の名称
各部の名称 /Component Names / 各部分的名称 ■ L9566 シリーズ / ■ L9588 シリーズ / L9566 series L9588 series L9566 系列 L9588 系列 ● 本体正面 / ● 本体正面 / Front View Front View 本体正面 本体正面 OVER HEAT OVER HEAT LAMP ERR. LAMP ERR. SHUTTER ERR. SHUTTER ERR. LAMP CHANGE LAMP CHANGE ● 本体背面... - Page 5 ランプ交換扉固定ねじ Lamp replacement hatch fixing screw ライトガイド固定ねじ Light guide fixing screw ランプ交換扉→ 11 ページ Lamp replacement hatch → page 25 ライトガイド接続口→ 10 ページ Light guide connection aperture → page 24 操作パネル Control panel 電源スイッチ Power switch 外部制御信号入出力コネクタ→ 9 ページ External control signal input/output connector →...
-
Page 6: 安全上の注意事項
安全上の注意事項 ご使用になる前に、必ずこの 「安全上の注意事項」 をよくお読みになり、注意事項を 守った上で本装置をご使用ください。 1-1. 警告表示の分類 1-2. 安全上の注意 この取扱説明書および製品の警告ラベルを、よりよく理解していた 警告 だくために、警告表示の分類を以下のように使い分けています。こ れらの内容をよく理解し、指示を守ってください。 ● 照射光について この表示を無視して誤った取り扱いをすると、使 警告 ・ 本装置は、JIS C 7550「ランプ及びランプシステムの光生物学 用者が死亡または重傷を負う可能性があると思わ 的安全性」 で規定する リスクグループ 3 となります。 れる事項があることを示しています。 ・ 本装置は目や皮膚に有害な非常に強い紫外線を放射します。 また、ライトガイド接続口から照射される光には、紫外線の他に この表示を無視して誤った取り扱いをすると、使 注意 赤外線が含まれているため、照射により熱が発生します。以下の 用者が障害を負うことが想定される内容および物 事項を守り、操作してください。 的損害の発生が想定される事項があることを示し ています。 ライトガイド接続口を直接覗いたり、ライトガイドからの 射出光を直視しないでください。 強力な紫外線により、視力障害を起こすおそれがあります。 この記号は、製品を取り扱う際に注意すべき事項が あることを示しています。 必ずメガネ ・ 手袋等の保護具を着用して、作業してください。 指示内容をよく読み、製品を安全にご利用ください。... -
Page 7: 警告ラベルの貼り位置
1-3. 警告ラベルの貼り位置 注意 これらの警告ラベルは常にはっきりと見えるようにし ● 振動・衝撃について ておかなければなりません。 装置の取り扱いには充分注意してください。 ラベルがはがれたり、汚損した場合は、新しいラベルと 装置内部には、ガラス製ランプが装着されています。また機構部品 交換してください。 も精密に調整されています。過度の振動や衝撃を加えますと、ラン 警告ラベルの交換は、弊社(56 ページをご参照くださ プの破損や調整の狂いを引き起こし、火災・感電の原因となります。 い) までご連絡ください。 代替品 (有償) を送付いたします。 ● 異常が認められた場合 煙が出ている、変なにおいや音がするなどの異常が認めら れた場合は、ただちに本装置の電源スイッチを切り、その ● 本体上面 後電源コードをコンセントから抜いてください。 異常状態のままで使用を続けると、火災・感電等の原因となります。 L9566/L9588- 01A, 02A ● 電源について 警告シール 感電防止のため、電源コードのアース端子を、必ずアース してください。 表示された電源電圧以外では、 絶対に使用しないでください。 火災・感電の原因となる場合があります。 ● ランプの交換について 4000 時間(L8253 は 3000 時間) 経過後はランプの交 換をしてください。... -
Page 8: 設置場所・設置方法
概要 本装置は任意の場所に光を照射するための光照射光源です。 弊社製水銀キセノンランプ (またはキセノンランプ) を使用し、ランプから放射された光を集光ミラーにより集光し、ラ イトガイドによって任意の場所へ導光して照射します。 装置は、ランプ・ミラー・シャッター・絞りを含む光学系と、ランプを点灯させる電源および制御系より構成され、コ ンパクトな筐体内に効率よく配置されています。 豊富なバリエーションのライトガイドおよび光学系 (オプション) との組み合わせで、多種多様な用途に対応可能です。 また、外部よりランプのオンオフ・シャッターの開閉・絞りの制御等が可能です。 設置場所・設置方法 ご注意 ● 高温・高湿の場所には設置しないでください。 ( 推奨使用環境 周囲温度 25 ℃ 程度、湿度 80 % 以下) ● 冷却ファンの排気が滞留しないよう、風通しのよい場所に設置してください。 ● ランプの種類によっては、点灯初期、オゾンが生成されオゾン臭がします。人体に影響するレベルではありませんが、密閉さ れた部屋で長時間使用する場合は、時々換気を行なってください。 ● 本体足を下にして、水平な場所に設置してください。 ● 本体背面の冷却ファン吹出口は、壁から 10 cm 以上離してください。また、周りを囲まれる密閉空間に入れる場合は、排気 ダクトを設けるなど強制排気を行なってください。 その際、ファン吹出口からの風量と温風の温度が開放空間条件と同等になるような設置設計としてください。 L9588 の設置 L9566 の設置 空気吸入口 空気吸入口 10 cm 以上... -
Page 9: 外部制御
外部制御 ■ 外部制御端子入出力信号一覧表 (15 ピン D-sub タイプ) ピン No. 信号名称 内 容 外観図 +12 V +12 V dc 出力(100 mA max.) ランプ交換信号 ランプ点灯積算時間が 4000 時間(L8253 は 3000 時間) に達したときに信号 が出力される。 ランプ点灯信号 ランプが点灯すると信号が出力される。 ランプ安定信号 ランプ点灯後、約 5 分 経過後に信号が出力される。 シャッター開信号 シャッターが開いている間、信号が出力される。 光量上限信号 光量が上限に達した場合、信号が出力される。 アラーム信号 オーバーヒート、ランプエラー、シャッターエラー、ランプチェンジの各アラーム が表示された場合、信号が出力される。 光量下限信号 光量が下限に達した場合、信号が出力される。 光量UP マニュアルモードでシャッターが開いているときに、信号を入力すると、その入力 期間光量が増加する。 (絞りが開く。 ) ランプ消灯トリガ 瞬時入力(0.5 秒程度)すると、ランプを消灯させる。... -
Page 10: アラーム表示
アラーム表示 装置が異常を起こした場合、それぞれの異常に対応した表示が点滅します。同時に外部制御端子から「アラーム信号」も出力さ れます。各アラームが表示されたら、速やかに原因を調査し、対処してください。 ● オーバーヒート 装置内部の温度が異常に高くなると、 が点滅表示さ アラーム表示 OVER HEAT れます。 オーバーヒートの状態が 2 分 間以上続くと、ランプ点灯時はラン プが強制的に消灯されます。 → 下記の項目をチェックしてください。 ・ 冷却ファンが止まっていないか? ● シャッターエラー ・ 空気吸入口が塞がれていないか? シャッター開 (または閉) の操作をしてもシャッターが開かない (閉 ・ 密閉空間内の排気が不十分で周囲温度が高くないか? じない) 場合に、 が点滅表示されます。 SHUTTER ERR. * 装置内の温度が下がればオーバーヒートアラームは解除さ → シャッターユニットが不良です。弊社までご連絡ください。... -
Page 11: ランプの取り付け
■ ランプの取り付け ランプのフランジを持ち、静かにまっすぐにランプホルダーの 穴に挿し込みます。このときスリットが真上にくるように調節 本機を初めてお使いになる場合は、最初に本体に同梱の し、ランプフランジを持ったままランプを押し込みます。 ランプを取り付けてください。 ランプホルダー ランプの取り扱いには充分注意してくださ 警告 ランプ い。ランプ内部には、高圧のガス[常温にて 1 MPa (約 10 気圧) ]が封入されています。 スリット 落下などの強い衝撃を与えますと、破裂する 危険性があります。 ランプフランジ ご注意 ● ランプガラス部およびランプ先端部には、素手でさわらな いでください。万一汚れや、 油が付着した場合は、 アルコー ルを付けたガーゼ (柔らかい布) で拭きとってください。 ● ランプの取り付けは、確実に行なってください。取り付け が不完全だと、放射出力強度が不安定になったり、点灯し ない場合があります。 ランプが奥まで収まったら、ランプ固定キャップを押しながら 回してランプをしっかりと固定します。 このときランプ固定キャップの溝部とランプホルダー部のピン 電源スイッチを OFF にします。 の位置を合わせ、押し込みながら右 (時計回り) に回します。 ランプ交換扉固定ねじをゆるめ、ランプ交換扉を手前に開きま... -
Page 12: 省電力モード設定について
■ 省電力モード設定について L9566 シリーズ 工場出荷時には「Normal」 (ノーマル)側に設定 されています。このスイッチを 「Save」 ( セーブ) 側に設定すると、消費電力が約 10 % 節約でき ます。ただし、光量も減少しますので比較的光 量を少なく使用する場合に有効です。また、ラ ンプの使用時間に対する劣化も少なくなります。 Save Normal POWER SAVING ● 省電力モード設定方法 電源コード、その他コード類をすべて外します。 L9588 シリーズ 光源カバーを外します。 ( M4 ねじ 8 箇所) 省電力モードスイッチを希望するモードに変更します。 光源カバーを取り付けます。 ご注意 ● 省電力モードを設定する際は、電源コードを必ず抜いてか ら設定するようにしてください。 Save Normal POWER SAVING フィルタ(オプション)の取り付け... -
Page 13: ランプの交換
ランプの交換 ■ ランプの交換手順 お願い ランプを消灯し、15 分 以上冷却ファンを回します。 ● 本製品には高圧のキセノンガス (0.1 MPa 〜 1 MPa 程度 ) と水銀 が封入されています。本製品を廃棄する場合は廃棄物処理法に則り、 装置内部の温度が十分下がってから、電源スイッチを 自ら適正に処理して頂くか、もしくはランプの内圧が高いため割らず OFF にします。 にそのまま許認可を受けた適正な産業廃棄物処理業者へ委託して処 ランプ交換扉固定ねじをゆるめ、ランプ交換扉を手前に 理してくださるようにお願いします。国外で使用し、その国で廃棄す 開きます。 る場合は、それぞれの国、州の廃棄物処理に関する法令に従って適正 ランプ固定キャップを回して外します。 に処理をしてくださるようにお願いします。 ランプフランジを持ち、静かにまっすぐにランプを引き 出します。 新しいランプを 11 ページの 〜 の手順で取り付けます。 ランプ点灯積算時間のリセット ランプ点灯積算時間が 4000 時間 (L8253 は 3000 時間) に 達すると、... -
Page 14: ランプの点灯・消灯
ランプの点灯・消灯 パネルボタン(ローカル)または外部制御信号(リモート)どちらでも操作できます。 ■ ランプの点灯 ご注意 パネルボタン(ローカル) 外部制御信号(リモート) ● 3 回点灯操作を行なってもランプが点灯し LAMP の「ON/OFF」ボタンを と ピンを瞬時(0.5 秒 ない場合は、それ以上繰り返さないで、 『故 1 回押すとランプが点灯します。 程度)ON するとランプが点灯 障診断』 (→ 19 ページ)の項目を参照して ランプが点灯すると表示灯が光 します。 対処してください。 ります。また、ランプ点灯イン ランプが点灯すると ピンが ジケータが回転して、点灯時間 “ON”します。 を積算していることを示します。 ■ ランプ安定信号 ご注意 パネルボタン(ローカル) 外部制御信号(リモート) ● 点灯直後は、ランプの光出力が低く不安定 ランプ点灯後、約... - Page 15 ■ オートモードでのシャッター開・閉 オートモードでは、あらかじめ時間と光量をプログラム内に設定しておく必要があります。 ● シャッターの開操作 q ノーマル表示モードから SHIFT ボタンを押しながら SELECT ボタンを押すとプログラムモードに切り替わり、プログラム番号が点滅し ますので、SHIFT ボタンと SELECT ボタンを使用し、所定のプログラム番号にセットします。 ( セットした後、SHIFT ボタンと SELECT ボタンを 3 秒 以上同時に押すと、ノーマル表示モードに戻ります。 ) w SHUTTER の AUTO ボタンを押すと、選択したプログラムが動作します。 パネルボタン(ローカル) 外部制御信号(リモート) SHUTTER の AUTO ボタンを 1 回押すと、 シャッター と ピンを瞬時(0.5 秒 程度)ON するとオー が開き、設定時間後、自動的にシャッターが閉じます。 トモードでシャッターが開き、設定時間後、自動的に...
- Page 16 ノーマル表示モード プログラムモード(7STEP) プログラム番号表示 プログラム番号設定 SELECT ボタンで番号 (1 〜 9) を選択 を 3 秒以上連続 または シャッターモード 1 または 2 1 分以上無操作 シャッターモード設定 SELECT ボタンで番号(1、2) を選択 シャッターモードについて ステップ 1 ● シャッターモード 1 ステップ間の光量はスライドして変化します。 光量設定表示 UP ボタンと DOWN ボタンで光量 光量 (絞り)を調整(0 % 〜 100 % , 1 % 単位) 。 オプティカルフィードバック機...
-
Page 17: オプティカルフィードバックユニット(オプション)の調整
オプティカルフィードバックユニット(オプション)の調整 LIGHTNING CURE LC8 シリーズにオプティカルフィードバックユニット (オプション) を取り付けることにより、 オートモー ド時に、光源の光フィードバック制御 (絞りの自動開閉制御) が有効となります。 ■ 光量調整 ■ ご使用いただく上での注意事項 光量調整の際は、必ず弊社製UVメータをご利 ランプを点灯させ、ランプ安定表示灯が点灯するまで待ちます。 用ください。 ライトガイドに光量計 (UV メータ) を取り付け、測定可能な状態にします。 他社製のメータですと、光量設定できない可能性が プログラムモードで SHIFT ボタンと SELECT ボタンを押して光量設定表 あります。また、本装置により表示される光量の値 示させ、SHUTTER の MANUAL ボタンを押してシャッターを開けます。 は、絶対値を保証するものではありません。そのた UP ボタンを 3 秒 程度 (または LCD パネルの光量表示が点滅しなくなるま め、始業点検時に弊社製UVメータを使用して光量 で) 押し続けます。 の確認をお願いします。... - Page 18 表 2:コマンド一覧 コマンド 内容 光源側が 1STEP 7STEP 備考 返す文字列 対応 対応 CNT0 制御モードの設定 CNT0OK ○ ○ フロントパネル制御のときは、このコマンド以外のコマ CNT1 0:フロントパネル制御 CNT1OK ンドに対して ERR を返す。 1:コマンド制御 電源投入時はフロントパネル制御とする。 CNTQ 制御モードの問合せ CNT* ○ ○ *: 制御モード (0: フロントから、1: 通信ポートから ) バージョン情報 VER**-**-** ○ ○ ランプ ON L1OK ○...
-
Page 19: 目 次 保守点検
保守点検 本装置を安全に正しくご使用いただくため、定期的に次の保守点検を行ってください。 ・ 付属の取扱説明書をよくお読みになり光源を正しくお使いください。 ・ 動作がおかしいと感じた場合は故障診断の項目をお読みください。 ・ 水に濡れたり油や埃が内部に入ると、絶縁が劣化して感電事故や火災につながる危険性があります。また絶縁の劣化によりランプが点 灯しない等の誤動作にもつながります。水に濡れたり、油、埃で汚れがひどくなった時は、使用を中止し弊社までご連絡ください ・ 本体の手入れは乾いた布で軽く拭いてください。 ・ ライトガイドの先端が汚れている場合には光出力が正常に出力されません。ライトガイドが汚れていないか定期的に確認を行なってくださ い。ライトガイドの入・出射端が汚れた場合にはアルコールを浸したガーゼでライトガイド端面の汚れをきれいに拭き取ってください。 ・ ランプは消耗品であり、長時間使用しますと光量の劣化が生じます。早めの交換をお勧めします。また、4000 時間(L8253 は 3000 時間) が経過しましたら、光量に関わらず新品のランプと交換してください。4000 時間(L8253 は 3000 時間) 以上ラン プを点灯させますと、ランプが破裂する危険があります。 故障診断 ■ 修理をご依頼になる前に、下記の項目をチェックしてください。 原因 対処方法 症状 参照ページ 電源が入らない インターロックが働いている。 ランプ交換扉をしっかり閉める。 ランプが点灯しない ランプ点灯積算時間が... -
Page 20: Safety Precautions
Safety Precautions Make sure to read these “Safety Precautions” carefully before starting to use the equipment and observe them during operation. 1-1. Classification of Warning Instructions 1-2. Safety Instructions Warning instructions in this manual and on labels are WARNING classified as described below. As each word and sym- bol carry special meanings, familiarize yourself with them and observe the instructions. ● Light • This equipment fall within IEC 62471 “Photobiological This means that possible death or safety standards for lamps and lamp systems” (estab- WARNING serious injury to the operator may... -
Page 21: Warning Label Positions
1-3. Warning Label Positions CAUTION These labels must be attached so that they are ● Vibration and Impacts clearly visible all the time. Handle the unit with care. Sharp impact or strong vibra- If they come off or become dirty, replace them tion can break the lamp or other fragile components, or with new ones. disrupt the precise adjustment of internal mechanisms. Warning labels are available (chargeable) from ● Abnormal Condition our sales office. (Refer to page 56.) Should an abnormal condition is found such as smoking, When it becomes necessary to replace any abnormal smell or noise, turn off the power immediately warning label, contact the nearby sales office. -
Page 22: Outline
Outline This light source equipment irradiates the light which can be applied to any place as desired. This equipment uses a mercury xenon lamp (or xenon lamp) made by Hamamatsu Photonics. The light from the lamp is collected by the converging mirror and lead by the light guide to any desired place for irradiation. The unit consists of the optical system including a lamp, mirror, shutter and diaphragm, power source and con- trol system to cause the lamp to turn on and these components are arranged effectively in the compact frame. Using with a light guide of wide variation and optical system (option) in combination, this unit can be used for various applications. Also, it is possible to turn the lamp on/off, open/close the shutter and control the dia- phragm from outside. Installation Caution ● For installation, avoid a place with high temperature or humidity. (Recommended environment for use: About +25 °C ambient temperature, 80 % or less humidity) ● Allow for adequate ventilation of fan exhaust. -
Page 23: External Control
External Control ■ External Control Signals (15-pin D-sub type) Pin No. Signal name Description External +12 V +12V dc output (100mA max.) view Lamp change signal This signal is output when the accumulated lamp operation time reaches 4000 hours (L8253:3000 hours). Lamp ON signal This signal is output when the lamp ON. Lamp STABLE signal This signal is output about 5 minutes after the lamp ON. -
Page 24: Alarm Display
Alarm Display If a problem occurs with the unit, the alarm indictor corresponding to each trouble flashes and at the same time, the alarm signal is output from the external control terminal. If occurrence of a problem is indicated, immediately check its cause and take corrective measures. ● Overheating Alarm Display If the temperature inside the unit rises excessively high, OVER HEAT indicator flashes. If the overheated status continues more than 2 minutes, the lamp is forcibly turned off. → Check for the following problems. • Has the cooling fan stopped? •... -
Page 25: Lamp Installation
■ Lamp Installation t Holding the lamp flange, inser t the lamp gradually straight into the hole in the lamp holder. When using this unit for the first time, install the At this time, make sure to hold the lamp flange so that lamp supplied with it first. -
Page 26: Power Saving Mode Setting Switch
■ Power saving mode setting switch L9566 series The switch is factory-set to the “Normal” side. With the switch set to the “Save” side, you can save about 10 % of power consump- tion. However, as this setting also causes light intensity to reduce, its use is effective when using the equipment with comparatively low light intensity. -
Page 27: Lamp Replacement
Lamp Replacement ■ Lamp Replacement q Turn off the lamp and let the cooling fan run for 15 minutes or longer. w After the temperature in the unit has dropped sufficiently, turn off the power switch. e Loosen the lamp replacement hatch fixing screw and open the hatch forward. r Remove the lamp fixing cap by turning it. -
Page 28: Power On/Off
Power ON/OFF ■ Power On/OFF Press the upper part of the power switch to turn on the power. Immediately after the power is turned on, initialization of the equipment is executed. It takes about 10 seconds and during this time, all indicator lamps light up and no button operation or external control is accepted. -
Page 29: Lamp On/Off
Lamp ON/OFF The panel buttons (local operation) or external control signals (remote operation) can be used for operation. ■ Lamp On Caution Control Panel External Control Signal (Local operation) (Remote operation) ● If the lamp fails to come on after input- Pressing the [LAMP ON/OFF] ting lamp-ON signal 3 times, abort the Shorting Pins for an button makes the lamp light instant (approximately 0.5 sec- operation. Refer to the Troubleshoot- up. When the lamp lights, the onds) makes the lamp light up. ing section (page 34) for information indicator lamp goes on. - Page 30 ■ Opening/closing of shutter in Auto mode For the shutter operation in the Auto mode, it is necessary to make settings of the time and light intensity in the program in advance. ● Shutter open operation q Press the [SELECT] button while pressing the [SHIFT] button in the normal display mode, then the mode changes to the pro- gram mode and the program number flashes. Using the [SHIFT] button and [SELECT] button in this state, set the specified program by selecting the number. (After setting, pressing the [SHIFT] and [SELECT] buttons at the same time for longer than 3 seconds will reset to the normal display mode.) w Press the [AUTO] button for [SHUTTER], and the selected program is activated.
- Page 31 Normal display mode Program mode (7STEP) Program number Setting program number Select the number (1 – 9) us- ing the SELECT button. Press these buttons for longer than 3 seconds continuously Shutter mode 1 or 2 or leave them untouched for Setting shutter mode longer than 1 minute Select the number (1 or 2) us- ing the SELECT button. Shutter mode Step 1 ● Shutter mode 1...
-
Page 32: Adjustment Of Optical Feedback Unit (Option)
For adjustment of the output intensity, be sure to use the q Turn on the lamp and wait until the lamp stable indicator lamp lights up. UV meter made by Hamamatsu Photonics. w Install the output intensity meter (UV meter) to the light guide and make It may not be possible to set the output intensity with any it ready for measurement. - Page 33 Table 2 : List of commands Explanation of NG ... XX represent the NG content. 01: Lamp trigger being applied, 02: Memory cure being executed, 03: Shutter auto function being executed, 04: Optical feedback unit unconnected, 05: Error not reaching memory cure setting of output intensity (W) * and X represent 1 character of ASCII Example: when xx=01, the data being communicated is H’30H’31.
-
Page 34: Maintenance And Inspection
(e.g, lamp failure to turn on). If the unit gets wet or dirty with oil or dust excessively, stop using the unit and contact Hamamatsu Photonics. • When cleaning this unit, wipe it lightly with a dry cloth. - Page 35 安全注意事项 使用前请务必阅读本“安全注意事项” ,使用本装置时请务必遵守注意事项。 1-1. 警告显示的分类 1-2. 安全注意事项 为了更好地理解本使用说明书及产品的警告标签,警告显示 警告 按以下分类分别使用。请务必充分理解这些内容,并遵守相 关指示。 ● 关于照射光 · 本 产 品 属 于 国 际 电 工 协 会(IEC) 于 2006 年 制 定 的 IEC 表示如果忽视该指示而进行了错误的操作, 警告 62471《灯和灯系统的光生物安全性》标准范围之内。 有可能导致使用者死亡或者负重伤的事项。 · 本装置会发射对眼睛、皮肤有害的非常强的紫外线。 注意 表示如果忽视该指示而进行了错误的操作, 除紫外线外,从光导向器连接口照射的光中还包含红外线,...
- Page 36 1-3. 警告标签粘贴位置 注意 这些警告标签必须始终保持清晰可见。 ● 关于振动、冲击 标签剥落、污损时,请更换新的标签。 在使用装置时请充分加以注意。 更换警告标签时, 请与本公司(参阅第 56 页)联系。 装置内部装有玻璃材料光源灯。同时,机构零部件也经过 我们将寄送替代品(有偿) 。 了精密的调整。如果施加了过度的振动、冲击,可能引起 光源灯的破损、调整失准等,甚至导致火灾、触电。 ● 发生异常情况时 ● 本体上面 如果出现冒烟、异味、异音等异常情况,请立即切断 L9566/L9588- 01A, 02A 本装置的电源开关,然后将电源软线从插座中拔出。 如果在异常状态下继续使用,则可能引起火灾、触电等事 警告标签 故。 ● 关于电源 为了防止触电,请务必将电源软线的接地端子接地。 请绝对不要使用标明的电源电压以外的电源电压。 否则,可能引起火灾、触电等事故。 ● 光源灯的更换 使 用 时 间 到 达 4000 小 时(L8253 ∶ 3000 小 时 ) 后, 请更换光源灯。...
- Page 37 概要 本装置是用于将光线照射到任意场所的光线照射光源。 使用本公司生产的水银氙光源灯(或者氙光源灯) ,用聚光镜将从光源灯发射出来的光聚光,通过光导向器引 导光线照射到任意的场所。 本装置由包括光源灯、反光镜、快门、光圈等的光学系统,以及使光源灯点亮的电源及控制系统组成,高效率 地配置在小型的筐体内。 通过种类丰富的光导向器及光学系统(选购件)的组合,可以应对各种各样的用途。 同时,可以从外部进行光源灯的开关、快门的开闭、光圈的控制等。 设置场所、设置方法 注意 ● 请不要设置在高温、高湿的场所。 (推荐使用条件 : 环境温度 25℃左右,湿度 80% 以下) ● 请设置在通风条件良好的场所,以避免冷却风扇的排气滞留。 ● 因光源灯种类的不同,亮灯初期可能会产生臭氧,出现臭氧气味。虽然不至于对人体造成影响,但是要在密闭的房 间长时间使用时,请随时注意通风。 ● 请将本体脚部向下,设置在水平的场所。 ● 本体背面的冷却风扇吹出口请保持离墙壁 10cm 以上的距离。另外,要放入四周围起来的密闭空间时,请装设排气 管道等,进行强制性通风。 这时,在配置设计时应保证从风扇吹出口排出的风量和暖风的温度保持与开放空间条件同等。 L9566 的设置 L9588 的设置 空气吸入口 空气吸入口 10cm 以上 10cm 以上...
- Page 38 外部控制 ■ 外部控制端子输入输出信号一览表(15 针 D-sub 型) 针脚 No. 信号名称 内容 +12 V +12V dc 输出(100 mA max.) 外观图 光源灯更换信号 光源灯亮灯累积时间到达 4000 小时(L8253 ∶ 3000 小时)后,输出该信号。 光源灯亮灯信号 光源灯亮灯后输出该信号。 光源灯稳定信号 光源灯亮灯经过 5 分钟后输出该信号。 快门开信号 快门打开期间输出该信号。 光量上限信号 光量达到上限时输出该信号。 警告信号 显示了过热、光源灯错误、快门错误、光源灯更换等各种警告后,输出该信号。 光量下限信号 光量达到下限时输出该信号。 光量 UP 在手动模式下快门打开时输入信号,输入期间光量增加。 (光圈打开) 光源灯熄灭触发器...
- Page 39 警告表示 装置发生异常时,各种异常所对应的显示会闪烁。同时,外部控制端子也会输出“警告信号” 。各种警告显示后, 请迅速查明原因,采取对策。 ● 过热 警告显示 OVER HEAT 装置内部的温度异常变高时, 会闪烁显示。 光源灯亮灯的情况下,如果过热状态持续 2 分钟以上,则会 强制性地将灯熄灭。 → 请检查下述项目 : ·冷却风扇是否已停止? ·空气吸入口是否堵塞? ● 快门错误 ·密闭空间内的排气是否不充分而使周围温度升高? 即使进行快门开 (或者闭) 的操作, 快门也不打开 (不闭合) 时, * 如果装置内的温度下降,则过热警告会解除。 SHUTTER ERR. 将闪烁。 → 快门单元不良。请与本公司联系。 ● 光源灯更换 光源灯亮灯累积时间到达 4000 小时 (L8253 ∶ 3000 小时) 后, ●...
- Page 40 ■ 光源灯的安装 t 握住光源灯的法兰部,轻轻地笔直地插入光源灯支架的孔 中。这时,要进行调节,使切口朝正上方,并握住光源灯 法兰部将光源灯插入。 初次使用本机时,请首先安装随本体包装的光源灯。 使用光源灯时请充分加以注意。 警告 光源灯支架 光 源 灯 内 部 封 入 了 高 压 气 体( 常 温 下 1MPa(约 10 个大气压) ) 。如果不慎摔 光源灯 落等施加了强烈冲击,则可能发生破裂。 切口 光源灯法兰 注意 ● 请不要用裸手接触光源灯玻璃部及光源灯前端部。 万一附着污垢、油时,请用沾有酒精的纱布(软布) 擦拭。 ● 请可靠安装光源灯。如果安装不可靠,则可能出现放 射输出强度不稳定,或者不亮灯的情况。...
- Page 41 ■ 关于省电模式设置 L9566 系列 工厂出厂时已设定在“Normal” (通常)侧。 如果将本开关设定在“Save” (省电)侧, 则消耗功率可节约 10% 左右。但是,光量 也会随之减少,因此在需要光量较少的情 况下有效。另外,相对于光源灯使用时间 的老化也会减少。 Save Normal POWER SAVING ● 省电模式设置方法 q 卸下电源软线及其它全部软线类。 L9588 系列 w 卸下光源护罩。 (M4 螺丝 8 处) e 将省电模式开关更改为希望的模式。 r 装上光源护罩。 注意 ● 在设置省电模式时,请务必事先拔出电源软线。 Save Normal POWER SAVING 滤光片(选购件)的安装...
- Page 42 光源灯的更换 ■ 光源灯的更换步骤 请求 q 关闭光源灯,使冷却风扇转动 15 分钟以上。 ● 本产品中封入了高压氙气(约 0.1MPa-1MPa)和水银,在废弃 本产品时,请按照废弃物处理法,自行进行适当的处置,或在 w 当装置内部的温度充分下降后,将电源开关置于 保证光源灯不因为内压高而破裂的情况下,委托具有处理资格 OFF。 的合适的废弃物处理业者进行处理。在日本国外使用,并在该 e 放松光源灯更换门固定螺丝,将光源灯更换门向面 国废弃时,请遵守各所在国家和地区的有关废弃物处理的法令, 前打开。 进行适当的处置。 r 转动光源灯固定帽,将其卸下。 t 握住光源灯法兰部,轻轻地笔直地将光源灯拉出。 y 请按照第 40 页的步骤 r 〜 u 安装新光源灯。 光源灯亮灯累积时间的复位 光源灯亮灯累积时间到达 4000 小时(L8253 ∶ 3000 小时)后,会显示...
- Page 43 光源灯的亮灯、熄灭 可以通过面板按钮(本地)或者外部控制信号(遥控)来进行操作。 ■ 光源灯的亮灯 注意 面板按钮(本地) 外部控制信号(遥控) 按 1 次 LAMP 的“ON/OFF”按 将 !1 和 !5 针脚瞬时 (0.5 秒左 ● 如果进行了 3 次亮灯操作后光源灯仍不 钮, 光源灯亮灯。 光源灯亮灯后, 右 ) 接通后,光源灯亮灯。 点亮,请不要再重复操作,应参照“故 指示灯发光。同时,光源灯亮 光源灯亮灯后,e 针脚“ON” 。 障诊断” (→第 48 页)的项目进行处理。 灯指示器旋转,表示正在累积 亮灯时间。 ■...
- Page 44 ■ 自动模式下的快门开闭 对于自动模式,必须事先将时间和光量设定在程序中。 ● 快门的开操作 q 在通常显示模式下,按住 SHIFT 按钮并按 SELECT 按钮后,切换为程序模式,程序编号闪烁。因此,可用 SHIFT 按钮和 SELECT 按钮将其设置为规定的程序编号。 (设置后,同时按住 SHIFT 按钮和 SELECT 按钮 3 秒钟以上,返回通常显示模式。 ) w 按 SHUTTER 的 AUTO 按钮后,所选择的程序动作。 面板按钮(本地) 外部控制信号(遥控) 按 1 次 SHUTTER 的 AUTO 按钮,快门打开 ; 经过设定时 将...
- Page 45 通常显示模式 程序模式 程序编号显示 程序编号设置 用 SELECT 按钮选择编号 (1 〜 9) 持续按住 3 秒钟以上或者 快门模式 1 或者 2 1 分钟以上无操作 快门模式设置 用 SELECT 按钮选择编号(1、 2) 关于快门模式 步骤 1 ● 快门模式 1 各分步间的光量滑动变化。 光量设置显示 用 UP 按 钮 和 DOWN 按 钮 调 节 光量(光圈)...
- Page 46 光反馈单元(选购件)的调整 通过将光反馈单元(选购件)安装到 LIGHTNING CURE LC8 系列,在自动模式时,光源的光反馈控制(光圈的自 动开闭控制)将有效。 ■ 使用注意事项 ■ 光量调整 进行光量调节时, 请务必使用本公司的 UV 计。 q 点亮光源灯,等待光源灯稳定指示灯点亮。 使用其它公司的光量计时,有可能无法进行光 w 在光导向器上安装光量计(UV 计) ,并置于可测量的状态。 量设定。另外,本装置显示的光量值并不保证 e 在程序模式下按 SHIFT 按钮和 SELECT 按钮显示光量设定,按 SHUT- 是绝对值。因此,开始工作时请用本公司生产 TER 的 MANUAL 按钮打开快门。 的 UV 计对光量进行确认。 r 持续按住 UP 按钮 3 秒钟左右(或者直到 LCD 面板上的光量指示器不 请注意光导向器的脏污。...
- Page 47 表 2 : 指令一览表 光源侧返回 1STEP 7STEP 内容 备注 字符串 对应 对应 控制模式的设置 CNT0 CNT0OK 采用前面板控制时,对于该指令以外的指令,返回 ERR 0 : 前面板控制 ○ ○ CNT1 CNT1OK 电源接通时为前面板控制 1 : 指令控制 CNTQ 控制模式询问 CNT* ○ ○ * : 控制模式(0 : 从前面板、1 : 从通信端口) 版本信息...
- Page 48 维护检查 为了您能安全、正确地使用本装置,请定期进行下述维护检查。 · 请仔细阅读附属的使用说明书,并正确地使用光源。 · 认为动作有异常时,请阅读故障诊断的项目。 · 溅上水时或者油、尘埃等进入内部时,有引起绝缘劣化而发生触电、火灾等事故的危险性。另外,绝缘劣化还可能导致光 源灯无法亮灯等错误动作。溅上水或者被油、尘埃严重污染时,请停止使用并与本公司联系。 · 保养本体时,请用干布轻轻地擦拭。 · 光导向器的前端脏污时,光无法正常输出。请定期检查光导向器是否已脏污。当光导向器的射出、入射端被污染时,请用 沾上酒精的纱布擦去光导向器端面的污垢。 · 光源灯属于消耗品,长时间使用后光量会劣化。建议尽早更换。另外,经过 4000 小时(L8253 ∶ 3000 小时)后,不论光 量是否劣化,请更换新的光源灯。如果亮灯时间超过 4000 小时(L8253 ∶ 3000 小时) ,光源灯有可能发生破裂。 故障诊断 ■ 委托修理前,请检查下述项目。 症状 原因 处理方法 参考页...
-
Page 49: Specifications
(at 365 nm) ● Paint : Standard paint color used at HAMAMATSU PHOTON- ICS ● Displays : Back side printed film attached (standard color and lettering used at HAMAMATSU PHOTONICS) ● EMC conforming standard : IEC61326 ● Safety conforming standard : IEC61010-1... -
Page 50: 外形寸法図
外形寸法図 / / 外观尺寸图 Dimensions 単位 : mm UNIT : mm 单位 : mm ■ L9566 シリーズ / L9566 series L9566 系列 12.7 SPOT LIGHT SOURCE IOIOI MODEL: L9566-01 S/N: DB0000 INPUT: 100 V – 240 V ~ : 300 VA : 50 HZ – 60 Hz MADE IN JAPAN 39.5 39.5... -
Page 51: 別売品(オプション
別売品 (オプション)/ / 另售品 (选购件) Accessories (Option) ■ オプティカルフィードバックユニット E9793-02(365 nm 用)/E9793-03(436 nm 用) ■ OPTICAL FEEDBACK UNIT E9793-02 (for 365 nm) / E9793-03 (for 436 nm) 光反馈单元 E9793-02 (365 nm 用 ) / E9793-03 (436 nm 用 ) ■ 単位 : mm UNIT : mm 单位 : mm 50.5 ■ フィルタ各種仕様 ● A9616 シリーズ 単位 : mm フィルタ 透過波長 透過率... -
Page 52: メンテナンス部品
メンテナンス部品 ご使用される光源の部品には寿命時間があります。保証期間(製品納入日より1年間)を経過しますと性能の劣化が生じる 可能性があります。本製品を末永くご使用していただくためにも、定期的な保守・管理をお願いします。 メンテナンス部品名 弊社型番 推定寿命(室内、周囲温度 25 ℃、湿度 60 % 程度、連続動作の条件にて) 水銀キセノンランプ L10852 4000 h(保証)※ オゾンレスキセノンランプ L8253 2000 h(保証)※ シャッターユニット(ノーマル) E9793-01 シャッター動作 5000 万回 シャッターユニット(365 nm 光フィードバック) E9793-02 シャッター動作 5000 万回もしくは 20 000 h シャッターユニット(436 nm 光フィードバック) E9793-03 シャッター動作 5000 万回もしくは 20 000 h ミラーユニット (365 nm タイプ ) E9794-01 50 000 h ミラーユニット (248 nm 増強タイプ ) E9794-02 50 000 h ミラーユニット ( 可視光タイプ ) E9794-03 50 000 h ミラーユニット... -
Page 53: 保証とアフターサービス
保証とアフターサービス ■ 保証 ■ アフターサービス 本装置の保証期間は、納入日より 1 年間 です。 長期のご使用で、部品寿命が原因で不具合が生じた場合には、装置 期間内に製造上の原因と認められる故障が発生した場合は、無償修 を弊社宛にお送りください。 理または無償交換いたします。ただし、次に該当するものについて 弊社にて修理・交換・調整作業を行ないます。 は保証期間内であっても有償となります。 (修理可能期間は、基本的に光源出荷後 7 年を目安としてください。 この修理可能期間を過ぎますと保守部品の入手が難しくなり、修理 (1) 取扱説明書に従わない誤ったご使用での故障、使用上の不注 をお断りすることがございますのでご了承ください。 ) 意による故障。 (2) 電気的、機械的な改造を施した場合の故障。 なお、本装置の保証期間は、納入日より1年間です。 (3) 天変地異、地震、火災、その他不可抗力によって発生または 誘発された故障。 ご注意 (4) 本装置に接続または近接する機器類その他の故障などにより 誘発された故障。 本装置は、精密なガラス製光学部品や、高電圧を発生する電源 (5) 動作寿命のある部品(ランプ・シャッター・リレー等)につ などで構成されています。不用意にカバーを取り外したり、部... - Page 56 Telephone: (34)93 582 44 30 Fax: (34)93 582 44 31 No patent rights are granted to any of the circuits described herein. E-mail: infospain@hamamatsu.es © 2013 Hamamatsu Photonics K.K. Quality, technology, and service are part of every product. WEB SITE www.hamamatsu.com □仙台営業所...
Need help?
Do you have a question about the LIGHTINGCURE LC8 and is the answer not in the manual?
Questions and answers