Table of Contents
Advertisement
Quick Links
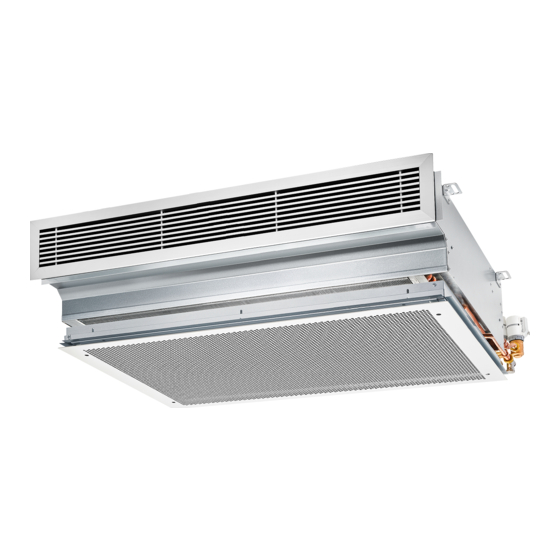
Product overview
Fig. 1: Schematic illustration DID-E2-VC
1
Primary air spigot
2
Terminal box for electrical connection of
volume flow controller (only with version VC)
3
Pressure measurement point (only with ver-
sion VC)
4
Rating plate
5
Water connections, valve with actuator
(optional)
6
Water connections, lockshield (optional)
7
Casing
8
Hanging brackets (4)
Installation manual
Active chilled beams
Type DID-E2
Active chilled beams Type DID-E2
GB/en
9
Extension spigot for supply air (optional)
10
Ventilation grille for supply air (optional)
11
Installation subframe for secondary air grille
(optional)
12
Safety cable for securing the grille
13
Secondary air grille (optional)
14
Heat exchanger
15
Pipe connection for direct valve connection
(optional)
TROX GmbH
Heinrich-Trox-Platz
47504 Neukirchen-Vluyn, Ger-
many
Phone: +49 (0) 2845 2020
Fax: +49 (0) 2845 202265
E-mail: trox@trox.de
Internet: http://www.trox-
technik.com
1
Advertisement
Table of Contents

Related Manuals for Trox Technik DID-E2 Series


Summary of Contents for Trox Technik DID-E2 Series
- Page 1 Installation manual GB/en TROX GmbH Heinrich-Trox-Platz 47504 Neukirchen-Vluyn, Ger- many Phone: +49 (0) 2845 2020 Active chilled beams Fax: +49 (0) 2845 202265 E-mail: trox@trox.de Internet: http://www.trox- Type DID-E2 technik.com Product overview Fig. 1: Schematic illustration DID-E2-VC Primary air spigot Extension spigot for supply air (optional) Terminal box for electrical connection of Ventilation grille for supply air (optional)
-
Page 2: Important Notes
Important notes Important notes Industrial safety helmet Information on the installation manual This manual enables operating or service personnel to correctly install the product described below and to use it safely and efficiently. It is essential that these individuals read and fully Industrial safety helmets protect the head from understand this manual before starting any work. - Page 3 Important notes Incorrect use WARNING! Danger due to incorrect use! Incorrect use of the unit can lead to dangerous situations. Never use the unit: – in areas with potentially explosive atmos- pheres – in humid rooms – in rooms with aggressive or dust-laden air Active chilled beams Type DID-E2...
-
Page 4: Technical Data
Technical data Technical data Designation Value Primary air volume flow rate 8 – 57 l/s, 29 – 205 m³/h Cooling capacity Up to 1600 W Heating capacity Up to 1000 W Max. operating pressure, water side 10 bar (in combination with connection hoses 6 bar) Max. - Page 5 Technical data Dimensions and weight Fig. 2: Dimension drawing DID-E2 with supply air spigot (-Z) and without volume flow controller, labelled DID-E2-4 Ø12 mm pipe, plain tails G½" external thread and flat seal G½" union nut and flat seal Weight (4L, 123, R+L) [kg] Nominal length (LN) 1000 x 320 1000 x 512...
-
Page 6: Dimensions (Mm)
Technical data Fig. 3: Dimension drawing DID-E2 with supply air spigot (-Z) and with volume flow controller (-VC), labelled DID-E2-4 Ø12 mm pipe, plain tails G½" external thread and flat seal G½" union nut and flat seal Weight (4L, 123, R+L) [kg] Nominal length (LN) 1000 x 320 1000 x 512... -
Page 7: Transport And Storage
Transport and storage Transport and storage Storage Transport Please note: Store the unit only in its original packaging CAUTION! Protect the unit from the effects of weather Protect the unit from humidity, dust and con- Danger of injury from sharp edges, sharp cor- tamination ners and thin sheet metal parts! Storage temperature: –10 to 50 °C... - Page 8 Fasten the device Fasten the device Personnel: Specialist personnel Protective equipment: Industrial safety helmet Safety shoes Protective gloves Assemble the device before attaching the plaster- board bulkhead! Only work in pairs; preferably use a lift. DANGER! Danger of death from the fall of a suspended unit! –...
- Page 9 Fasten the device Installing the plasterboard bulkhead Assembly of the installation subframe (optional) The DID-E2 active chilled beams must be clad with Create an assembly opening in accordance a plasterboard bulkhead provided by others after with nominal size of the secondary air grille. attachment to the ceiling.
-
Page 10: Connecting The Water Pipes
Connecting the water pipes The heat exchanger is fitted with water flow and Installation opening without installation sub- water return connections: frame L = Grille length to be ordered - L= 15 mm H = Grille height to be ordered - H= 15 mm Assembly of extension spigot for supply air (optional) Create an assembly opening in accordance... -
Page 11: Connecting The Ductwork
Connecting the ductwork Connecting the unit – screw connection Check the system for leaks immediately after installation and then in regular inter- Personnel: vals. Specialist personnel Connecting the ductwork Protective equipment: DID-E2 active chilled beams are fitted with a pri- Industrial safety helmet ... -
Page 12: Electrical Connection
Electrical connection Electrical connection For ventilation devices with volume flow controller (VC), the electrical connection must be made once assembly is complete. Wiring is done in the terminal box Ä Fig. 1/2. 24 V supply voltage only via safety trans- ... - Page 13 Commissioning Commissioning Cleaning the heat exchanger Before you start commissioning: Personnel: Specialist personnel Check active chilled beams for correct position Remove protective films, if any Protective equipment: Ensure that all connections are correct Industrial safety helmet ...
- Page 14 Cleaning CAUTION! Risk of injury from a falling secondary air grille! If the secondary air grille is not secured, there is a risk of injury from the grille falling. Safety cables are provided on the optional installation subframe for securing the grille.
- Page 15 Active chilled beams Type DID-E2...
- Page 16 Active chilled beams Type DID-E2...
Need help?
Do you have a question about the DID-E2 Series and is the answer not in the manual?
Questions and answers