Advertisement
Quick Links
2753 Michigan Road • Madison, Indiana 47250 • 855-743-3427
Item Description
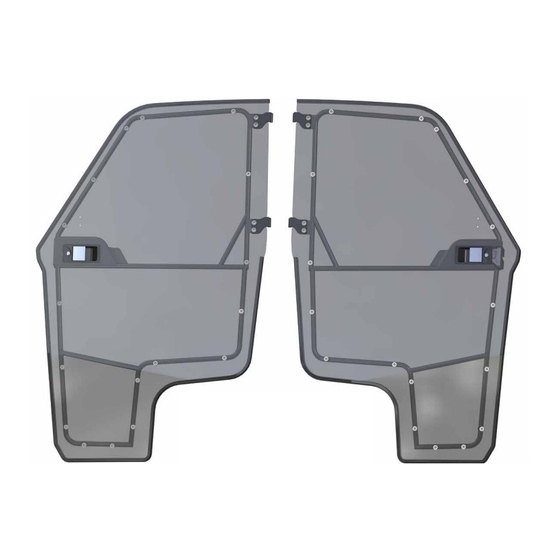
A
Passenger Side Door
Need help with your installation?
sales@superatv.com
1-855-743-3427
®
© 2016 SuperATV.com
. All Rights Reserved.
Full Doors:
Item Description
B
Driver Side Door
B
DOOR-P-RAN900-001 Doors
(kit contents continue on following pages)
www.superatv.com
8:00am - 8:00pm EST M-Th
8:00am - 7:00pm EST Friday
9:00am - 2:00pm EST Saturday
INSTALLATION INSTRUCTIONS
for Polaris Ranger XP
DOOR-P-RAN900-001 Door installation shown
A
Read instructions and view illustrations before beginning.
Rev IN-DOOR-P-RAN900-001 / IN-DOOR-P-RAN900-002 2/13/2019
Thank You
For Choosing
900
®
Advertisement

Related Manuals for SuperATV DOOR-P-RAN900-001


Summary of Contents for SuperATV DOOR-P-RAN900-001
- Page 1 Read instructions and view illustrations before beginning. Thank You sales@superatv.com www.superatv.com For Choosing 8:00am - 8:00pm EST M-Th 1-855-743-3427 8:00am - 7:00pm EST Friday 9:00am - 2:00pm EST Saturday ® © 2016 SuperATV.com . All Rights Reserved. Rev IN-DOOR-P-RAN900-001 / IN-DOOR-P-RAN900-002 2/13/2019...
- Page 2 DOOR-P-RAN900-002 Doors Item Description Item Description Passenger Side Door Driver Side Door IN-DOOR-P-RAN900-001 / IN-DOOR-P-RAN900-002...
- Page 3 KEYS ARE LOCATED UNDER ORANGE TAPE. DO NOT DISCARD. IN-DOOR-P-RAN900-001 / IN-DOOR-P-RAN900-002...
- Page 4 (Passenger Side) Item Description Item Description Hinge Mount; passenger Striker Assembly x 2 Rear Support; passenger Male Hinge Assembly; driver Hinge Mount; driver Strut Bracket x 2 Rear Support; driver Strut x 2 Male Hinge Assembly; passenger Gasket IN-DOOR-P-RAN900-001 / IN-DOOR-P-RAN900-002...
- Page 5 The Buyer is also responsible to obey all ® applicable federal, state, and local laws and ordinances when operating his/her vehicle while using this product, and the Buyer agrees to hold SuperATV harmless from any ®...
- Page 6 Remove Side Nets and hardware shown from both sides of machine keep all components removed from machine (Driver Side) remove hardware from Frame remove Side Net Buckle and hardware remove hardware (Driver Side) from Hip Bolster remove Side Net hardware Floor (Passenger Side) IN-DOOR-P-RAN900-001 / IN-DOOR-P-RAN900-002...
- Page 7 Do not tighten hardware completely unless noted. - Install Striker Assembly (H) to Frame with hardware shown. - Loosen Striker Pin as shown below. - Repeat for opposite side. M8 x 20mm loosen hardware (Passenger Side) IN-DOOR-P-RAN900-001 / IN-DOOR-P-RAN900-002...
- Page 8 - Install Male Hinge Assembly; passenger (G) to Hinge Mount (C) and Rear Hinge Support (D) with hardware shown. - Repeat for driver side components. M8 x 20mm Qty 2 each per Hinge Mount M8 Washer M8 Acorn Nut (Passenger Side) IN-DOOR-P-RAN900-001 / IN-DOOR-P-RAN900-002...
- Page 9 - Install Hinge Mount (C) and Strut Bracket (K) to machine with hardware as shown. - Repeat for opposite side. stock hardware M8 x 20mm 2 each M8 Washer stock hardware (Passenger Side inside machine) (Passenger Side) IN-DOOR-P-RAN900-001 / IN-DOOR-P-RAN900-002...
- Page 10 - Install Passenger Side Door (A). - Install Strut (L) to Strut Bracket (K). Secure with hardware shown. - Install provided Gasket to Hinge Mount (C). 2x - M8 Nut Gasket (Passenger Side) - Close Door and engage Latch. - Align Door to machine. - Tighten all hardware completely. - Repeat steps for opposite side. IN-DOOR-P-RAN900-001 / IN-DOOR-P-RAN900-002...
- Page 11 - Remove installed Mounts on Mirrors. Use 8mm wrench. Discard Mount and hardware. Mirror hardware Mount hardware - Install Mirrors to Doors with hardware shown. - Tighten hardware completely. M5 x 20mm 2 each M5 Nut IN-DOOR-P-RAN900-001 / IN-DOOR-P-RAN900-002...
-
Page 12: Installation Instructions
Need help with your installation? Read instructions and view illustrations before beginning. Thank You sales@superatv.com www.superatv.com For Choosing 8:00am - 8:00pm EST M-Th 1-855-743-3427 8:00am - 7:00pm EST Friday 9:00am - 2:00pm EST Saturday ® © 2016 SuperATV.com . All Rights Reserved. IN-DOOR-P-RAN9004-001 / IN-DOOR-P-RAN9004-002 10/3/2019... - Page 13 DOOR-P-RAN9004-002 Doors Item Description Item Description Passenger Side Door Driver Side Door IN-DOOR-P-RAN9004-001 / IN-DOOR-P-RAN9004-002...
- Page 14 KEYS ARE LOCATED UNDER ORANGE TAPE. DO NOT DISCARD.
- Page 15 (kit contents continued) (Driver Side) (Passenger Side) Gasket Item Description Item Description Hinge Mount; passenger Striker Assembly x 2 Rear Support; passenger Male Hinge Assembly; driver Hinge Mount; driver Strut Bracket x 2 Rear Support; driver Strut x 2 Male Hinge Assembly; passenger IN-DOOR-P-RAN9004-001 / IN-DOOR-P-RAN9004-002...
- Page 16 (kit contents continued) M8-1.25 x 25mm Lg. M8-1.25 Nylock Nut M8 Acorn Nut M8 Washer Cleaning: - Do not use a dry cloth, or your hands, to wipe off Doors; Scratching will occur. - Do not use window cleaning fluids (Windex, 409, etc) or any solvents (gasoline, denatured alcohol, acetone, etc). - Never use abrasive cleaners, abrasive pads, or gritty cloths. 1. Thouroughly rinse Doors to float off dirt and mud. 2. Using a soft cloth, or microfiber cloth, clean Doors with warm water and a gentle detergent. Baby shampoo or hand washing soap are recommended. 3. To prevent water spots, use a chamois and blot Doors dry. IN-DOOR-P-RAN9004-001 / IN-DOOR-P-RAN9004-002...
-
Page 17: Rear Removal
Rear Removal: Remove components shown from both sides of machine. - keep all components removed from machine - remove Side Net Buckle and hardware remove Side Nets (Driver Side) Floor remove hardware IN-DOOR-P-RAN9004-001 / IN-DOOR-P-RAN9004-002... - Page 18 Rear Removal continued: remove Rear Hip Bolsters (Driver Side) remove hardware from Frame (Driver Side) IN-DOOR-P-RAN9004-001 / IN-DOOR-P-RAN9004-002...
- Page 19 Do not tighten hardware completely unless noted. - Install Striker Assembly (H) to Frame. - Loosen Striker Pin as shown below. - Repeat for opposite side. loosen hardware (Driver Side) IN-DOOR-P-RAN9004-001 / IN-DOOR-P-RAN9004-002...
- Page 20 - Install Male Hinge Assembly; passenger (G) to Hinge Mount (C) and Rear Hinge Support (D) with hardware shown. - Repeat for driver side components. M8 x 20mm Qty 2 each per Hinge Mount M8 Washer M8 Acorn Nut (Passenger Side) IN-DOOR-P-RAN9004-001 / IN-DOOR-P-RAN9004-002...
- Page 21 - Install Hinge Mount (E) to machine with stock hardware. - Install Strut Bracket (K) to Hinge Mount (E) with hardware shown. - Repeat for opposite side. (Passenger Side) (Passenger Side inside machine) stock hardware 2 each M8 x 25mm M8 Nut M8 Washer stock hardware IN-DOOR-P-RAN9004-001 / IN-DOOR-P-RAN9004-002...
- Page 22 - Install Driver Side Door (B). (Driver Side) - Secure Strut (L) to Driver Door (B) with hardware shown. (Driver Side inside machine) M8 Nut - Engage Latch and align Driver Door (B) to machine. - Tighten all hardware completely. - Repeat steps for opposite side. IN-DOOR-P-RAN9004-001 / IN-DOOR-P-RAN9004-002...
- Page 23 - Installer may add Gasket to location shown to further seal cab. - Repeat for opposite side. (Passenger Side) IN-DOOR-P-RAN9004-001 / IN-DOOR-P-RAN9004-002...
- Page 24 The Buyer is also responsible to obey all ® applicable federal, state, and local laws and ordinances when operating his/her vehicle while using this product, and the Buyer agrees to hold SuperATV harmless from any ®...
Need help?
Do you have a question about the DOOR-P-RAN900-001 and is the answer not in the manual?
Questions and answers