Table of Contents
Advertisement
Quick Links
2753 Michigan Road • Madison, Indiana 47250 • 855-743-3427
B
E
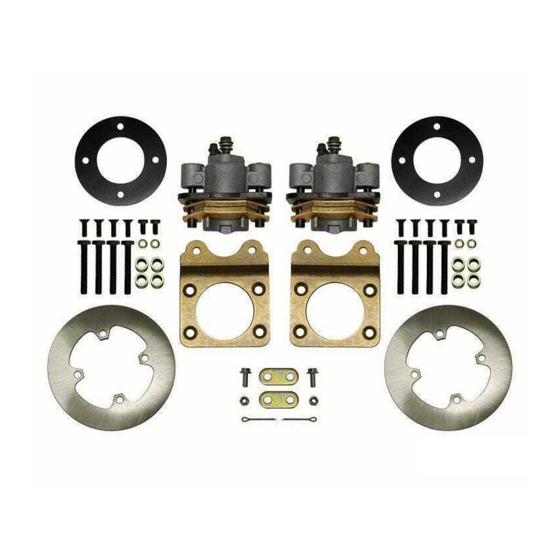
Item
Description
A
Caliper
B
Caliper
C
Wheel Spacer x 2
D
Bracket x 2
E
Relocation Bracket x 2
F
Rotor x 2
8x
Spacer
4x
M8-1.25 x 16mm Lg. HHCS
8x
M8-1.25 x 20mm Lg. FHCS
2x
M6-1.0 Nylock Nut
Need help with your installation?
sales@superatv.com
1-855-743-3427
© 2019 SuperATV.com
®
. All Rights Reserved.
Disk Brake Kit:
C
www.superatv.com
8:00am - 9:00pm EST M-Th
8:00am - 7:00pm EST Friday
9:00am - 2:00pm EST Saturday
INSTALLATION INSTRUCTIONS
INSTALLATION INSTRUCTIONS
Modifications must be made when using on
OEM 12" Aluminum Wheel with inner lip.
D
2x
M8 Lock Washer
2x
2x
M6-1.0 x 16mm Lg. FHCS
8x
M10-1.25 x 70mm Lg. HHCS
Read instructions and view illustrations before beginning.
for Honda ATV' s
F
A
Cotter Pin
Thank You
For Choosing
IN-DBK-H-001 4/26/2019
Advertisement
Table of Contents

Subscribe to Our Youtube Channel
Related Manuals for SuperATV DBK-H-001


Summary of Contents for SuperATV DBK-H-001
- Page 1 Need help with your installation? Read instructions and view illustrations before beginning. Thank You sales@superatv.com www.superatv.com For Choosing 8:00am - 9:00pm EST M-Th 1-855-743-3427 8:00am - 7:00pm EST Friday 9:00am - 2:00pm EST Saturday © 2019 SuperATV.com ® . All Rights Reserved. IN-DBK-H-001 4/26/2019...
- Page 2 Caliper Notes: To use with 12” aluminum Wheels, area shown must be slightly ground to clear Inner Wheel Lip. When installing Calipers ensure that Bleeders face UP. Bleeder Bleeder Bleeder Bleeder IN-DBK-H-001...
- Page 3 The Buyer is also responsible to obey all ® applicable federal, state, and local laws and ordinances when operating his/her vehicle while using this product, and the Buyer agrees to hold SuperATV harmless from any ®...
- Page 4 - Install hardware shown and Spacers to Rotor (F). - Slide Hub onto bolts and install Wheel Spacer (C). - Tighten hardware completely. (4) each Spacer M10 x 70mm - Install Hub on Axle and reinstall stock Castle Nut and supplied Cotter Pin. IN-DBK-H-001...
- Page 5 - Temporarily reinstall Wheels to check clearance. Brake Hose must not bind or rub while turning or rotating tires. (Right Side looking towards front) Bleeder must be UP as shown (4WD Shown) (Right Side) Rear M8 x 16mm (2) each M8 Lock Washer repeat steps for LEFT side; see following page IN-DBK-H-001...
- Page 6 LEFT (4WD Shown) (Left Side looking towards rear) Rear (2) each (Left Side) M8 x 16mm M8 Lock Washer IN-DBK-H-001...
- Page 7 - Bleed Brakes. - Seat Brake Pads by test driving and making several hard stops. Allow Brake Pads to cool and perform several more hard stops. If Brakes begin to feel spongy or weak during this time, bleed Brakes again. IN-DBK-H-001...
Need help?
Do you have a question about the DBK-H-001 and is the answer not in the manual?
Questions and answers