Advertisement
Quick Links
2753 Michigan Road • Madison, Indiana 47250 • 812-574-7777
Item Description
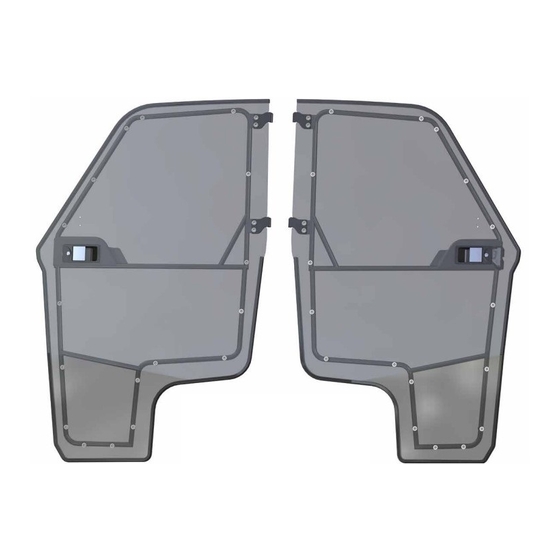
A
Passenger Side Door
Read instructions and view illustrations before beginning.
Need help with your installation?
sales@superatv.com
1-812-574-7777
Thank You
®
© 2016 SuperATV.com
. All Rights Reserved.
Item Description
B
Driver Side Door
B
(kit contents continue on following pages)
www.superatv.com
8:00am - 9:00pm EST M-Th
8:00am - 7:00pm EST Friday
9:00am - 2:00pm EST Saturday
For Choosing
INSTALLATION INSTRUCTIONS
Full Doors:
A
Liability Statement
SuperATV's
products are designed to best fit user's ATV/UTV under stock
®
conditions. Adding, modifying, or fabricating any factory or aftermarket parts will
void any warranty provided by SuperATV
products could interfere with other aftermarket accessories. If user has aftermarket
products on machine, contact SuperATV
Although SuperATV
that installing lift kits, long travel, or suspension kits, tires, etc. will change the ride
of machine and may increase maintenance and part wear. Operating any off-road
machine while, or after, consuming alcohol and/or drugs increases risk of bodily
harm or death. No warranty or representation is made as to this product's ability to
protect user from severe injury or death. SuperATV
to wear a helmet and appropriate riding gear at all times.
By purchasing and installing SuperATV
occur, SuperATV
replacement parts, or freight charges. SuperATV
responsible for any direct, indirect, incidental, special, or consequential damages
that result from any product purchased from SuperATV
user for all damages, losses, and causes of action, if any, shall not exceed the total
purchase price paid for the product that gave rise to the claim.
SuperATV
will warranty only parts provided by SuperATV
®
problems with OEM housings, bearings, seals, or other manufacturers' products will
not be covered by SuperATV
item was not installed properly, misused, or modified.
for Polaris Ranger XP
and is not recommended. SuperATV's
®
to verify that they will work together.
®
has thousands of satisfied customers, user should be aware
®
urges operators and occupants
®
products, user agrees that should damages
®
will not be held responsible for loss of time, use, labor fees,
®
, nor any 3rd party, will not be held
®
®
. SuperATV
parts and products are not warrantied if
®
®
Rev IN-DOOR-P-RAN900-001 2/8/2017
900
®
®
. The total liability of seller to
. Any damage or
®
Advertisement

Related Manuals for SuperATV DOOR-P-RAN900-001


Summary of Contents for SuperATV DOOR-P-RAN900-001
-
Page 1: Installation Instructions
No warranty or representation is made as to this product’s ability to 8:00am - 9:00pm EST M-Th protect user from severe injury or death. SuperATV urges operators and occupants ®... - Page 2 (kit contents continued) (Driver Side) (Passenger Side) Gasket Item Description Item Description Hinge Mount; passenger Striker Assembly Rear Support; passenger Male Hinge; driver Hinge Mount; driver Strut Bracket; passenger Rear Support; driver Strut Male Hinge; passenger Strut Bracket; driver IN-DOOR-P-RAN900-001...
- Page 3 1. Thouroughly rinse Doors to float off dirt and mud. 2. Using a soft cloth, or microfiber cloth, clean Doors with warm water and a gentle detergent. Baby shampoo or hand washing soap are recommended. 3. To prevent water spots, use a chamois and blot Doors dry. IN-DOOR-P-RAN900-001...
- Page 4 Remove Side Nets and hardware shown from both sides of machine keep all components removed from machine (Driver Side) remove hardware from Frame remove Side Net Buckle and hardware remove hardware (Driver Side) from Hip Bolster remove Side Net hardware Floor (Passenger Side) IN-DOOR-P-RAN900-001...
- Page 5 Do not tighten hardware completely unless noted. - Install Striker Assembly (H) to Frame with hardware shown. - Loosen Striker Pin as shown below. - Repeat for opposite side. M8 x 20mm loosen hardware (Passenger Side) IN-DOOR-P-RAN900-001...
- Page 6 - Install Hinge Mounts (G) to Hinge Mount (C) and Rear Support (D) with hardware shown. - Repeat for driver side components. M8 x 20mm Qty 2 each per Hinge Mount M8 Washer M8 Acorn Nut (Passenger Side) IN-DOOR-P-RAN900-001...
- Page 7 - Install Strut Bracket (K) to Hinge Mount (C) with hardware shown. - Install Strut (L) to Strut Bracket (K). Secure with hardware shown. - Repeat for opposite side. stock hardware 2 each M8 Nut M8 x 25mm M8 Nut M8 Washer stock hardware (Passenger Side) (Passenger Side inside machine) IN-DOOR-P-RAN900-001...
- Page 8 - Install provided Gasket to Hinge Mount (C). - Repeat for opposite side. (Passenger Side) Gasket - Install Passenger Side Door (A) to Male Hinges (G) as shown. (Passenger Side) IN-DOOR-P-RAN900-001...
- Page 9 - Secure Strut (L) to Driver Door (B) with hardware shown. M8 Nut (Driver Side inside machine) - Engage Latch and align Driver Door (B) to machine. - Tighten all hardware completely. - Repeat steps for opposite side. IN-DOOR-P-RAN900-001...
- Page 10 - Install Mirrors to Doors with hardware shown. - Tighten hardware completely. 2 each M5 x 20mm M5 Washer (Driver Side) M5 Nut IN-DOOR-P-RAN900-001...
- Page 11 To ease installation, soak Seal in hot water before cutting or installing to increase flexibility. Seal Bulb portion of Seal to always Seal face towards vehicle (1) piece of Seal to Door as shown Stop approximately 2” before Hinge. (1) piece of Seal to Door as shown (Driver Side) IN-DOOR-P-RAN900-001...
Need help?
Do you have a question about the DOOR-P-RAN900-001 and is the answer not in the manual?
Questions and answers