Table of Contents
Advertisement
Advertisement
Table of Contents

Related Manuals for Waterdrop G2 Series


Summary of Contents for Waterdrop G2 Series
- Page 3 Find the installation video Search “Waterdrop G2 undersink RO installation” on Register 1-year manufacturer warranty* Visit warranty.waterdropfilter.com and enter the product serial number: Any questions, please contact us by Phone: 1-888-352-3558 Mon-Fri 8:00 AM-5:00 PM (PST) or by Email: service@waterdropfilter.com This device complies with part 15 of the FCC Rules.
-
Page 5: Table Of Contents
Contents Installation Instructions Before Installation ··································································1 Parts List ··················································································2 Product Introduction ·······························································3 Installation Tips ·········································································4 Installation Steps ····································································5 ···············································5 Step 1: Install the Feed Water Adapter ····························································6 Step 2: Install the RO Faucet ························································7 Step 3: Install the Drain Saddle ············································7 Step 4: Position the RO System Housing ································································8... -
Page 6: Installation Instructions
Inspect them according to the parts list to ensure nothing is left out or damaged during shipping. If there are any parts cracked or broken, please do not proceed with the installation and contact Waterdrop by phone: 1-888-352-3558 Mon-Fri 8:00 AM-5:00 PM (PST) or by Live chat: waterdropfilter.com. Identify and get familiar with all components for quick installation. -
Page 7: Parts List
Parts List White 3/8” Feed Water Adapter 3/8” and 1/2” PE Tubing X 1 Set X 59” RO Faucet X 1 Set Preinstalled Drain Saddle 1/4” White 1/4” PE Tubing X 1 Set X 59” RO System Red 1/4” PE Tubing Lock Clip Teflon Tape X 1 Set... -
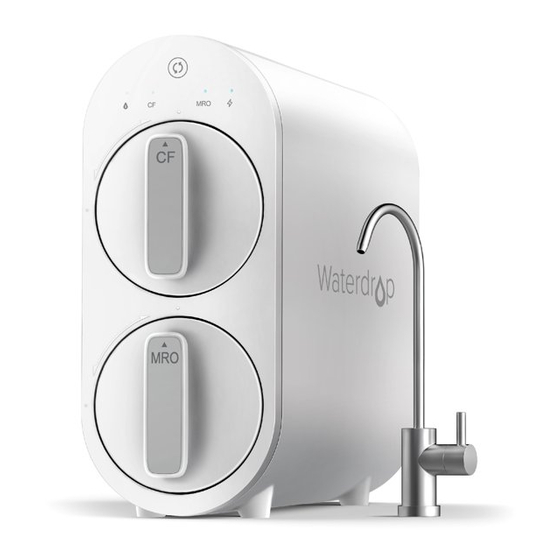
Page 8: Product Introduction
Product Introduction The brief introduction of various parts and sample connections are presented as follows. Please identify and get familiar with these parts and connection points for a smooth installation. Filter Life Reset Indicator Filtering Indicator Power Indicator CF Filter Life Indicator MRO Filter Life Indicator Pre-sediment and Carbon Block Filter (CF) -
Page 9: Installation Tips
Installation Tips How to Use the Quick-Connect Fittings Mark for Full Insert To connect: • Push the tubing into the fitting until you reach the mark on the tubing. NOTE: If the tubing is not fully inserted, it will cause leakage. •... -
Page 10: Installation Steps
6. Once breaking through the surface, swirl the drill a little to apply pressure in a circle evenly. Installation Steps Prior to installation, it is highly recommended to watch the video “Waterdrop undersink RO installation ” on NOTE: •... -
Page 11: Step 2: Install The Ro Faucet
3/8" 1/2" Cold Water Pipe Unscrew Cold Water Pipe Washer Feed Water Adapter 3/8'' INPUT Water Tubing Cold Water Unscrew Supply Valve Figure 3 Figure 4 Step 2: Install the RO Faucet (Non-Air Gap Faucet) NOTE: If there is no hole in your kitchen sink or countertop, you have to drill one (1⅜”) or use the hole in the soap... -
Page 12: Step 3: Install The Drain Saddle
Step 3: Install the Drain Saddle 1. Choose a spot on the drainpipe that is convenient for installing the drain saddle and drill a 1/4” hole. Be sure not to penetrate the opposite side of the pipe; NOTE: It’s recommended to install the drain saddle on the vertical drainpipe. 2. -
Page 13: Step 5: Connect Tubing
Step 5: Connect Tubing NOTE: Confirm the tubing length you need and cut the tubing if it’s too long, referring to “How to Use the Quick-Connect Fittings” on page 4. 1. Install the Input Water Tubing • Connect the input water tubing from the feed water adapter to the “IN” input water port;... -
Page 14: Step 6: Start Up The System
Step 6: Start up the System 1. Turn on the cold water supply valve. Check for leaks; 2. Insert the power plug into the socket; NOTE: If the system can’t be powered on after you insert the power plug, check the power under the sink, as this mostly occurs when the power under the sink is powered off. -
Page 15: Owner's Manual
Owner’s Manual Display and Operation Section 1: Working Mode Display When making water, the filter and power indicators are permanent blue (Figure 11). Filter life indicators display in real time and their color depends on their life span. Filtering indicator is off when the system stops making water, and the rest of the indicators are still on (Figure 12). -
Page 16: Section 3: Filter Replacement Guide
There are helpful electronic filter indicators (CF/MRO) on the front panel that will notify you to perform routine filter replacement by color change. Be sure to reset the filter life indicator every time you replace your filter. Display Status: Indication Remaining Status Status... - Page 17 Figure 13 How to Reset the Filter Life Indicator: 1. Press the filter life reset indicator for 5 seconds (Figure 14). Release the indicator when you hear a beep. Now filters are ready to be reset; 2. Press the reset indicator and choose the CF filter or MRO filter (there is no need to choose if only one filter expired).
-
Page 18: Section 4: Malfunction Display
How to Flush the Filter After Replacement: For the CF filter: Turn on the RO faucet to flush for 5 minutes; For the MRO membrane filter: Turn on the RO faucet to flush for 30 minutes. NOTE: Turn on the faucet to flush for 30 minutes if replacing the CF filter and MRO membrane filter at the same time. -
Page 19: Troubleshooting
Troubleshooting • If the System Cannot Be Powered on After You Insert the Power Plug a. Check the power under the sink, as this mostly occurs when the power under the sink is powered off. Also, check the connection between the power plug and the power outlet, and ensure that the system has been plugged correctly into the power outlet, as this may occur in a few cases. - Page 20 • Filtered Water from the RO Faucet Tastes Like Tap Water a. Incorrect tubing installation: Make sure the waste water tubing is not connected with the RO faucet. b. Filter expires: Check the filter life indicators to confirm which filter needs to be replaced and replace it immediately.
-
Page 21: Limited Product Warranty
Limited Product Warranty The warranty of our product covers defects in materials and workmanship from the original date of purchase. During the warranty period, we will replace or repair any part which is deemed to be defective, if the product has not been subjected to tampering, alteration, lack of regular maintenance or improper use after delivery. - Page 22 NOTE: In case some states do not allow limitations on how long an implied warranty lasts, you may choose to return the system. If you choose to keep it, you agree that the above limitations still apply to you. Warranty Registration Please visit our website www.waterdropfilter.com and go to the “Warranty Registration”...
Need help?
Do you have a question about the G2 Series and is the answer not in the manual?
Questions and answers
Why won’t the faucet turn on after having the unit turned off while repairing something else.
The Waterdrop G2 Series faucet may not turn on after repairs if the power under the sink is off or the system is not properly plugged into the power outlet. Check the power connection and try a different outlet to test if the system itself has an issue. If the problem persists, contact customer support for assistance.
This answer is automatically generated
I have a G2 that was purchased in Feb of 2025. It is now May 24th and the unit has stopped working and the filters need to be replaced. No where close to 1,100 gallons have been run through the unit. I am on city water and the water arrives at 107 ppm. The unit takes it down to 9ppm. The filters are roughly 1/3 of the price I paid for the unit. It is not worth it to keep it in service.
How do I recycle the WD-G2MRO Filter and CF Filter?