
Related Manuals for Waterdrop WD-TK


Summary of Contents for Waterdrop WD-TK
- Page 1 Read this manual before using and keep it for future reference. King Tank Gravity-Fed Water Filter System User Manual System Model List WD-TK WD-TK-F Stainless WD-TK-S WD-TK-FS Steel...
-
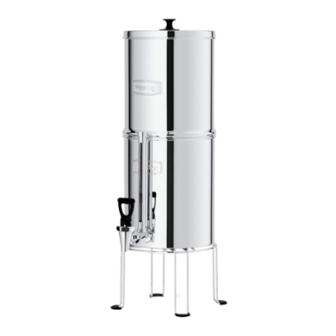
Page 2: Product Overview
Product Overview WD-TK WD-TK-F WD-TK-S WD-TK-FS... -
Page 3: Parts List
11. Spigot Hex Nut 12. Stand 16. Flat Washer * 1, 3 and 4 have been pre-assembled together; 5, 7 and 8 have been pre-assembled together; 11, 15 and 16 have been pre-assembled together. WD-TK WD-TK-F WD-TK-S WD-TK-FS Items Lower Chamber... -
Page 4: Product Specifications
(It is important not to clean the carbon and fluoride filters so as to prevent contamination during the assembly process.) Product Specifications System Model WD-TK/WD-TK-F/WD-TK-S/WD-TK-FS Carbon Filter Capacity Up to 6,000 gallons in total Fluoride Filter Capacity... - Page 5 5. Carbon Filter Figure 3 Fluoride Filter* (Only applicable to WD-TK-F/WD-TK-FS) Attach the Fluoride Filter (9) to the water outlet of your faucet, making a tight seal with the Priming Washer (14), and flush the Fluoride Filter (9) for at least 120 seconds or until the water runs clear. (Figure 4) 14.
- Page 6 Step 5-Upper and Lower Chamber Assembly*(* denotes optional) Place the Upper Chamber (6) gently into the Lower Chamber (10), cover it with the Lid, and put the Lower Chamber (10) onto the Stand (12). The Stand (12) is only applicable to WD-TK-S/WD-TK-FS. (Figure 7) Figure 7 6.
-
Page 7: Operation And Use Tips
Operation and Use Tips 1. Check that the spigot (15) is closed during the first operation and after each re-priming. 2. The height of the water level in the lower chamber is indicated by the red ball in the water level tube. -
Page 8: Warranty
This does not apply to any filter cartridge because the life expectancy varies depending on the quality of the incoming water. System Certified by IAPMO R&T against NSF/ANSI Standard 372 (≤0.25 lead). Manufacturer Technical Support Tel: 1-888-352-3558 (U.S.) Made in China V044 E-mail: service@waterdropfilter.com Qingdao Ecopure Filter Co., Ltd. -
Page 9: Kurulum Talimatları
5. Karbon Filtre Şekil 3 14. Astar Pulu Florür Filtresi* (Sadece WD-TK-F/WD-TK-FS için geçerlidir) Florür Filtresini (9) musluğunuzun su çıkışına takın, Astar Pulu (14) ile sıkı bir sızdırmazlık sağlayın ve Florür Filtresini (9) en az 120 saniye boyunca veya su temiz akana kadar yıkayın. - Page 10 5. Adım - Üst ve Alt Hazne Montajı*(* tercihe bağlıdır) Üst Bölmeyi (6) yavaşça Alt Bölmenin (10) içine yerleştirin, Kapakla kapatın ve Alt Bölmeyi (10) Standın (12) üzerine koyun. Stand (12) sadece WD-TK-S/WD-TK-FS için geçerlidir. (Şekil 7) Şekil 7 6. Hacim 1 – Üst Bölme 10.
-
Page 11: Instrukcja Instalacji
8. Nakrętka motylkowa 5. Filtr węglowy Rysunek 3 14. Podkładka gruntująca Filtr fluorkowy* (dotyczy tylko WD-TK-F/WD-TK-FS) Zamocuj filtr fluorkowy (9) na wylocie wody z kranu, uszczelniając go podkładką gruntującą (14), i płucz filtr fluorkowy (9) przez co najmniej 120 sekund lub do momentu, gdy woda będzie czysta. - Page 12 Krok 5 - Montaż górnej i dolnej komory* (* wskazuje opcję) Umieść delikatnie górną komorę (6) w dolnej komorze (10), przykryj ją pokrywą i umieść dolną komorę (10) na stojaku (12). Stojak (12) ma zastosowanie tylko do WD-TK-S/WD-TK-FS. (Rysunek 7) Rysunek 7 6.
- Page 13 8. Flügelmutter 5. Kohlefilter Abbildung 14. Ansaugscheibe Fluoridfilter* (gilt nur für WD-TK-F/WD-TK-FS) Befestigen Sie den Fluoridfilter (9) am Wasserauslass Ihres Wasserhahns, indem Sie ihn mit der Ansaugscheibe (14) fest verschließen, und spülen Sie den Fluoridfilter (9) mindestens 120 Sekunden lang oder bis das Wasser klar ist.
- Page 14 Setzen Sie die obere Kammer (6) vorsichtig in die untere Kammer (10), decken Sie sie mit dem Deckel ab und setzen Sie die untere Kammer (10) auf den Ständer (12). Der Ständer (12) ist nur für WD-TK-S/WD-TK-FS geeignet. (Abbildung 7) Abbildung 7 6.
-
Page 15: Instructions D'installation
Figure 3 14. Rondelle d'amorçage Filtre à fluorure* (applicable uniquement au WD-TK-F/WD-TK-FS) Fixez le filtre à fluorure (9) à la sortie d'eau de votre robinet, en faisant un joint étanche avec la rondelle d'amorçage (14), et rincez le filtre à fluorure (9) pendant au moins 120 9. - Page 16 Étape 5 - Assemblage des chambres supérieure et inférieure* (* indique une option) Placez délicatement la chambre supérieure (6) dans la chambre inférieure (10), couvrez-la avec le couvercle et placez la chambre inférieure (10) sur le support (12). Le support (12) ne s'applique qu'aux WD-TK-S/WD-TK-FS. (Figure 7) Figure 7 6.
-
Page 17: Installatie-Instructies
Figuur 3 14. Grondwasmachine Fluoridefilter* (Alleen van toepassing op WD-TK-F/WD-TK-FS) Bevestig het fluoridefilter (9) op de wateruitlaat van je kraan, sluit het goed af met de aanzuigring (14), en spoel het fluoridefilter (9) minstens 120 seconden door of tot het 9. - Page 18 Stap 5-Bovenste en onderste kamer montage*(* geeft aan dat dit optioneel is) Plaats de bovenste kamer (6) voorzichtig in de onderste kamer (10), dek hem af met het deksel en zet de onderste kamer (10) op de standaard (12). De standaard (12) is alleen van toepassing op WD-TK-S/WD-TK-FS. (Figuur 7) Figuur 7 6.
- Page 19 8. Vingmutter 5. Kolfilter Figur 3 Fluorfilter* (endast tillämpligt på 14. Grundbricka WD-TK-F/WD-TK-FS) Fäst fluorfiltret (9) på kranens vattenutlopp, gör en tät tätning med grundbrickan (14) och spola fluorfiltret (9) i minst 120 sekunder eller tills vattnet rinner klart. 9. Fluorfilter...
- Page 20 Steg 5-Övre och nedre kammarmontering*(* anger valfritt) Placera den övre kammaren (6) försiktigt i den nedre kammaren (10), täck den med locket och sätt den nedre kammaren (10) på stativet (12). Stativet (12) gäller endast WD-TK-S/WD-TK-FS. (Figur 7) Figur 7 6.
-
Page 21: Instrucciones De Instalación
8. Tuerca de Mariposa 5. Filtro de Carbón Figura 3 Filtro de flúor* (sólo aplicable a WD-TK-F/WD-TK-FS) 14. Arandela de Cebado Conecte el Filtro de Fluoruro (9) a la salida de agua de su grifo, haciendo un sello hermético con la Arandela... - Page 22 Paso 5- Instalación de las Cámaras Superior e Inferior*(* indica que es opcional) Coloque suavemente la Cámara Superior (6) en la Cámara Inferior (10), cúbrala con la tapa y coloque la Cámara Inferior (10) en el Soporte (12). El Soporte (12) sólo es aplicable a WD-TK-S/WD-TK-FS. (Figura 7) Figura 7 6.
-
Page 23: Istruzioni Per L'installazione
14. Rondella di Priming 8. Dado ad Alette 5. Filtro Carbone Figura 3 Filtro al Fluoruro* (Applicabile solo a WD-TK-F/WD-TK-FS) 14. Guarnizione di Priming Attaccare il Filtro al Fluoruro (9) all'uscita dell'acqua del rubinetto, sigillandolo ermeticamente con la Guarnizione di Priming (14) e sciacquare il filtro al fluoruro (9) per almeno 120 secondi o finché... - Page 24 Fase 5- Assemblaggio della Camera Superiore e Inferiore*(* indica facoltativo) Posizionare delicatamente la Camera Superiore (6) nella Camera Inferiore (10), coprirla con il Coperchio e posizionare la Camera Inferiore (10) sul Supporto (12). Il supporto (12) è applicabile solo a WD-TK-S/WD-TK-FS. (Figura 7) Figura 7 6.
Need help?
Do you have a question about the WD-TK and is the answer not in the manual?
Questions and answers