Waterdrop WD-G3-B Instruction Manual
Reverse osmosis
Hide thumbs
Also See for WD-G3-B:
- Instruction manual (24 pages) ,
- Instruction manual (26 pages) ,
- Replacement /installation instructions (2 pages)
Table of Contents
Advertisement
Advertisement
Table of Contents

Related Manuals for Waterdrop WD-G3-B


Summary of Contents for Waterdrop WD-G3-B
- Page 3 Find the installation video Search ‘Waterdrop RO Installation’ in www.youtube.com Register 1-year manufacturer warranty* Visit www. water-filter.com/warranty and enter the product serial number: Any questions, please contact Waterdrop by Phone: 1-888-352-3558 Mon-Fri 8:00 AM-5:00 PM (PST) or by Email: service@water-filter.com This device complies with part 15 of the FCC Rules.
-
Page 5: Table Of Contents
CONTENTS INSTALLATION INSTRUCTIONS Before Installation · · · · · · · · · · · · · · · · · · · · · · · · · · · · · · · · · · · · · · · · · · · · · · · · · · · · · · · · · · · · · · · · · · 1 Parts List ·... -
Page 6: Installation Instructions
If there are any parts cracked or broken, please do not proceed with the installation and contact Waterdrop by Phone: 1-888-352-3558 Mon-Fri 8:00 AM-5:00 PM (PST) or by Email: service@water-filter.com. Identify and get familiar with all components for quick installation. -
Page 7: Parts List
Parts List Pre-sediment and Reverse Osmosis Activated Carbon Filter Carbon Block Filter Membrane Filter System Housing (CB: WD-G3-N3CB) (CF: WD-G3-N1CF) (RO: WD-G3-N2RO) X 1 Set Feed Water Adapter RO Faucet White 3/8” PE Tubing Lock Clip Teflon Tape 3/8”-1/2” X 60” X 1 Set X 1 Set Preinstalled... -
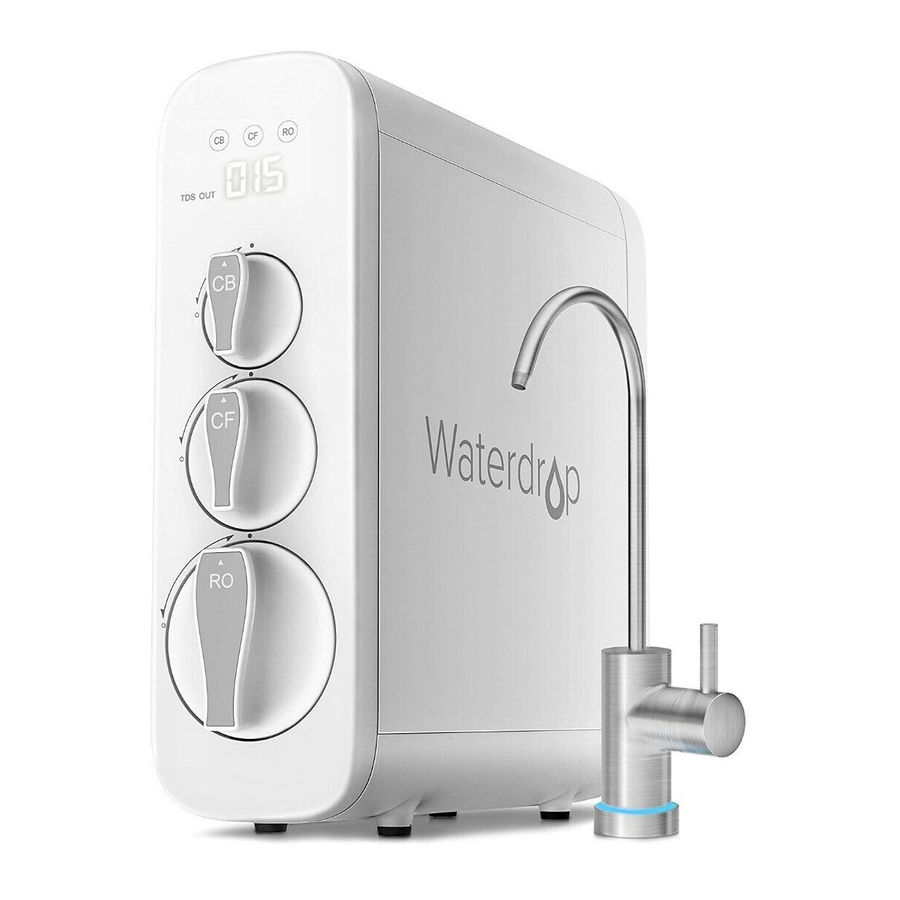
Page 8: Product Introduction
Product Introduction The brief introduction of various parts and sample connection are presented as follows. Please identify and get familiar with these parts and connection points for a smooth installation. Filter Life Indicators “FAUCET” Connector “POWER” Port Display Screen Activated Carbon Filter (CB) Pre-sediment and Carbon Block Filter (CF) -
Page 9: Installation Tips
Installation Tips How to Use the Quick-Connect Fittings Mark for Full Insert Figure 1 To connect: NOTE: There is an existing mark (Figure 1) at the end of the tubing for you to confirm if the tubing is fully inserted into the fitting. •... -
Page 10: Installation Steps
6. Once breaking through the surface, swirl the drill a little to apply pressure in a circle evenly. Installation Steps Prior to installation, it is highly recommended to watch the video “Waterdrop RO Installation” on YouTube. NOTE: • The RO system must be connected to the COLD water supply ONLY. -
Page 11: Step 2: Install The Ro Faucet
Unscrew 1/2" 3/8" Cold Water Pipe Cold Water Pipe Washer Feed Water Adapter 3/8" INPUT Water Cold Water Supply Tubing Valve Unscrew Figure 4 Figure 5 Step 2: Install the RO Faucet (Non-Air Gap Faucet) NOTE: If your kitchen sink or countertop does not have an existing hole, you will have to Faucet Spout... -
Page 12: Step 3: Install The Drain Saddle
Step 3: Install the Drain Saddle 1. Choose a spot on the drain pipe that is convenient for installing the drain saddle; NOTE: It’s recommended to install the drain saddle on the vertical drain pipe. 2. Drill 1/4” hole in the drain pipe. Be sure not to penetrate opposite side of the pipe; 3. -
Page 13: Step 5: Connect Tubing
Step 5: Connect Tubing NOTE: Confirm the tubing length you need first, cut the tubing if it’s too long referring to “How to Use the Quick-Connect Fittings” on page 4. 1. Install the “INPUT” Water Tubing • Remove the plug from “INPUT” water port; •... -
Page 14: Step 6: Connect Power Cord
3. Install the “WASTE” Water Tubing • Remove the plug from “WASTE” water port; • Identify the red 1/4” PE tubing which has been attached to the drain saddle (Figure 15); • Insert the other end of the tubing into the “WASTE” water port (Figure 16), and pop the lock clip on the fitting. -
Page 15: Step 8: Start Up The System
Solid Circle Mark Empty Circle Mark Figure 19 Figure 20 Figure 21 Step 8: Start Up the System 1. Turn on cold water supply valve . Check for leaks; 2. Insert the plug of power adapter into socket; 3. The system starts flushing automatically for 5 minutes; NOTE: There is one beep sound. -
Page 16: Other Outputs Connection (Optional)
Other Outputs Connection (Optional) If you want to connect the system to your refrigerator output, you will need to prepare additionally: • 1/4" quick connect T-fitting, • 1/4" male water supply line adapter, • 1/4" nut cap, • 1/4" PE tubing, •... - Page 17 B: If your refrigerator is not connected to water source, “Input” water tubing Refrigerator joint Sleeve Tee-fitting Insert PE tubing “Output” water tubing Congratulations! You have successfully installed the system! Register your product now for 1 YEAR MANUFACTURER WARRANTY* Visit Scan the QR code or Text www.water-filter.com/warranty...
-
Page 18: Owner's Manual
OWNER’S MANUAL Display and Operation Section 1: TDS Display The built-in TDS sensor detects the water quality when the system begins to work, and shows the TDS reading on front panel display screen (Figure 25). NOTE: The system will provide above 90% TDS rejection rate when working properly, which may vary with deviation of 10% depending on source water quality and water usage. - Page 19 1. Filter Life Indicator on System Housing There are helpful electronic filter indicators (CF/CB/RO) on the front panel (Figure 26) that will notify you to perform routine filter replacement by color change. Be sure to reset the filter life indicator every time you replace your filter. Display Status: Indication Remaining...
-
Page 20: Section 3: Filter Replacement Guide
Light Remaining Life(Day) Remaining Capacity (G) Status >15 >40 Good Blue Replace Soon Yellow ≤15 ≤40 ≤ 0 ≤ 0 Replace Now Blue Flash Flushing Red Flash Malfunction Section 3: Filter Replacement Guide NOTE: If filter expires, please purchase and replace filter immediately. Otherwise, the filtration efficiency will decrease significantly and affect the performance. -
Page 21: Section 4: Automatic Flushing
How to Flush the Filter after Replacement: NOTE: The display screen will show flushing status (Figure 30) during the flushing. For CF filter: It will be flushed automatically for 5 minutes without turning on RO faucet; For CB filter: Turn on RO faucet to flush for15 minutes; For RO membrane filter: Turn on RO faucet to flush for 30 minutes. -
Page 22: System Maintenance
• E03: booster pump overworked, buzzer beeps for 3 minutes. The system will need to be powered on again to recover; • E04: booster pump starting and stopping frequently, buzzer sounds 5 times. The system will need to be powered on again to recover. NOTE: Please refer to “Troubleshooting”... -
Page 23: Troubleshooting
Troubleshooting • No Output Water from RO Faucet a. Filter expires. Check the filter life indicators to confirm which filter needs to be replaced and replace immediately. b. Low water pressure. Check and confirm the water pressure is between 14.5 PSI and 87 PSI. c. - Page 24 • TDS Reading Fluctuates When Dispensing Water a. The TDS reading displayed is the TDS of flowing filtered water. Therefore, the content of dissolved solids may vary slightly as water flows, causing the fluctuation of TDS reading. b. The built-in TDS sensor has deviation, causing the fluctuation of TDS reading. •...
-
Page 25: Limited Product Warranty
Waterdrop cannot verify or guarantee the integrity or authenticity of the Product. Waterdrop’s sole obligation under this warranty shall be repair or replacement of a non- conforming product or parts of this product, or at Waterdrop’s option, return of the product and a refund of the purchase price. - Page 26 Warranty Registration Please visit our website www.water-filter.com and go to the “Warranty Registration” tab to register your product for the warranty. We offer a 30-day money back guarantee, a 1-year manufacturer warranty, and lifetime tech support for all our products. Please be sure to fill in the order information upon registration of your system.
Need help?
Do you have a question about the WD-G3-B and is the answer not in the manual?
Questions and answers
Does the WD-G3-W flush for 15-20 seconds after EVERY use? Mine does.
No, the Waterdrop WD-G3-B does not flush after every use. It flushes automatically for 20 seconds only in specific situations: after 2 hours of accumulative working time or when power is restored.
This answer is automatically generated
What do the numbers mean on the faucet face plate
The numbers on the Waterdrop WD-G3-B faucet face plate indicate error codes such as E02, which shows there is water leakage inside the system.
This answer is automatically generated
We accidentally left the water faucet on filling up a picture. When we came back, the water system was completely off and the control display was black. After an hour or so the display came back on linking and there’s an error code E03. Please advise on what we should do to get the system back on. Also to turn the water on at the Waterdrop faucet should they handle be down position for on an up position for off? It also shows that the second filter is blinking red on the faucet control display however, on the unit all indicators show Should we replace the filter? Thank you, Janice Elder. We have a Waterdrop G3. My phone number is 408-799-3545.
To resolve error code E03 on the Waterdrop G3 system, which indicates that the booster pump has overworked and the buzzer beeps for 3 minutes, the system must be powered on again to recover.
For proper operation, the faucet handle should be turned on when using the system.
If the second filter is blinking red on the faucet control display, it should be replaced immediately as it has expired.
This answer is automatically generated
My reverse osmosis filter is nit running through the cycles to filter the water
What does the single digit of 5 or any number mean/represent in the TDS ; I understand what tds stands for ; what does the number mean, thnx
The single digit number in the TDS reading for the Waterdrop WD-G3-B represents the Total Dissolved Solids (TDS) level in the flowing filtered water.
This answer is automatically generated