
Related Manuals for SCHUNK ROTA FSW Series


Summary of Contents for SCHUNK ROTA FSW Series
- Page 1 Translation of Original Operating Manual Chuck quick-change ROTA FSW Assembly and Operating Manual Superior Clamping and Gripping...
- Page 2 Imprint Copyright: This manual is protected by copyright. The author is SCHUNK GmbH & Co. KG. All rights reserved. Any reproduction, processing, distribution (making available to third parties), translation or other usage - even excerpts - of the manual is especially prohibited and requires our written approval.
-
Page 3: Table Of Contents
Table of Contents Table of Contents 1 General ........................5 1.1 About this manual ....................5 1.1.1 Presentation of Warning Labels ..............5 1.1.2 Applicable documents ................... 6 1.1.3 Sizes ....................... 6 1.2 Warranty ........................6 1.3 Scope of delivery ...................... 6 2 Basic safety notes .................... - Page 4 Table of Contents 5.4.1 Assembling the retainer ring and draw tube adapter to the clamping device ........................24 5.5 Assembly of the clamping device and the ROTA FSW chuck quick-change... 25 6 Function ........................27 6.1 Function of the ROTA FSW Chuck quick-change ............ 27 6.2 Handling the ROTA FSW Chuck quick-change ............
-
Page 5: General
General General About this manual This manual contains important information for a safe and appro- priate use of the product. This manual is an integral part of the product and must be kept accessible for the personnel at all times. Before starting work, the personnel must have read and under- stood this operating manual. -
Page 6: Applicable Documents
• Calculation of the jaw centrifugal forces, "Technology" chapter in the lathe chuck catalog * • Quick guide The documents marked with an asterisk (*) can be downloaded on our homepage schunk.com 1.1.3 Sizes This operating manual applies to the following sizes: •... -
Page 7: Basic Safety Notes
By conversions, changes, and reworking, e.g. additional threads, holes, or safety devices can impair the functioning or safety of the product or damage it. • Structural changes should only be made with the written ap- proval of SCHUNK. 04.00|ROTA FSW |en... -
Page 8: Spare Parts
Use of unauthorized spare parts Using unauthorized spare parts can endanger personnel and damage the product or cause it to malfunction. • Use only original spare parts or spares authorized by SCHUNK. Environmental and operating conditions Required ambient conditions and operating conditions... -
Page 9: Personal Protective Equipment
Basic safety notes Trained electrician Due to their technical training, knowledge and experience, trained electricians are able to work on electrical systems, recognize and avoid possible dangers and know the relevant standards and regulations. Qualified personnel Due to its technical training, knowledge and experience, qualified personnel is able to perform the delegated tasks, recognize and avoid possible dangers and knows the relevant standards and regulations. -
Page 10: Transport
Basic safety notes • Do not expose the product to any corrosive media. This does not apply to products that are designed for special environments. • Eliminate any malfunction immediately. • Observe the care and maintenance instructions. • Observe the current safety, accident prevention and environ- mental protection regulations regarding the product's application field. -
Page 11: Fundamental Dangers
Basic safety notes 2.12 Fundamental dangers General • Observe safety distances. • Never deactivate safety devices. • Before commissioning the product, take appropriate protective measures to secure the danger zone. • Disconnect power sources before installation, modification, maintenance, or calibration. Ensure that no residual energy remains in the system. -
Page 12: Protection Against Dangerous Movements
Basic safety notes 2.12.3 Protection against dangerous movements Unexpected movements Residual energy in the system may cause serious injuries while working with the product. • Switch off the energy supply, ensure that no residual energy remains and secure against inadvertent reactivation. •... -
Page 13: Notes On Particular Risks
Basic safety notes 2.12.4 Notes on particular risks DANGER Possible risk of fatal injury to operating personnel if a jaw breaks or if the ROTA FSW chuck quick-change or the clamping device fails because the technical data has been exceeded and a workpiece is released or parts fly off. - Page 14 Basic safety notes DANGER Possible risk of fatal injury to operating personnel from clothing or hair being caught on the ROTA FSW chuck quick-change and/or clamping device and being dragged into the machine. Loose clothing or long hair may become caught on projecting parts of the ROTA FSW chuck quick-change or clamping device and be drawn into the machine.
- Page 15 Basic safety notes CAUTION Danger of limbs being crushed when manually attaching the ROTA FSW chuck quick-change and assembling and dismantling the clamping device. • Use a crane to install the ROTA FSW chuck quick-change and clamping device. • Wear personal protective equipment. •...
- Page 16 Basic safety notes CAUTION Hazard from vibration due to imbalanced rotating parts and noise generation. Physical and mental strains due to imbalanced workpieces and noise during the machining process on the clamped and rotating workpiece. • Ensure that the ROTA FSW chuck quick-change and the clamped clamping device run true, both radially and axially.
-
Page 17: Technical Data
Technical data Technical data Type ROTA FSW 220-A8 290-A11 400-A15 ID no. 0824200 0824300 0824400 Tightening torque [Nm] Max. actuating force [kN] Max. speed of rotation [rpm] 6000 4200 3500 Weight without adapter [kg] Operating temperature [°C] 15 - 60 Maximum number of clamping cycles of the flexi- 250.000 ble adapter and the draw tube adapter. -
Page 18: Torques Per Screw
Torques per screw Torques per screw Tightening torques for mounting screws used to clamp the ROTA FSW Chuck quick-change on lathes or other suitable technical equipment (screw quality 10.9) Screw size M6 M8 M10 M12 M14 M16 M18 M20 M22 M24 M27 M30 Admissible torque 120 160 200 290 400 500 1050 1500 (Nm) -
Page 19: Mounting
Mounting Mounting Installing and connecting WARNING Risk of injury due to unexpected movements! If the power supply is switched on or residual energy remains in the system, components can move unexpectedly and cause seri- ous injuries. • Before starting any work on the product: Switch off the power supply and secure against restarting. -
Page 20: Assembly Of The Rota Fsw Chuck Quick-Change
Mounting Assembly of the chuck quick-change or intermediate flange Assembly of the ROTA FSW Chuck quick-change 5.3.1 Assembly of the ROTA FSW Chuck quick-changes with a reducing or extension flange (Figure "Assembly of the chuck quick-change or intermediate flange" see chapter "Checking the spindle nose of the holder of the chuck quick-change"... - Page 21 Mounting • An intermediate flange produced by the user must be fully ma- chined on the machine spindle and balanced and aligned be- fore assembly of the ROTA FSW chuck quick-change. • After assembly, ensure that the flange is in contact with the en- tire surface.
-
Page 22: Assembly Of The Rota Fsw Chuck Quick-Change With A Direct Mount
Mounting 5.3.2 Assembly of the ROTA FSW Chuck quick-change with a direct mount (Figure "Assembly of the chuck quick-change or intermediate flange" see chapter "Checking the spindle nose of the holder of the chuck quick-change" ( 5.2, Page 19)) If the ROTA FSW chuck quick-change is mounted directly on the machine spindle without a reducing or an extension flange, the fol- lowing points must be observed: •... -
Page 23: Assembly Of The Flexible Adapter To The Draw Tube/Drawbar
( 5.2, Page 19)) The flexible adapter must be designed to suit the machine and the changing clamping devices. Only original SCHUNK attach- ments may be used! • Remove the flexible adapter (Pos. 9) from the packaging and check it for damage/completeness. -
Page 24: Assembling The Retainer Ring And Draw Tube Adapter To The Clamping Device
(jaw change) position. To do this, ensure that the dimensions for the attachment are complied with. EXCEPTION: the power chuck of series ROTA NCR. Contact SCHUNK before using this toolholder type with the ROTA FSW chuck quick-change. 5.4.1 Assembling the retainer ring and draw tube adapter to the... -
Page 25: Assembly Of The Clamping Device And The Rota Fsw Chuck Quick-Change
Mounting • Check that an O-ring is fitted in the draw tube adapter (Pos. 11). • Lay the retainer ring on the locating surface of the chuck so that the bore hole of the positioning block faces the installer, and then tighten slightly using the screws. Then align and check radial run-out (see fig. - Page 26 Mounting • Ensure that the two golden indicator pins are level with the chuck quick-change housing and the clamping device was tightened against the ROTA FSW chuck quick-change. • Actuate the clamping cylinder to move the draw tube/drawbar to the foremost position; the flexible adapter then locks into the draw tube adapter of the clamping device.
-
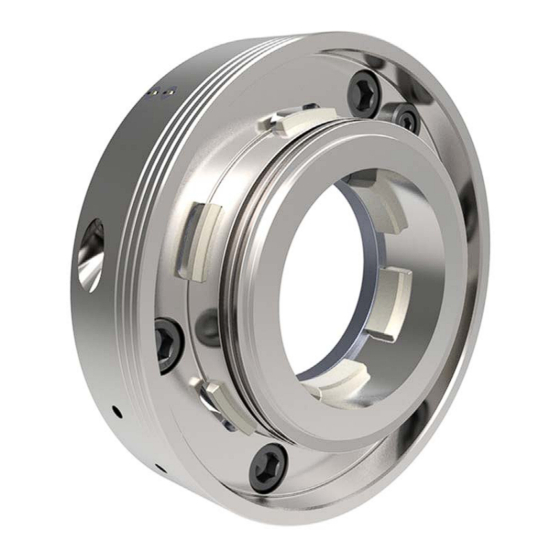
Page 27: Function
Function Function The item numbers specified for the corresponding individual components relate to chapter drawings.( 10, Page 38) Function of the ROTA FSW Chuck quick-change The Chuck quick-change has a clamping and release mechanism with manual actuation. The side of the housing (Item 1) offers access to the actuating screw (Item 5), which is actuated using the enclosed hexagon socket for torque wrenches. - Page 28 Function • The clamping device is now exposed and hangs in the lifting equipment. Locking and inserting the clamping equipment • Move the clamping cylinder into the foremost position. • Loosen the side actuating screw (Pos. 5) with a hexagonal sock- et counter-clockwise and then turn further with maximum 50 Nm as far as the back stop.
-
Page 29: Functional Testing
Function Functional testing Functional test After installation of the ROTA FSW chuck quick-change, its function must be checked prior to start-up. Important points are: • Smooth running The actuating screw must turn smoothly and the clamping slides must move smoothly as a result. •... -
Page 30: Commissioning
Commissioning Commissioning • Do not start the machine spindle until the clamping device is clamped securely and the optional draw tube is locked into place. • Do not start the machine spindle until the clamping pressure is built up in the clamping cylinder and the clamping position display of the ROTA FSW chuck quick-change is lowered. - Page 31 Commissioning NOTICE Property damage due to damaged products! Damaged, incomplete, or unbalanced clamping devices or adapters could seriously damage or even destroy the machine and the workpiece. • Only mount undamaged, complete, and fine-balanced products. 04.00|ROTA FSW |en...
-
Page 32: Maintenance
Turn the chuck quick-change into the open position. Lubricate the chuck at the lubrication nipples (A) using a high-pressure grease gun with 2 - 4 strokes (depending on the chuck side) of SCHUNK LINO MAX special grease. For optimum grease distribution, the chuck quick-change must be closed and opened several times after lubrication. -
Page 33: Maintenance Instructions
In order to replace the flex adapter and the draw tube adapter, these parts must be ordered from SCHUNK and can be replaced upon request by the SCHUNK service team. NOTICE Loss of function in the event of heavy soiling! It is essential that the cleaning intervals are observed. -
Page 34: Period Of Maintenance
Damaged parts must be replaced with origi- nal SCHUNK spare parts. • Replace the mounting screws if there are signs of wear or dam- age. Only use screws of equivalent quality. -
Page 35: Storing The Rota Fsw Chuck Quick-Change
Maintenance Storing the ROTA FSW Chuck quick-change Store the ROTA FSW chuck quick-change in its original packaging under the following conditions: Do not keep outdoors. Store in a dry and dust-free place. Do not expose to any aggressive media. Protect from sunlight. Avoid mechanical vibrations. - Page 36 (Pos. 23). Clean all individual components and check them for damage and wear. Only original SCHUNK spare parts may be used! Reverse the procedure to assemble the ROTA FSW chuck quick- change. Tightening torque for the shoulder screws (Pos. 13):...
-
Page 37: Spare Parts
Spare parts Spare parts When ordering spare parts, it is imperative to state the type, size, and above all the serial no. of the ROTA FSW chuck quick-change. Seals, sealing elements, screw connections, springs, bearings, screws, and wiper bars, plus parts coming into contact with the clamping device are not covered by the warranty. -
Page 38: Assembly Drawing
Assembly drawing Assembly drawing 04.00|ROTA FSW |en... -
Page 39: Translation Of Original Ec Declaration Of Incorporation
Directive 2006/42/EG, Annex II, Part 1.B of the European Parliament and of the Council on machinery. Manufacturer/ H.-D. SCHUNK GmbH & Co. Spanntechnik KG Distributor Lothringer Str. 23 D-88512Mengen We hereby declare that on the date of the declaration the following partly completed ma- chine complied with all basic safety and health regulations found in the directive 2006/42/EC of the European Parliament and of the Council on machinery. -
Page 40: Appendix On Declaration Of Incorporation, As Per 2006/42/Ec, Annex Ii, No. 1 B
Appendix on Declaration of Incorporation, as per 2006/42/EC, Annex II, No. 1 B Appendix on Declaration of Incorporation, as per 2006/42/EC, Annex II, No. 1 B 1. Description of the basic safety and health protection requirements, as per 2006/42/EC, Annex I, that apply to and are fulfilled for the scope of the partly completed machinery: Product designation Manually actuated chuck quick-change with through-bore Type designation... - Page 41 Appendix on Declaration of Incorporation, as per 2006/42/EC, Annex II, No. 1 B 1.4.2.2 Interlocking movable guards 1.4.2.3 Adjustable guards restricting access 1.4.3 Special requirements for protective devices Risks due to other hazards 1.5.1 Electricity supply 1.5.2 Static electricity 1.5.3 Energy supply other than electricity 1.5.4 Errors of fitting...
Need help?
Do you have a question about the ROTA FSW Series and is the answer not in the manual?
Questions and answers